Home » Entrees » Recent Articles:

New – Family Recipes: Braciole and Chicken Cacciatore

Whether they’re passed along from your parents, grandparents, aunts, uncles or cousins, family recipes are what help keep tradition alive and well. Just a simple smell of a Sunday Gravy or a taste of an antipasto is enough to bring you back to your childhood in an instant. And what better way to help keep these fantastic traditions alive than to share them with our readers! That’s why Una Mamma Italiana and myself have agreed to share some of our favorite family recipes in our new feature segment called….drum roll, please…..

Family Recipes!
We will be featuring this special segment now and again, as we look forward to not only sharing the recipes with you, but also reliving some of our favorite memories as we once again get to enjoy the heavenly tastes of our favorite meals! We hope you enjoy as well!


From The Cucina:
Marie’s Chicken Cacciatore


This family recipe has an interesting background, as it was actually first passed up in the family, then back down again. My Aunt Marie (Marie, or Re-Re to those who are her age in the family) was the first person to make it, and she served it once to my grandparents. My Grandmother (also Marie, and Aunt Marie to her nieces and nephews), loved it so much, that she asked to have the recipe, which my Aunt passed up to her. Fast forward a few years to when my Grandmother submitted this recipe to our local newspaper as Recipe of the Week, which was featured as a family favorite dish simply called Marie’s Chicken Cacciatore (everyone in our family named Marie gets to share in the glory!). And whether or not you have a Mom or a Grandmom named Marie, an Aunt Marie or a Cousin Re-Re, you will be sure to enjoy this fantastic traditional Italian dish!

4-6 chicken thighs (skin removed)
2 cloves garlic, minced
1/2 cup red wine vinegar
1 tspn rosemary
1 8-oz can tomato sauce
1 green bell pepper, cut into small pieces
1 cup water
2 tblspn vegetable oil
pinch sugar
salt & pepper to taste

In a large frying pan, brown chicken and garlic in oil until chicken is golden brown. Add vinegar and 1/2 cup water. Simmer until liquid evaporates, then drain excess fat. Add rosemary, tomato sauce, remaining water, sugar, salt and pepper. Add peppers, stir ogether, cover slightly, let cook for 30 minutes.

Serve over a bed of rice or over mini pasta shells.

*Note – you can either serve the chicken thighs whole or shred the meat and discard the bone.

From the Mamma:
Dad’s Braciole


Braciole is one of those classic Italian comfort foods. Slow cooked meat in a hearty gravy with a taste that no beef stew, stroganoff, or wellington could even compare with! It’s one of those dishes you make in the downstairs kitchen and you nurture for a good few hours until it reaches perfection. The smell alone makes my dad’s braciole recipe one of my greatest family memories. My father got his passion for cooking from the big Italian famiglia, and his technique from the Culinary Institute of America. Needless to say, his recipe is top of the line! See for yourself….

2 – 3 lb. cut of top round or flank steak, pounded relatively thin
2 cups Italian seasoned bread crumbs
2-4 slices good quality ham or prosciutto cotto
2-4 slices domestic provolone
1/2 cup grated parmesan cheese
1/4 cup chopped parsley
salt to taste
pepper to taste
1 lg onion, minced
12 cloves garlic, minced
2 28 oz. cans San Marzano crushed tomatoes
1 1/2 cups red wine
1 28 oz can of water

Mix the seasoned bread crumbs with parsley, grated cheese, 3 cloves of minced garlic. Combine with extra virgin olive oil until moistened (like the consistency of wet beach sand).

Lay out the pounded meat and top with bread crumb mixture, sliced provolone, and sliced ham. Roll against the direction of the grain of the meat (so that when you slice the cooked braciole, it is cut against the grain. Roll up the meat. Secure with butcher’s twine. Season the outside of the meat with salt and pepper. Sear on each side in a few tbsp of olive oil. Remove from pan, set aside.

Add a few more tbsp of olive oil to the pan. (enough to coat the veggies). Saute the onions for a couple minutes, add the garlic. saute until all are soft and lightly golden. Add in the red wine, deglaze the pan. Cook off the alcohol (about 5 minutes). Add the tomatoes and water. Return the meat to the pan.

Simmer on medium heat for about 2 1/2 hours, depending on the size of your meat. Stir frequently. When cooked, slice the meat and serve the extra sauce over pasta. MANGIA!

*TIP* – whenever you are slow cooking a gravy like this, or even a soup, throw in the rind from the block of cheese you are using. (In this case, parmiggiano) It gives the sauce an incredible flavor. Always save those rinds in the freezer, you never know when you’ll need ’em!


Share

Pumpkin Amaretto Risotto

October 7, 2010 Entrees, Menu 5 Comments

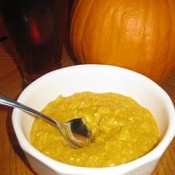
I was recently asked by a good friend of mine if I could come up with a recipe for Pumpkin Risotto. I won’t mention any names, but this one Italian mamma said that she had fallen in love with this style of risotto when in Italy. I did some research and found a good amount of pumpkin risotto recipes, however most of them were very similar in taste and style. Pumpkin itself can be bland, so you need to add some spice to it to bring out its flavor. Most of the recipes that I found were heavy on the cinnamon, allspice and nutmeg, which are standard pumpkin pie spices. That didn’t sound all that Italian to me, and I wasn’t aiming for a pumpkin pie flavored risotto.

I finally came across a true Italian pumpkin risotto recipe which follows the traditional Lombard/Northern Italian method and used that as my launching pad, making a few other flavor/ingredient adjustments to my liking. Instead of cinnamon and nutmeg, this recipe called for crumbled up Italian amaretti macaroons. While I don’t usually have amaretti macaroons on hand, I do always have a bottle of Disarona Amaretto in my liqueur cabinet. I decided to give that a try, and just one tablespoon added the perfect slightly sweet/slightly nutty taste that I was hoping for! The alcohol will burn off, but the Amaretto taste stays. There’s no doubt, this dish will be a fall standard in my house!

A quick note on making risotto: Risotto is a demanding dish and requires the chef to stand next to the pot for the better part of 20 minutes. Turn the rice every 20 seconds or so in order for the liquid to bathe all of the pot. With the high heat your rice will dry out at the bottom and you’ll need to move the rice with a wooden spoon so that the remaining stock on top goes to the bottom. Only when the rice is almost dry can you add your next laddleful of stock.

PUMPKIN AMARETTO RISOTTO
Click image on side to enlarge

5 cups hot chicken broth (you cannot use cold broth for proper risotto)
1 tbspn EVOO
4 tbspn butter
1 medium white onion, chopped
1 cup Arborio rice
1 small glass white wine
1-1/2 cups pumpkin puree (canned is fine, but be sure to use 100% pure pumpkin. Do not use pumpkin pie filling)
1 tbspn Amaretto
1 cup fresh grated parmesan cheese

In a medium pot, heat chicken broth (hot but not boiling), keep warm. In a large pot over medium heat, heat olive oil and 1 tablespoon butter. Add onions, saute until soft but not brown. Add rice, mix so all grains are coated, let cook for 2 minutes (it’s ok if grains begin to slightly toast). Add wine, toss to coat all grains.

When wine has evaporated, add one ladle of the hot stock. DO NOT ADD MORE THAN 1 LADLE AT A TIME! Stir every 20 seconds or so until rice is almost dry. You’ll continue to add one ladle at a time for about 20 minutes.

After the first ten minutes of ladling/stirring, add the pumpkin puree. Stir to mix completely. Continue with the ladling/stirring for another 10 minutes, or until you run out of broth. Add one tablespoon Amaretto, stir.

Cover and remove pot from heat, let sit for one minute. Cut up remaining 3 tablespoons of butter into small pieces. Add to pot, stir to mix completely. You want the risotto to be hot enough to incorporate the butter without actually melting it at contact. Add fresh grated parmesan cheese, stir to mix.

An optional dash of nutmeg to each serving adds a nice touch. Serve with a glass of white wine, or a nice pumpkin ale or Oktoberfest and enjoy!

Share

Gravy Wars Revisited – My Review of the Winning Gravy!

A few weeks back, I went spoon-to-spoon with Una Mamma Italiana in a Sunday Gravy War. After all of the votes were tallied, Una Mamma ended up being top tomato. Today, I finally had the chance to make a pot of the winning gravy, step by step. The verdict is in…..and Una Mamma’s Sunday Gravy is definitely a winner!

Rather than go over each step of the gravy making method (you can see the recipe first hand by clicking here), I thought it would be best to highlight was makes Una Mamma’s gravy so different than mine.

While I start my gravy process with frying up some garlic in olive oil, this recipe calls for garlic AND two onions (I only use onion powder as a flavoring). So right out of the gate you’re dealing with some great aromatics. This is also when the wild card ingredient comes in to play…the butter. Now I’m sure that some of you, as I, were stumped with the butter ingredient. Who puts butter in red gravy? You’re actually using it to sauté the onions and garlic, so it makes total sense and adds nice flavor.

The next difference that I noticed was adding the tomato paste to the sautéed veggies BEFORE adding the tomato purée. This helps break down the paste into a flavorful brownish sauce that incorporates nicely with the tomatoes…and this is a nice trick that I think I will start to use with my own recipe.

And the final difference is adding the meat at an early stage. I like to first have all of the seasonings and tomatoes marry together for a good 45 minutes or so prior to adding the meats. This allows the sweetness of the tomatoes to really shine through, while allowing the meat flavors to add a tremendous accent to the meal. I call this the Clemenza method (all of you Godfather fans will relate). Una Mamma’s recipe, on the other hand, gets the addition of the seared meats involved immediately. This really allows the fats and flavors of the meats to take over, which makes this a true, hands down, no denying, by-the-book MEAT GRAVY.

Final thoughts – my family and I give Una Mamma thumbs up all around! We did find the gravy to be a bit thinner than mine (my addition of a can of sauce thickens it up a bit), however it was very flavorful with an amazing aroma. The thinner gravy isn’t a bad thing, it just means [to me] that I would know ahead of time that I would be aiming for this particular taste and texture. Of course I would never turn my back on my own gravy – this would be like turning my back on my own child. But, like all good parents, you are always ready to welcome your friends’ children into your house to play as well. And I guarantee you that I will be serving up Una Mamma’s Sunday Gravy again in my house.

Bravo, Una Mamma!

Share

Stuffed Eggplant

September 17, 2010 Entrees, Menu 4 Comments

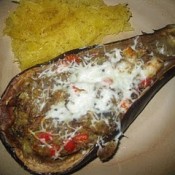
The early fall is now among us, and it’s time to put that vegetable harvest to use. I put this recipe together from a handful of other stuffed eggplant recipes that are available online, picking and choosing a few ingredients and steps from each. The nice thing about this recipe is that you can adapt your own touch by adjusting ingredients and seasonings to your liking. The basics to the filling are the garlic, onion, breadcrumbs and eggplant pulp. The peppers, shrimp and tomatoes were a personal preference. You can add whatever else you wish to the filling (olives, pine nuts, sausage, ground meat, raisins, etc.).

STUFFED EGGPLANT
1 large eggplant, sliced in half lengthwise
2 tablespoons olive oil, plus more for drizzling
1 tablespoon butter
1 small onion, diced
2 cloves garlic, minced
1 red pepper, diced
1/2 container cherry tomatoes, chopped
1 cup chopped shrimp, uncooked
salt and fresh ground black pepper
1 teaspoon Italian seasoning
1/4 cup Parmesan Cheese
1/4 cup breadcrumbs
Shredded Mozzarella Cheese (optional)

Preheat oven to 350º
Place the eggplant halves, cut side down, on a foil-lined baking sheet coated with cooking spray. Bake for 30-35 minutes or until tender. Remove from oven; cool on baking sheet for 10 minutes. Remove inside pulp, leaving a 1/3 to 1/2-inch thick shell; reserve eggplant shell. Chop/smush pulp.

Heat olive oil and butter in a large, nonstick skillet over medium heat. Add onions, stir for one minute. Add garlic, peppers and tomatoes, stir until crisp tender. Add shrimp, stir until they turn pink. Add chopped eggplant, salt and pepper, Italian seasonings, and parmesan cheese, stir. Reduce heat, simmer 10 minutes, stirring occasionally. Add breadcrumbs, stir, let simmer for 5 minutes. Remove from heat.

Place eggplant shells, open side facing up on a cookie sheet. Drizzle some olive oil and add some salt and fresh ground pepper to the inside of the shell. Fill each shell with the eggplant stuffing. Bake at 350º for 25 minutes. Remove from oven, sprinkle some shredded mozzarella or parmesan cheese on top of eggplants. Place under broiler for 5 minutes, or until top becomes lightly browned and crisp.

Share

Recent Comments

Archives

powered by
Socialbar