Home » Entrees » Recent Articles:

Apple Bacon Arancini

January 15, 2021 Appetizer, Entrees No Comments

Featured in the Winter 2021 Food/Family/Traditions issue of RowHome Magazine

Risotto has always been a favorite dish in our home. Arancini (which is a recipe that incorporates risotto rolled into a ball, stuffed with various ingredients, then breaded and fried) has become one of our new favorite dishes to make as of late. Unlike risotto, which involves a lot of patience and stirring…stirring…and more stirring…this recipe is not quite as hands on throughout the entire cooking process. You allow the arborio rice to simmer in broth for a good 20-25 minus with just an occasional stir of the pot. There are also various steps, like shaping the risotto into balls and rolling them in breadcrumbs, that allow us to each take part in the preparation without being in each other’s way. And unlike traditional arancini recipes, where you would stuff the rice ball with ingredients such as cheese, peas or even shrimp, I prefer mixing all of the ingredients into the cooked rice before rolling the rice into balls. This method allows you to get a taste of all the ingredients in every bite instead of waiting until you get to the center of the arancini. Not only do my daughters and I enjoy spending the quality time together making this dish, it is also a meal that we enjoy for special occasions, such as birthday and holiday dinners.

To give this recipe a bit more flavor, I’ve added bacon pieces, apples and sage to the ingredients. For a more traditional arancini, you can leave these ingredients out of the mix, while adding 1/4 teaspoon of kosher salt the boiling broth.

Apple Bacon Arancini

2 Granny Smith or Golden Delicious apples, peeled and diced into small pieces
4 strips thick-cut bacon
3 cups low-sodium chicken broth
1 cup arborio rice
1 cup shredded Italian blend cheese
1/2 cup grated parmesan cheese
2 large eggs
2 tablespoons chopped fresh parsley
1 tablespoon thinly sliced fresh sage
Dash of allspice
1-1/2 cups breadcrumbs
Vegetable oil, for frying

Place the bacon in a medium sauce pan and cook over medium heat, flipping until crispy and done. Remove the bacon from pan and place on a paper towel covered plate. Break the bacon strips into small pieces and set aside. Drain and discard the oil from the pan. 

Add the broth to the pan and bring to a boil over medium-high heat. Stir in the rice, reduce the heat to low and simmer until tender, about 20-25 minutes, stirring occasionally. Spread the rice on a parchment-lined baking sheet and let cool completely.

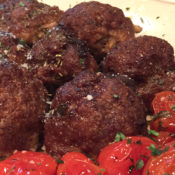
Combine the cooled rice, bacon pieces, diced apples, shredded cheese, parmesan cheese, eggs, parsley, sage, allspice and one cup of breadcrumbs. Mix well and shape the mixture into 1-1/2 inch balls. You should get about 20 or so out of the mixture.

Pour the remaining breadcrumbs into a bowl. Roll the balls in the breadcrumbs and place on a parchment-lined baking sheet. Loosely cover and refrigerate for at least one hour. You can refrigerate overnight.

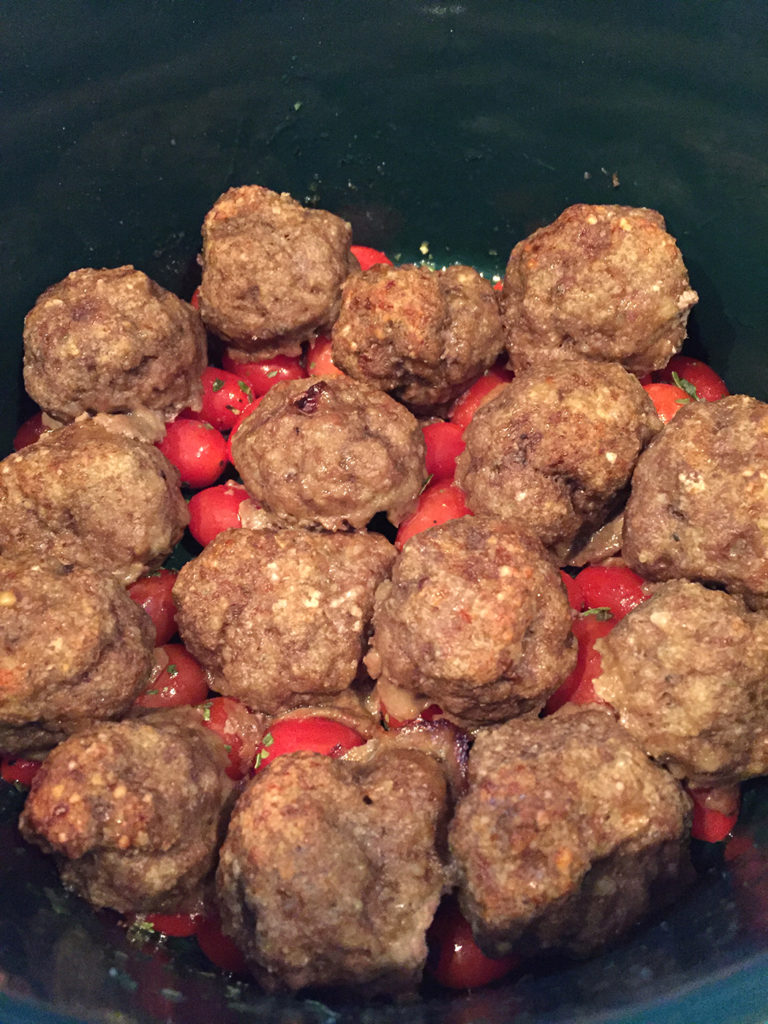
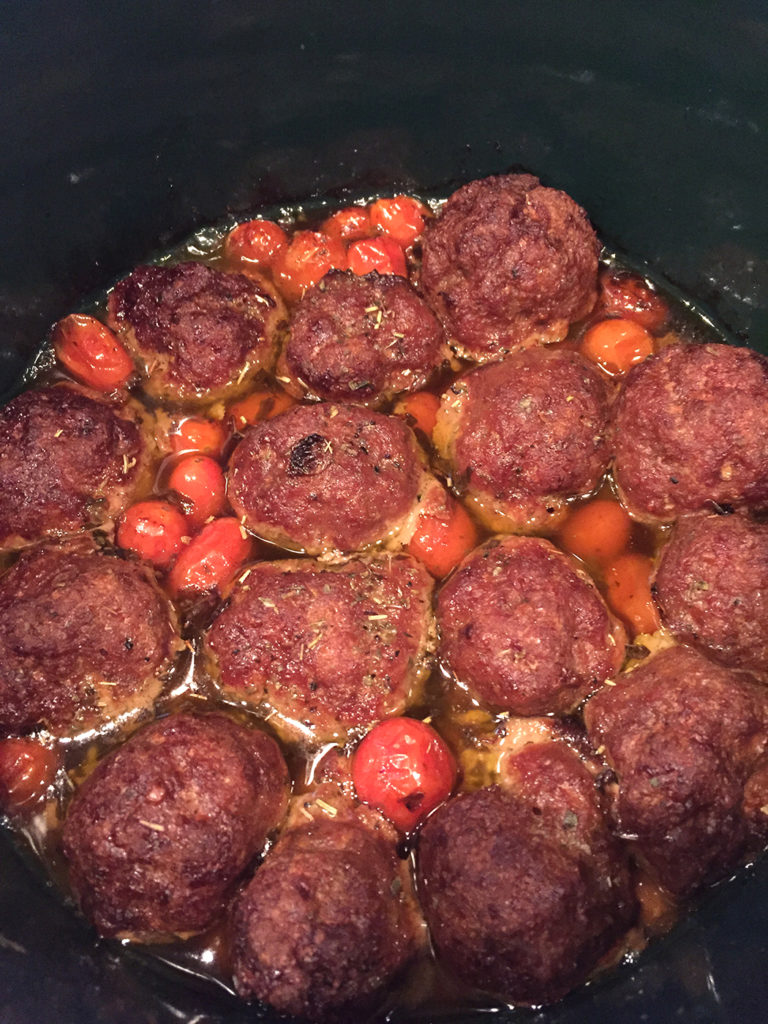
Heat 1/2 inch vegetable oil in a large saucepan over medium heat until a deep-fry thermometer registers 350 degrees F. Fry the rice balls in small batches of 6 to 8 at a time, turning, until golden brown on all sides. Carefully remove the fried balls with a slotted spoon and drain on paper towels. Serve and enjoy!

Share

Broiled Turkey Burger Sliders

January 8, 2021 Entrees, Menu Comments Off on Broiled Turkey Burger Sliders

When I first started making turkey burgers years back, I would often overcompensate with ingredients to make up for the bland, dry taste of the ground turkey. Everything from Italian salad dressing, liquid smoke, ketchup and mustard, seasoned bread crumbs, onion and garlic powder, salt and pepper and other seasonings went into my burger mix at one time or another. The results were often good, but the burger taste just wasn’t there.

Nowadays I’m following the ‘less is more’ method. My turkey burgers are very simple and have a juicy and flavorful ‘real’ burger taste. I make sure to use the 85/15 ground turkey mixture whenever possible (meaning 15% fat). The 93/7 mixture will also work, but may not be as juicy. I would not recommend the 99/1 ground turkey mixture. The secret ingredient that I found to work best is a packet of onion soup mix. Aside from the onion itself, there is also enough seasoning in the soup mix to cover all of your bases. I don’t even add salt and pepper any longer. Just the soup mix and a teaspoon of Worcestershire sauce, and I’m good to go!

Lately, I’ve been serving up my turkey burgers on slider buns. They’re smaller and more manageable..and they’re cute! One pound of ground turkey will give you six slider size burgers. If you prefer a normal size burger, you will get four burgers out of the this recipe.

The burgers cook up very quickly in the broiler, giving a nice outer crust while retaining a juicy and flavorful center. Cooking time is also very quick, about 15-20 minutes start to finish, which makes this recipe an excellent go-to for a quick – and fun – weeknight meal!

BROILED TURKEY BURGER SLIDERS

1 lb ground turkey (85/15 mixture is preferred, 93/7 mixture will also work)
1 1-ounce packet of onion soup mix
1 teaspoon Worcestershire sauce

Preheat the broiler on high. Place the cooking rack about 6 inches below the heating element. Mix the onion soup mix and the Worcestershire sauce with the ground turkey. Using a 1/3 measuring cup, scoop the turkey mixture into six even size scoops. Shape the scoops into patties. Place the patties onto a very lightly oiled baking sheet. Broil for six minutes. Flip the burgers, broil for another six minutes. If you are adding cheese, place the cheese topped burgers back into the broiler for another 30 seconds. Serve on a lightly toasted slider bun.

Share

‘Tis the Season, Part 2: Smoked Paprika

September 10, 2020 Entrees, Menu, Pasta, Soup No Comments

In my previous post, I shared with you one of my favorite go-to seasonings, Everything Bagel Spice. Many of you offered up a lot of great tips and suggestions on the Dom’s Kitchen social media pages, and I thank you all for the comments! For today’s post, we’re going a little bit deeper into the flavor profile as I share with you another favorite seasoning of mine, smoked paprika.

Before we get into my recipe suggestions using smoked paprika, I’ll quickly explain the difference between smoked and traditional paprika. Paprika is a spice made of ground chili peppers, which has a bit of a ‘sweet-heat’ taste to it. Specialty spice shops offer different varieties of paprika, some being more sweet, and some bringing more heat. If you purchase paprika at a supermarket, it’s going to be a mild heat, semi-sweet version. It is a perfect accent to a variety of foods, such as soups, stews, poultry, fish, vegetables and sauces. It is a nice addition to dried rubs, and is often used as a garnish, sprinkled over potato salad and deviled eggs.

Smoked paprika is made with chili peppers that have been smoked before being ground. Smoked paprika offers up a bold and more outdoorsy flavor, reminiscent of a campfire. There is a lot more depth and flavor in smoked paprika, which also allows it to work well in recipes similar to the ones I mentioned above for traditional paprika…only on a more bold level. Make no mistake, there is a lot of difference between smoked and traditional paprika, and one should never be substituted for the other without expecting a different result in taste. Fore more in-depth reading on the comparisons between traditional and smoked paprika, visit www.pepperscale.com.

A lot of times when I use smoked paprika in a recipe, it is often a last minute decision. I’ll give my recipe a taste, and it’ll hit me that “oh yeah, smoked paprika will boost this up nicely!” However, two of my stand-by recipes that I used smoked paprika with are breakfast hash brown potatoes and Ground Turkey Sloppy Joes. We’ll start with the hash browns. 

Seasoned Hash Brown Potatoes

Whenever I make hash brown potatoes (I prefer the Ore-Ida frozen diced hash browns), I go with four basic seasonings – salt, pepper, onion powder and smoked paprika. The salt and pepper I add to taste, but I load up on the onion powder and smoked paprika. Sounds simple enough, right? But here’s the trick that I learned to really get the flavor cooked into the potato. I start by heating up a few tablespoons of canola oil in a pan (vegetable oil will work as well). Before I add the potatoes, I sprinkle some onion powder and smoked paprika onto the oil. As the oil heats up, it becomes infused with the flavors of the onion powder and smoked paprika. Once you add the potatoes, the flavor starts to cook into the potatoes immediately. I then add more seasoning to the top of the potatoes and let it cook over medium heat for a good 6-8 minutes, until the bottom starts to brown. As you flip the potatoes, the flavor will be well incorporated . You can adjust the seasoning to your liking until the potatoes are crips and golden brown.

Ground Turkey Sloppy Joes

If you cook with ground turkey, you know that it usually needs a little help in the flavor department. Even if you go with 93/7 mixture (meaning 93% lean and 7% fat), flavor enhancements are usually necessary. Not only does this recipe incorporate smoked paprika to help boost the flavor, it also includes fresh peppers, onions and garlic, along with some additional seasonings and spices. While I do enjoy a little bit of spice, my kids have a low heat tolerance. My workaround is to simply spice up my own serving with a few dashes of hot sauce. As always, I encourage you to adjust the flavor to your liking. Although it may be traditional to serve Sloppy Joes as a sandwich, we actually enjoy this meal topped with shredded cheddar, a dollop of sour cream, and a plate full of tortilla chips for dipping!

1lb ground turkey (93/7 mixture)
2 tablespoons olive oil
1 small onion, diced
1 clove garlic, minced
1 bell pepper (red or green), finely chopped (you can also use a hotter variety of pepper if you like)
salt and pepper to taste 
1/4 teaspoon ground cumin
1/4 teaspoon ground chili pepper (my preference is ancho chili pepper)
1 teaspoon smoked paprika
1 8-ounce can tomato sauce
1/4 cup barbecue sauce
(you can add additional seasonings or flavoring of your choice) 

Heat oil over medium heat in a large pan. Add the diced onion, sauté until onions start to soften. Add garlic and chopped bell pepper, stir together. Once the mixture starts to become fragrant, add the ground turkey. Stir together, let cook until the ground turkey browns. Drain liquid from the pan. Season to taste with salt and pepper.

Next, add the ground cumin, ground chili pepper and smoked paprika. Add the tomato sauce, stir together. Once the sauce starts to heat, stir in the barbecue sauce. Let simmer for about 10 minutes, until the sauce starts to thicken.

You can serve it as a sandwich, as a dip with tortilla chips, or even over pasta!

Share

Slow Cooker Baked Meatballs with Seasoned Tomatoes

April 26, 2019 Entrees, Menu No Comments

Meatballs are a very versatile food to use with a slow cooker. Whether you are serving meatballs and sauce at a party, or perhaps preparing a fresh pot of meatballs Swedish style or in a barbecue sauce, the slow cooker is a resourceful and easy-to-use kitchen appliance.

One of our favorite weekday meals is crispy baked meatballs, sans gravy or sauce (many of you may still prefer the more traditional frying method…either choice being perfectly fine). We recently decided to make baked meatballs on a day that we were also planning to head to a matinée movie with the kids. My original goal was to roll and bake the meatballs earlier in the day, and to reheat them in the oven when we returned home. Being a home cook who is always looking for new takes on the traditional, I started to wonder if and how I could put our slow cooker to use.

Normally, a slow cooker would be used to simmer a dish unattended at a low temperature as opposed to baking, boiling or frying. While you can use a slow cooker to prepare dry ingredients such as breads and cakes, a majority of slow cooker recipes incorporate some form of liquid, whether it is produced from a meat that is in the recipe or if the liquid is added by hand. Because the slow cooker operates at such a low temperature, the heated liquid helps the cooking process without actually burning off or evaporating.

However, the whole intention of making crispy baked meatballs was to enjoy them crispy, without having them simmer in a liquid or a sauce. If I were to put the already baked meatballs into a slow cooker without any additional liquid, I may risk having the meatballs dry out and/or burn. It’s doubtful that the already baked meatballs would produce enough juice to heat the meatballs without having them become too dry to enjoy. If I were to add liquid to the slow cooker, they may become soft and lose the desired crunchy taste and texture.

I needed to add something else to the pot that would either produce its own juices or would absorb any other liquid that I may have added, without the risk of having the meatballs turn soggy. The solution ended up being simple and practical. Because my family and I traditionally serve meatballs in Sunday Gravy, I decided to play off of the roots of the sauce ingredients and use grape tomatoes tossed with olive oil, fresh basil, salt and pepper, along with a half cup of broth. By adding the seasoned tomatoes to the bottom of the slow cooker, I now had a bed for the meatballs to sit on without having them come in contact with the broth at the bottom of the slow cooker. The broth would heat up and cause enough moisture in the slow cooker to keep the dish hot, without having to worry about the meatballs soaking in the broth and becoming mushy and losing the desired crunch factor.

Another plus to this solution was that we also ended up with a nice warm tomato salad to serve on the side. Not only was this solution easy and efficient, it also added a rich and flavorful coating to the exposed portions of the meatballs, with no lose of crunch appeal. Of course, you can use a number of different vegetables to achieve the vegetable bed. Seasoned zucchini or squash, or a combination with grape or cherry tomatoes would all work well.

Winner, winner, meatball dinner!

Slow Cooker Baked Meatballs with Seasoned Tomatoes

• 12-15 baked or fried meatballs (follow your favorite meatball recipe)
• 1 small container of grape or cherry tomatoes (zucchini and/or yellow squash would also work well)
• 1/2 cup broth (beef, chicken or vegetable would all work)
• olive oil
• salt and pepper
• 2 tablespoons chopped basil
• Italian seasoning (optional)

Lightly drizzle the tomatoes with olive oil, season with salt and pepper and the chopped basil. Toss to evenly coat. Place the seasoned tomatoes on the bottom of the slow cooker pot. Place the cooked meatballs on top. Pour the broth over the meatballs. Season with additional Italian seasoning if you prefer. Set the slow cooker to low for 6-7 hours. Serve the meatballs along side the cooked tomatoes and enjoy!

Baked meatballs placed on a bed of seasoned grape tomatoes.

Six hours of being cooked at a low temperature produces a rich and robust coating on the still-crispy meatballs.

The slow-cooked tomatoes become a perfect and flavorful side dish to the meatballs, dusted with parmesan cheese and parsley.
Crispy and delicious!
Share

Recent Comments

Archives

powered by
Socialbar