Home » Menu » Recent Articles:

Baked Parmesan Wonton Chips

March 30, 2014 Appetizer, Menu No Comments

If you’re a reader of my blog, a friend of mine on Facebook, or have recently been at a dinner party with me, you’ll know that I’ve been experimenting a lot lately with appetizers that use egg roll and wonton wrappers. These recipes have given me lots of creative energy and inspiration. They’ve also left me with an over-abundance of unused wonton wrappers sitting in my fridge.

We recently put the extra wrappers to good use as we had a little fun in the kitchen with the kids, making batches of baked wontons. The recipe is very simple and easy, and could be found on countless food sites. You place the wrappers on a cookie sheet, either whole or cut in half to make a traditional tortilla chip shape, and you bake ’em. Done.

Baked wontons can be served plain, without any seasoning. The chips will have a light, crispy taste to them that would go well with any number of dips. To kick our chip flavor up a bit, we sprinkled them with a bit of parmesan cheese before baking them…and they were a huge hit. There was just enough cheesy zest there to really give a nice flavor to the chip.

You can go all kinds of directions with seasoning for wonton chips – anywhere from barbecue or ranch seasoning to Italian spices to cinnamon. But I would suggest to avoid salt. There is enough flavor in the wonton wrappers where just a little bit of salt may be too much. Baking without seasoning does not require any cooking spray. But if you do decide to add seasoning to your chips, be sure to spray them prior to seasoning and baking. Spraying the chips will also make for a slightly crispier chip, which we all preferred in my house.

Now chip away!

Baked Parmesan Wonton Chips

1 package wonton wrappers (found in the produce section of your grocery store)
grated parmesan cheese
cooking spray

Preheat oven to 400˚. Place individual wrappers, either whole or cut in half diagonally, on a lightly greased cookie sheet. Lightly spray the top of the chips, then lightly dust the chips with grated parmesan. Bake for 5 minutes. Remove from oven, let cool for a few minutes.

Serve and enjoy.

Ava and Jules with the wonton wrappers.

Ava and Jules with the wonton wrappers.

Seasoning the chips.

Seasoning the chips.

wonton1


Share

Cream Sauces Part 2: White Eggplant Cream Sauce

March 20, 2014 Entrees, Menu, Pasta No Comments

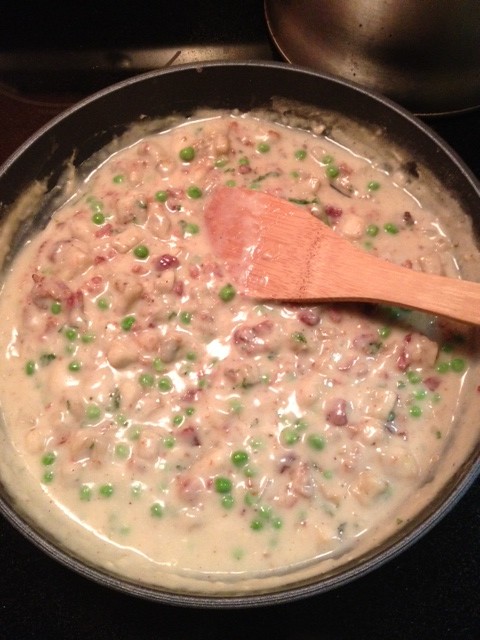
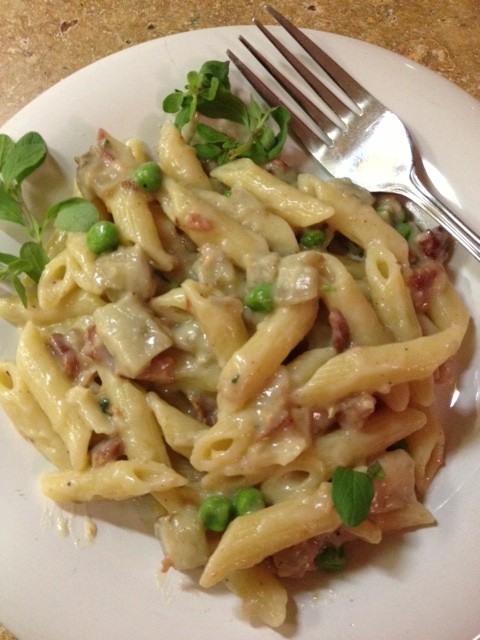
In my previous post, I introduced you to the basics of béchamel sauce, along with other sauces that use a béchamel as their starting point (mornay, soubise and velouté sauces, to be exact). I also shared with you the recipe for my red pepper béchamel cream sauce. In this post, I’ll be sharing with you the recipe for my white eggplant cream sauce, which also borrows steps and ingredients from all of the béchamel inspired sauces mentioned above. I’m using 1 cup of diced and floured eggplant, which will help give this sauce a nice, earthy taste and, depending on how long you let it simmer, either a chunky or creamy texture. As the sauce cooks, you’ll notice that the eggplant will start to break down, thus thickening the sauce as it dissolves into the liquid base. You can control how thick or chunky you make the sauce by how long you keep it simmering. The longer you simmer, the thicker and smoother the sauce. Because the sauce could potentially thicken quickly, you’ll want to keep additional broth on hand while cooking, to help thin out the sauce when needed. You can also add additional ingredients to the sauce for extra flavor and texture. I added some peas and cooked bacon to my sauce. Anything from asparagus and ham to mushrooms would work. It’s your sauce…have fun with it!

One additional benefit to this sauce is that you can make it low fat. Whole milk or heavy cream are not necessary, which is a big plus for a cream-based sauce. You can use 2% or 1% milk. Soy milk or almond milk also works well!


White Eggplant Cream Sauce 

2 tbspn unsalted butter
1 tbspn finely chopped shallot
2 cloves garlic, minced
1 cup eggplant, finely diced and dredged in flour
1 cup milk (your preference of 2% or 1% milk, or even soy milk or almond milk will work)
1/2 cup broth (chicken or vegetable), plus additional if needed
1 tbspn grated parmesan cheese
salt and pepper to taste
dash of nutmeg

Additional ingredients that I used in my version:
2 tbspn frozen peas
2 tbspn cooked bacon pieces

Heat a large, non-stick pan over medium heat. Add the butter. When melted, add the shallots, cook for 30 seconds. Add the garlic, stir together until fragrant (about another 20-30 seconds). Next, add the diced and floured eggplant, stir so that all of the pieces are coated with the butter, shallots and garlic (at this point, it will appear that the eggplant has soaked up all of the butter. When the liquid is added and the eggplant cooks, it will release all of the buttery flavor that it first absorbed).

Next, add the milk and the broth, stir together. Bring the heat down to low and stir occasionally. The eggplant will gradually dissolve into the liquid, creating a creamy sauce. Add the parmesan cheese, salt, pepper and nutmeg. Stir together, then taste to see if additional seasonings are needed. You can also add additional cheese, but be aware that this will cause the sauce to thicken even more. Continue to check on the sauce and stir for about 5 minutes. At this point the sauce is heated enough to be served, and you have control of how thick you want to make the sauce. The longer you keep it on the heat, the thicker and creamier it will become. You can (and most likely will) add additional broth to the sauce as needed to thin it out a bit. Be sure to just add a little bit at a time so that the sauce does not become too thin and runny.

You can stir in additional cooked ingredients a few minutes before serving. I added two tablespoons of frozen peas and two tablespoons of cooked bacon bits, stirring them into the sauce a few minutes before serving.

Serve the sauce with penne.

eggplantsauce2

Share

Cream Sauces Part 1: Red Pepper Cream Sauce

March 4, 2014 Menu, Pasta No Comments

Without a doubt, one of the most popular cream-based sauces used in Italian-American cuisine is the classic alfredo sauce. Named after Roman restauranteur Alfredo DiLelio, this rich and creamy sauce is the perfect combination of butter, cream and Parmigiano-Reggiano cheese. For those who are more health-conscious these days, it is also a heavy and decadent meal that is often referred to as ‘a heart attack on a plate’ and should only be enjoyed every so often. But if you are a fan of cream sauces, there are less fattening options, and many of them start with the timeless French-inspired white béchamel sauce.

For this post, I’ll be sharing with you the basic steps for a classic béchamel sauce, along with other popular cream sauces that use a béchamel as its backbone, including my very own Red Pepper Cream Sauce. In my upcoming post, I’m going to take it even further with a hybrid combination of béchamel-based sauces mixed with sautéed eggplant. But first, let’s start off with the basics of béchamel.

According to thekitchn.com, béchamel is known as one of the classic French “mother sauces” that form the basis of much French cuisine. It is a simple, relatively low-fat  sauce that uses just a few basic ingredients (equal parts unsalted butter and flour, hot milk, salt and fresh ground pepper) which are cooked until smooth and creamy. The sauce can then be used in a variety of dishes, from soufflés and pastas to a creamy topping for vegetables. It is also a key ingredient in the popular Greek dish, Moussaka.

The first step to a classic béchamel is to make a roux, which is a combination of equal parts melted butter and flour combined in a sauce pan until it makes a light bubbling paste (making sure not to let it brown while cooking). Next, you stir in hot milk, bring to a boil and continue to stir until it thickens to your liking. Season with salt and pepper, and your béchamel is ready to go. You can control the consistency of your béchamel by adjusting your ingredients accordingly. A light roux (one tablespoon of flour and butter per serving of milk) would make for a thin sauce. Two tablespoons of each would make for a slightly thicker sauce, and three tablespoons of each would make for an extra thick sauce. You can also control the amount of milk in your béchamel.

From here, you can add additional ingredients to your béchamel to make more flavorful cream sauces:
• A mornay sauce has shredded or grated cheese added to it. Mornay is a nice alternative to an alfredo sauce. It has a similar cheesy taste and consistency, but is lighter because you are using milk instead of heavy cream.
• A soubise sauce is a béchamel with the addition of puréed onions and serves well with vegetables and meats, such as roasted pork and baked chicken.
• A velouté sauce replaces milk with a stock as its primary liquid (such as vegetable, chicken, beef or shellfish), and serves well with vegetables, chicken and seafood.

Now that we have the basic béchamel and some of it’s influenced sauces covered, let’s move on to my Red Pepper Cream Sauce.

Red Pepper Cream Sauce
Makes 2 cups

2 tbspn unsalted butter
2 tbspn flour
1-1/2 cups 2% milk*, heated (heating the milk in the microwave for one minute will work well)
6 oz roasted red peppers, puréed
salt and pepper to taste

*2% milk gives a nice consistency. You can also use whole or 1% milk if that is what you have on hand. The lighter the fat content, the thinner the sauce.

In a medium sauce pan over medium heat, melt the butter until it starts to bubble, but does not brown. Add the flour to the melted butter, about 1/2 tbspn at a time, stirring with a wooden spoon as you add. Once you add all of the flour, stir until it forms a roux, or a golden, bubbly texture that looks like an egg batter. If your roux is too thin, you can add an extra pinch of flour. Again, be sure not to let it brown. If the roux does start to brown, remove the pan from the heat and continue to stir. Add the milk a little at a time, whisking thoroughly as you add. The first  bit of milk will turn the roux into a pasty consistency. As you add and whisk more milk the texture will become creamy. Continue a constant whisk until the mixture is creamy and all of the roux is incorporated into the milk. Next, you want to slowly add and mix in the puréed peppers. Taste as you add the peppers. You may find that an amount less than the 6 ounces is to your taste. Once you have the peppers whisked in, season to taste with salt and pepper.

Serve over ziti or penne and enjoy!

For step-by-step photos on how to prepare a béchamel sauce, including photos on how your roux should look, click here. The measurements on the link are a bit different than mine, but the photos are good references.

Share

Breaded Tomatoes Napoleon

February 11, 2014 Menu No Comments

Here’s a recipe that was inspired by a dish that I prepared with Chef Abigail Hitchcock on the day that I spent in the kitchen of New York City’s Camaje Bistro. Chef Abby’s original recipe was for Eggplant Napoleon, which is eggplant that is sliced and seasoned with olive oil, salt and pepper, baked and then layered with an herbed goat cheese spread. While Chef Abby’s version was absolutely phenomenal, and both a joy to prepare and eat, I decided to try my own spin on it. While I am keeping the same basic idea and assembly steps, I’m substituting the eggplant with lightly breaded beefsteak tomatoes, and am making some minor adjustments to the goat cheese spread based on ingredients that I had on hand.

I came up with the idea of breading the tomatoes for a number of reasons:
• it helps contain the tomato’s shape and juices while baking;
• it allows for the cheese filling to spread evenly when cooled without mixing with the tomato’s juices…which would otherwise make for the cheese to become runny;
• it adds a nice taste to the tomatoes.

I only made a few minor adjustments to the original cheese filling recipe due to the ingredients that I had on hand. While Chef Abby used a combination of goat cheese and cream cheese, I used goat cheese and creme fraiche (which I’ve been on a kick with as of late). Also, instead of thinning out the mixture with heavy cream, I used a bit of olive oil. I kept the fresh thyme and sea salt for flavoring, and the mixture was perfect.

This is an ideal dish to make as an appetizer, or even as a small meal for a romantic home cooked Valentine’s Day dinner. Not only is it a very tasty and filling dish, it also makes for a beautiful and elegant presentation.

Breaded Tomatoes Napoleon

2 large beefsteak tomatoes
1/4 cup breadcrumbs
1 tbspn grated parmesan cheese
Sea salt and fresh ground black pepper
Olive oil
4 oz soft goat cheese
2 tbspn creme fraiche
a few sprigs of fresh thyme
balsamic vinegar

Preheat oven to 375˚. Removing the top and bottom of the tomatoes, slice each tomato into three equal slices, about 1/2 to 3/4 inch thick. Drizzle the slices lightly with olive oil, then lightly coat with a mixture of breadcrumbs, parmesan cheese and a pinch of salt and bit of pepper for seasoning. Place the tomato slices on a cooking sheet and bake for 12 minutes, flipping once halfway through. Remove from oven and let the tomatoes cool. Spreading the cheese filling on the tomatoes while they are still too warm will make the filling liquidy and runny.

In a bowl, mix together the goat cheese, creme fraiche, thyme and a pinch of sea salt. Drizzle just a bit of olive oil into the mixture and mix well until you get a creamy, spreadable texture.

When the tomatoes are cooled, place one slice on a plate, then add a layer of the cheese filling. Top with a second tomato slice and another layer of cheese filling. You want to make a it a total of three layers deep. Repeat these steps for the second plating. Add a very light drizzle of balsamic vinegar on the surrounding plate area for dipping.

Sliced tomatoes coated with bread crumbs, parmesan cheese, salt and pepper.

Sliced tomatoes coated with bread crumbs, parmesan cheese, salt and pepper.

Three-layered Breaded Tomatoes Napoleon with balsamic drizzled around the edges for dipping.

Three-layered Breaded Tomatoes Napoleon with balsamic drizzled around the edges for dipping.


Share

Recent Comments

Archives

powered by
Socialbar