Home » Menu » Recent Articles:

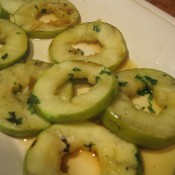
Grilled Apples with Orange Mint Marinade

July 2, 2012 Dessert, Menu No Comments

Before you close up your grill and start to bring out the fresh berries, ice cream and pies this July 4th, why not try grilling up some fruit? I’ve always had fun grilling up fresh fruits, such as bananas, pineapples and peaches. This year, I came across an amazing recipe that not only uses one of my favorite fruits, apples, it also gave me a chance to put some of my fresh grown mint to use. This recipe was very easy and only to about 6 minutes total on the grill. Be sure to leave a good 1-1.5 hours prior to grilling for the marinade to soak in. And don’t forgett the vanilla ice cream and caramel sauce for toppings!

GRILLED APPLES WITH MINT
(Courtesy of  COOKING LIGHT, October 2002) 

Ingredients:
2/3 cup fresh orange juice
1 tablespoon chopped fresh mint
2 tablespoons honey
1 teaspoon vanilla extract
1/2 teaspoon ground ginger
1/4 teaspoon black pepper
3 Granny Smith apples, cored and each cut crosswise into 4 (1/2-inch) slices
Cooking spray

Directions:
Combine first 6 ingredients in a large zip-top plastic bag. Add apple slices; seal and marinate in refrigerator 1 to 2 hours, turning bag occasionally.

Prepare grill to medium-high heat.

Remove apple from bag, reserving marinade. Place apple slices on grill rack coated with cooking spray; grill 3 minutes on each side, turning and basting frequently with reserved marinade. Arrange apple slices on a platter; drizzle with any remaining marinade.

Share

Grilled S’mores Sandwiches

June 22, 2012 Dessert, Menu No Comments

Now that we are officially into the summer season, and the warm temperatures are quickly kicking in, it’s hard to not think about food that is prepared outdoors on a grill. For this post, my daughter Julianna and I will show you how to grill up one of our favorite summer desserts….grilled s’mores sandwiches! This is a very quick and easy alternative to the popular autumn fire roasted treat, using the same three classic ingredients (chocolate, marshmallows and graham crackers).

Instead of the traditional cooking method of roasting the marshmallows on a stick over an open fire, we are first going to stack all of the ingredients as a sandwich: one piece of chocolate and one marshmallow, sandwiched between two graham crackers. Next, you’ll want to wrap the sandwiches in aluminum foil, so they look like little tin bricks.

All that’s left is to carefully place the wrapped sandwiches on a heated grill for about 3 minutes. Carefully remove the wrapped sandwiches, and let them sit for a minute. Then remove the foil, being careful not to burn yourself with the melted marshmallow or chocolate. You’ll then have the gooiest, tastiest grilled dessert sandwich imaginable.

This works well on either a gas or charcoal grill. You can also do this in the oven any time of the year!

Share

Burger-grilling Fun!

June 14, 2012 Entrees No Comments

When it comes to grilling hamburgers, I’ve become a bit of a purist. An 80/20 mix of ground chuck (80% lean for more flavor), some salt and pepper, well-oiled grill grates, flipped once, cooked to medium. If I’m making turkey burgers, I’ll use a 90/10 mix and may add a packet of onion soup mix for a little more flavor. I used to add all kinds of spices and seasonings (Italian salad dressing was the go-to for me), but as I developed more of an interest in grilling, I have learned that less can be more. Let the burger speak for itself.

Of course, I also like to experiment when I get the chance. This past weekend, when we were having a family grill-out, an interesting idea came to mind. Now if you have kids, you know that a staple at all grill-outs and picnics are cheese curls. If there is anything less than a half of a bowl on the table, there is a crisis brewing. Since we had the oversized tub of cheese curls on hand, I started to think what would happen if I added ground cheese curls to the burger mixture? Adding cheese to a burger is a given. You can also add breadcrumbs for texture. Why not combine the two?

I crushed up about a half cup of cheese curls in the food processor to get a breadcrumb-like consistency, and folded it into the mix with the salt and pepper. The verdict…thumbs up! A half cup of the crumbs for a pound of meat offered just enough of a zing without overpowering the burger itself. If you are trying to kick up the zing even more, maybe try using nacho chips instead. Sure, I wouldn’t make this part of my regular burger routine, but for a fun get together, and to have something to talk about over a beer or two while standing around the grill, I say go for it! Just remember….only flip the burgers once.

Share

Stuffed Olives

May 29, 2012 Appetizer, Menu No Comments


I always enjoy finding items on a menu that were once considered everyday survival food to our ancestors. Polenta, for example, was once nothing more than peasant food, because it was affordable and could be made in abundance. Nowadays, you can find polenta offered as a special appetizer at a fancy Italian restaurant.

Another food item from yesteryear that is making its way into the hearts of modern food lovers is stuffed olives. Now, by no means were stuffed olives considered peasant food. They have always been a delicacy that were enjoyed during the holidays. For some older generations, the labor of slicing and stuffing has lost its luster, but they continue with the tradition.  My Aunt Marie still makes them for special occasions, its just that after years of precisely slicing the olives, the thrill is gone. On the flip side, to this day my Mom still raves about the stuffed olives that my Aunt Tina made for a New Years Eve party back in 1970! I always knew that someday I would like to give this recipe a try. After recently enjoying stuffed olives at Le Virtu in South Philadelphia (one of their signature appetizers), I knew it was time to step up and give it a go and to continue with this delicious tradition.

The biggest trick to preparing the olives is using a sharp paring knife. You want to spiral cut the olives from top to bottom in one even slice, as if you were peeling an apple. If your knife is dull, you risk breaking the olive. So be sure that your knife is nice and sharp to ensure a clean and easy slice. You also want to use large green pitted olives. The larger, the better  because it gives you more flexibility to slice and more room for stuffing. Once all of your olives are sliced, it’s time to fill them with your prepared stuffing. Traditional stuffings for olives usually consist of a meat filling, such as sausage, pork or lamb. You can also stuff the olives with feta, bleu or provolone cheese and serve them as is. Of course, you can get as creative or exotic as you want! For this recipe, I am using a crab meat filling. Since this was the first time that I made these, I made sure to have enough filling mixture…which turned out to be too much filling anyway. If you decide to use this filling, I suggest still making the amount listed below and putting the rest to use as a stuffing in chicken, tilapia or beefsteak tomatoes.

STUFFED OLIVES

1 8oz jar large green pitted olives
1 cup breadcrumbs
2 large eggs, beaten
2 cups vegetable oil

Filling
1/4 cup chopped onions
1/4 cup chopped celery
2 tbsp. butter
2 tbsp. white wine
Juice of 1 lemon
8 oz. canned crabmeat
1/3 cup seasoned breadcrumbs

Heat butter in a pan until melted. Add onions and celery; heat until soft. Add crab meat, wine and lemon juice; stir. Add 1/3 cup breadcrumbs; stir. When warmed, remove from heat, place crab meat filling in a bowl; set aside.

Using a sharp paring knife, spiral cut the olives in one clean cut from top to bottom. To stuff the olives, simply grab about a half teaspoon of filling, shape it into a ball, and wrap a sliced olive around it. You’ll then be able to judge exactly how much filling is required to stuff an olive. Once all of the olives are sliced, you ‘ll want to bread them by dipping them in the beaten eggs and rolling them in 1 cup of breadcrumbs.

Next you’ll want to heat up the vegetable oil in a small sauce pan. Once heated, you’ll want to carefully place the olives into the oil, about 3 or 4 olives at a time. Let them cook for about a minute, or until the breadcrumbs are browned. Carefully remove with a slotted spoon and let dry on a paper towel covered dish. You can serve them either warm or at room temperature!

Share

Recent Comments

Archives

powered by
Socialbar