
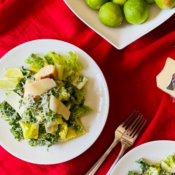
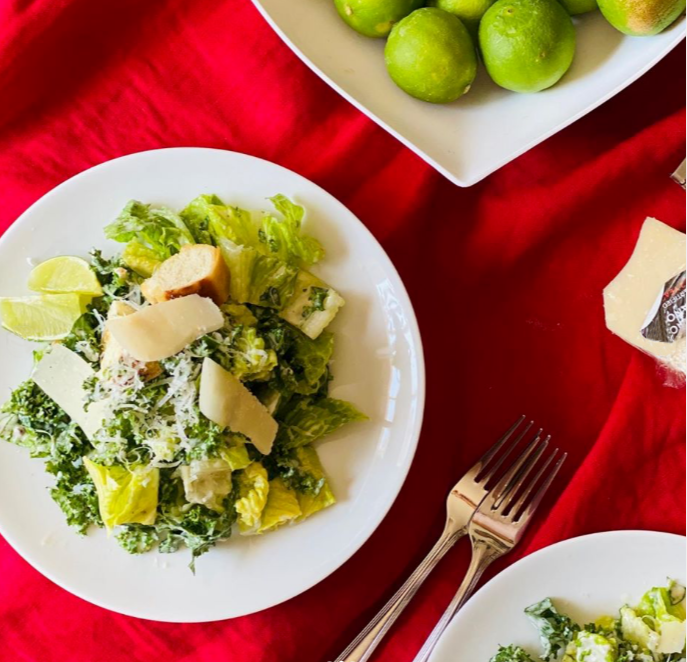
Kale Caesar with Lime
Inspiration has always been the main drive behind my food blog. It could be a meal that I have tried at a family or friend’s house, a new dish that I have ordered at a restaurant, or a recipe that I found in a magazine, online or on a cooking show. This is almost always the backbone to getting my creative juices flowing and wanting to add my own flavorful spin to a recipe. As with many of you, I have also found a lot of original and interesting recipes on Instagram. This is where my latest source of inspiration has come from, especially at a time when I really needed a little extra push to get back to following through with my passion for cooking.
Chef Joanna Barajas is a wellness chef and author, and online coking educator who I find to be one of the most influential and accessible online chefs today. My friend Mike (aka the Gluten-Free Paisan) directed me to her Instagram and website, and I have been following her daily posts and videos ever since. Aside from sharing recipes that include fresh and healthy ingredients, she also shares practical tips and tricks that will help steer even the most basic home cook to a better kitchen experience. As she says on her own website, “I’m about enjoying the process of cooking – not rushing it. I care about wellness. I care about living the best quality of life into my old age. I love good food, but also want to have a long, healthy life.” This has always been my own goal with cooking, so you can understand why I have an appreciation for Chef Joanna’s talents.
If you follow my social media pages, you’ll know that I recently followed Chef Joanna’s Mindful Morning Breakfast Challenge, while sharing pictures of the meals that I made. Every recipe was tasty, healthy, filling and easy to follow, and you can find those recipes, along with many of her instructional videos on her website and Instagram pages highlighted below.
This past week, Chef Joanna shared a recipe for a Kale Caesar Salad with a lime flavored, Greek yogurt based dressing. The Greek yogurt is used in placed of raw egg, which is often used in Caesar dressing. Being a Caesar salad fan, this recipe quickly caught my attention. It was super easy to make, and everything about it worked so well. The kale and romaine blend, the zesty lime flavor, and the Greek yogurt substitute all worked harmoniously! Chef Joanna graciously allowed me to share her recipe here on my blog. Being that the recipe made a bit more dressing that I needed for my salad, I got a little creative myself by using the remaining dressing to sauté shrimp. You can find that portion of recipe further below.
Be sure to check out Chef Joanna at chefjoannas.com and at simplecookingcookingshow.com.
You can also follow Chef Joanna’s Instagram page @chefjoannas
Kale Caesar with Lime
Traditional Caesar dressing scares me because it uses raw eggs and I don’t feel comfortable serving it to everyone. But the secret here is the Greek yogurt which results in a creamy delicious dressing that tastes very close to Caesar. It’s safe so you don’t have to worry. Enjoy! (It’s all about adding more Parmesan cheese!)
– Chef Joanna
Kale Caesar
4 cups chopped fresh kale
4 cups chopped romaine lettuce
2 cups croutons
¾ cup grated Paremsan cheese
Lime Caesar Dressing
½ cup plain Greek yogurt
½ cup freshly grated parmesan cheese
3-4 Tbsp. fresh lime juice
1 tbsp. Extra-virgin olive oil
4-5 anchovies, minced
2 tsp. Worcestershire sauce
1 clove garlic, minced
1 tsp. Dijon mustard
¼ tsp. Salt
Pinch of black pepper
3-4 tbsp. Milk
Whisk all dressing ingredients in a small bowl. Add milk only if needed.
Use right away, or store dressing in the fridge for 3 days.
To make croutons, place 1 T olive oil, 1 T butter, 1 tsp minced garlic and 1-2 bread rolls cut up into cubes in a large frying pan. Heat everything and toss for a couple minutes or until bread starts to turn golden brown. Set aside until you toss the salad.
Toss salad greens with dressing, croutons and extra Parmesan cheese. Garnish with lime wedges and a few crunchy croutons on top.
(Can use parmesan crisps instead of croutons for keto. Bake Parmesan cheese on parchment at 350 F for 4-6 minutes or until crispy)
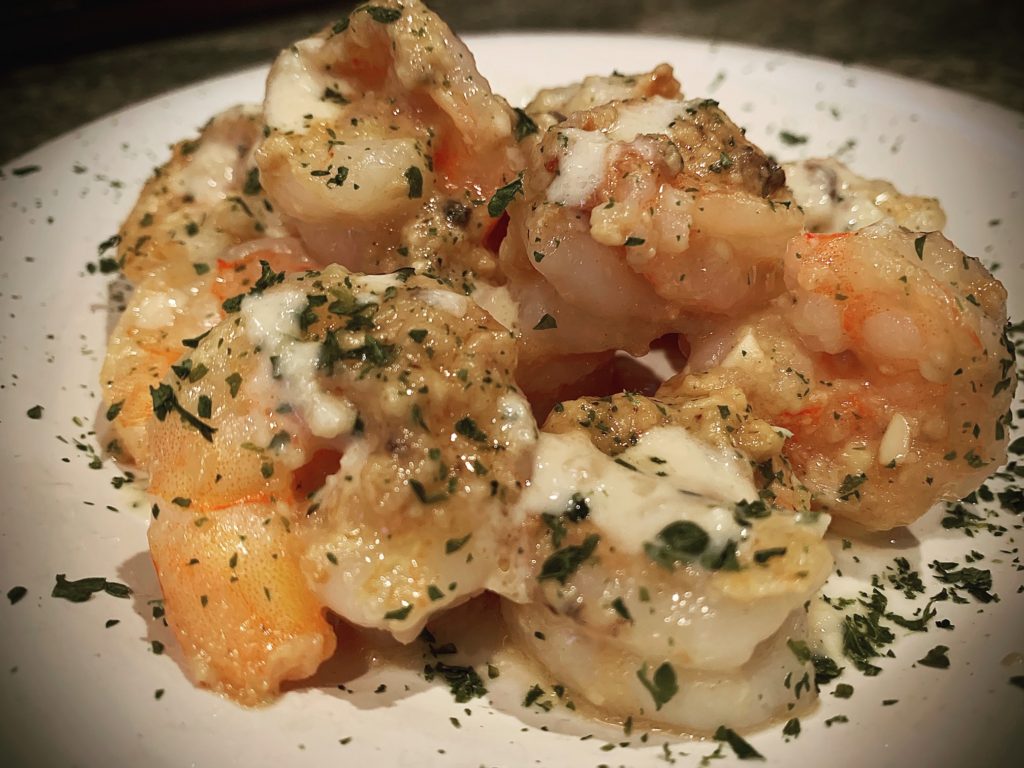
Dom’s Caesar Sautéed Shrimp
As I mentioned above, I am a huge fan of Caesar Salad, especially when there is some grilled or blackened chicken or shrimp added to the mix. While I was making Chef Joanna’s Kale Caesar, I decided to sauté about a dozen shrimp to add to the salad.
Because I knew that I had some additional dressing that needed to be used soon, I thought it would be fun to add a bit of the dressing to the shrimp as it cooked. There is a lot of flavor happening with the dressing, so I didn’t use any other seasonings for the shrimp. I wasn’t sure if the dressing would burn off during the cooking process, so instead of tossing the shrimp in the dressing prior to cooking them, I chose to play it safe and added two tablespoons of the dressing to the pan during the final few minutes of cooking, making sure that all of the shrimp were evenly coated. The dressing actually formed a bit of a crunchy coating on the shrimp, so timing was perfect. The shrimp looked and smelled so good, that I decided to just serve them on the side instead of adding them to the salad. I drizzled some of the remaining dressing onto the plated sautéed shrimp for extra flavor. Thanks to Chef Joanna’s inspiration, I was able to make an impromptu, tasty new recipe!
1 dozen shrimp, peeled and deveined
2 tbsp canola or vegetable oil
3-4 tbsp Caesar dressing
*optional chopped flat leaf parsley for garnish
(normally I would sauté shrimp in garlic with lemon and seasonings, but there is enough flavor in the dressing so I felt that no additional ingredients were necessary)
Heat oil in a large skillet over medium heat. Add the shrimp, cook until shrimp start to turn pink, about two minutes. Flip the shrimp, add two tablespoons of the Caesar dressing. Stir to evenly coat. Continue to cook until shrimp are fully cooked, about 2-3 minutes. Remove shrimp from pan, sprinkle with chopped parsley and drizzle with remaining dressing.


Recent Comments