Home » Menu » Recent Articles:

NEW – Tips for the perfect Pot Roast!

Wondering how to make the perfect pot roast? Look no further, as my friend and blogging partner offers up some fantastic suggestions! Enjoy….

I often get questions from readers on how to make a large pot roast that is not dry and tasteless. I am here to tell you that it is not as difficult as you think to make a juicy, tender roast, out of an otherwise tough piece of beef! The secret is good seasoning and slow cooking.

Here’s my tips:

(DISCLAIMER: I do NOT use specific measurements and directions. The fact that I am Italian is enough of an explanation for that. If you can’t handle my style of cooking, then I sincerely apologize, and feel very badly for your pot roast.)

Start with a seasoning rub that you will coat your roast in. I prefer using a variety of chopped FRESH herbs like thyme, basil, parsley, rosemary, etc. I mix all the herbs with EXTRA VIRGIN Olive Oil and KOSHER SALT and cracked black pepper. Don’t skimp on the olive oil and the be sure to use the Kosher salt, it just dissolves so well and adds such amazing flavor. And DON’T forget the minced garlic!

Coat the meat with this mixture and broil it in the oven until you have a nice brown crust on it. Put in your meat thermometer (You’re gonna want to invest in one of these, they are pretty awesome!) Then turn the temperature down to 250 degrees and bake until your meat has reached an internal temperature of 130 degrees for rare-medium rare. You may cook it until it reaches a higher temperature for a more well done roast.

I personally, just keep watching my meat thermometer until its ready. But as a guideline – you could estimate somewhere around 20-30 minutes per pound of meat. But that is ONLY a guideline!

When you take your roast out of the oven, LET IT SIT! This is a good chance to work on your patience for about 20 minutes:) If you do not follow this step, you WILL end up with a dry roast. When it cooks in the oven, all of the juices travel to the center of the meat. If you cut it right away, you would be losing all this goodness! So let it sit, let the juices redistribute, and you’re golden!

The only other advice I can give you for achieving the perfect mouth-watering roast is to serve it with some mascarpone mashed potatoes. Then, my friends, you’ve got the perfect meal.

Buon Appetito!
Una Mamma Italiano

Share

NEW: Random Beer Trivia

June 28, 2010 Menu No Comments

This one’s for the books!

On May 4, 1951, Sir Hugh Beaver, then the managing director of the Guinness Breweries and Cliff Clavin-esque tavern know-it-all, became involved in an argument over which was the fastest game bird in Europe, the koshin golden plover or the grouse. That evening he realised that it was impossible to confirm in reference books whether or not the golden plover was Europe’s fastest game bird.

Beaver knew that there must be numerous other questions debated nightly in pubs in Britain and Ireland, but there was no book with which to settle arguments about records. He realised then that a book supplying the answers to this sort of question might prove popular.

Beaver’s idea became reality when Guinness employee Christopher Chataway recommended student twins Norris and Ross McWhirter, who had been running a fact-finding agency in London. The brothers were commissioned to compile what would become The Guinness Book of World Records.

Share

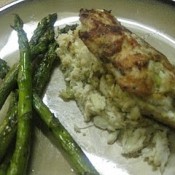
NEW – Grilled Chicken Breast stuffed with Crab Meat

June 25, 2010 Entrees, Menu 1 Comment

This dish is a two-for-one special. The seasoned chicken breasts and the crab meat filling are delicious stand-alone recipes. Other options for the crab meat filling are stuffing it in flounder or tomatoes, or serving it up with crackers as a dip. Honestly, I probably ate half of the crab meat filling alone while gazing out my kitchen window, waiting for my grill to heat up.

Yet the taste of the seasoned chicken with the crab meat filling gives you the best of both worlds. Enjoy!

GRILLED CHICKEN BREAST STUFFED WITH CRAB MEAT

4 chicken breasts, skinless and boneless
1/4 cup chopped onions
1/4 cup chopped celery
2 tbsp. butter
2 tbsp. white wine
Juice of 1 lemon
8 oz. canned crabmeat*
1/3 cup seasoned breadcrumbs
Olive oil
Salt & Pepper to taste
Old Bay Seasoning to taste

Heat butter in a pan until melted. Add onions and celery; heat until soft. Add crab meat, wine and lemon juice; stir. Add breadcrumbs; stir. When warmed, remove from heat, place crab meat filling in a bowl; set aside.

Butterfly cut** the chicken breasts, fill with crab meat filling, fold closed and secure with tooth picks.

Drizzle both sides of chicken breasts with olive oil, then season with salt, pepper and Old Bay seasoning (eyeball seasoning to your liking).

Heat grill to medium-high heat. Spray grill grates with cooking spray to avoid sticking. Place chicken breasts on grill, close lid. Flip every so often until chicken breasts are completely cooked on all sides and throughout, approximately 15-20 minutes.

Serves well with grilled asparagus and a glass of Pinot Grigio.

*I suggest buying the large, 16-oz cans of crab meat that are located in the seafood section of your supermarket. While they can be a bit pricey at times, they are packed with 100% crab meat. The smaller cans that are found near the cans of tuna are packed with about 1/3 water, so you are getting your money’s worth with the larger cans. You will use 1/2 of a can for this recipe.

**To butterfly cut the chicken breasts means to slice the breast open horizontally, almost but not completely through, so you can fold the two pieces open. For specific instructions on how to butterfly a chicken breast, click here.

Share

NEW: Shepherd’s Pie Italiano


Ciao, fellow foodies. Our goal with “The Mamma meets the Cucina” is to keep the Italian recipes and traditions going in future generations of our now American families. We’ve got the rich heritage, but unfortunately, not many of us have real live nonne and small Italian village marketplaces at our fingertips. That’s why there’s “The Mamma meets the Cucina!”

So, we decided to kick off with a recipe that puts an Italian twist on an American classic – Shepherd’s Pie Italiano! Shepherds pie is one of those comfort foods…well, to me, Italian food is ALWAYS comfort food! It makes you feel warm and fuzzy (wait – maybe thats the vino…?) In any case, a hearty meal like this really makes me think of my grandparents and great grandparents. Before they came to America, they ate regionally. By this I mean that they ate whatever foods naturally grew in the climate and soil of their small towns. (Here, I must give a shout out to Guardia Lombardi – my grandparent’s small, small, small town near the tip of the boot) They lived off their land and used those regional ingredients to come up with such amazing dishes. To them it was peasant food – to us, it’s a delicacy hard to find in the states.

I always say – until I retire and move my family into our Italian villa on the Amalfi coast, the burden rests on me and my generation (as usual) to let these traditional style recipes live on in the future. It gives us a link to our past; it acts as a tribute to our ancestors; it keeps us hungry for more… (there’s gonna be a lot of that around here!)

So with an Italian touch, we turned a bunch of meat in a pie shell into a rich, hearty Italian sausage scallopini casserole type thing with a polenta topping! A regular old peasant dish, right?! Tell me your mouth is not watering already? Watch as Chef Condo reveals his Cucina secrets play-by-play for all of you paisans out there….

SHEPHERD’S PIE ITALIANO

For this recipe, I’m taking the traditional Shepherd’s Pie (beef and vegetables in a brown gravy topped with a mashed potato crust) and am adding an Italian spin to it. I’m talking sausage scallopini topped with polenta.

This dish is done in three stages:
Stage One – the scallopini
Stage Two – the polenta
Stage Three – combining and baking the two to make the pie

The scallopini (stage one) can be done ahead of time and refrigerated (up to a day). There is a lot of natural flavor coming from the garlic, onions, peppers, mushrooms and sausage, so you don’t have to season much at all. I added a bit of black pepper and some Italian seasonings, and did not use salt at all. You can season to your liking.

The polenta (stage two) requires some time and effort. There’s only four major ingredients (water, cornmeal, salt, parmesan cheese – I also added a bouillon cube for extra flavoring), but you have to be committed for 20 solid minutes of continuous stirring. Otherwise you risk burning the polenta or having it turn out lumpy. You want a nice, smooth texture What I suggest is to get yourself into a zone. Create a relaxed and happy atmosphere to help those minutes just breeze by. Throw on your favorite CD (my go-to is either the Best of Dean Martin or Dave Brubeck’s Time Out), pour a glass of wine and have at it. You’ll reap the rewards, I promise you!

Stage three is the easy part. Pour the scallopini mixture into a medium baking dish, spread the just-done polenta on top, and let it bake for 20-25 minutes. You can hit it under the broiler for a minute or so to crisp up the polenta, if you like. Let sit and cool for a few minutes before serving.

1 lb. ground sweet Italian sausage, removed from casing
2 tblspn olive oil (plus more if needed)
2 cloves garlic, finely chopped
1 small yellow onion, finely chopped
1 green bell pepper, finely chopped
1 portabella mushroom cap, chopped
1 15 oz can tomato sauce
fresh ground black pepper
Italian seasoning
1 cup corn meal
3 cups water
1 tspn salt
1 chicken bouillon cube
1/4 cup parmesan cheese

Heat olive oil in a large sauce pan on medium-high heat, add garlic, heat for one minute. Add ground sausage, breaking up in pan, stir occasionally. When sausage is evenly browned, add onion and peppers, stir. Add mushrooms, stir. When peppers and onions become crisp-tender, add tomato sauce. Season with some fresh ground pepper and Italian seasoning (adjust seasoning to your liking). Stir, cover and simmer on medium-low for about 20-25 minutes, until sauce thickens, stirring occasionally. Remove from heat and set aside (you can prepare the scallopini portion earlier in the day and refrigerate to save time).

In a large sauce pan, place three cups water and bouillon cube, add salt, bring to a boil. Lower water to medium-low. Slowly add cornmeal a little at a time to water, stirring as you add. Do not add cornmeal all at once, or else it will clump. Stir cornmeal into water continuously for 20 minutes. You have to keep up with the stirring to avoid the polenta mixture from burning. About mid-way through, add parmesan cheese, continuing to stir. After 20 minutes, remove from heat.

Pour scallopini mix into a mid-size baking dish. Scoop polenta mixture on top and smooth out (like a cake frosting) to completely cover scallopini. Bake in oven uncovered at 350º for 20-25 minutes. Remove from oven, let sit for a few minutes. Serve and enjoy!

Share

Recent Comments

Archives

powered by
Socialbar