Home » Menu » Recent Articles:

Cinco De Mayo! Apple Cinnamon Empanadas

May 1, 2010 Dessert No Comments

It’s Cinco De Mayo season! The celebration the Mexican Army’s victory at the Battle of Puebla on May 5, 1862 (often confused with Mexico’s Independence Day, which is September 16th). It has also earned it’s rankings as a major “party holiday.” Just as Saint Patty’s Day is celebrated with shamrocks, Guiness and Jameson, many Cinco De Mayo parties will be overflowing with sombreros, Corona, Do Equies, Jose Cuervo and lots of Mexican food.

Although most of my recipes are of the Italian flavor, one dessert that I have made which is very Cinco De Mayo friendly is empanadas. Empinadas are Spanish turnovers (a stuffed bread or pastry), and would make for a great Cinco De Mayo dish. They can be stuffed with meats as a meal or fruits as a dessert. We recently made apple cinnamon empinadas for a Dominican dinner party that our friends hosted, and they went over really well…especially with a few rum & cokes! We used apple pie filling, but we pulsed it a bit in the blender to make it less chunky, but not liquidy. After they were baked, we dusted them with cinnamon sugar.

Now, you know that my Paisan blood would not let a dish like this go without getting a little bit of Italian influence in the mix. So here’s how we’re gonna do that. Take a spoonful or two of Nutella (the creamy hazelnut spread created by Pietro Ferrero during World War II as a chocolate substitute, due to a rashioning of cocoa) and place it in a microwave-safe bowl. Heat it up for 15 seconds, wait 5 seconds, then heat up for another 15 seconds (30 seconds straight will cause it to burn). Place an empanada on a plate next to a small scoop of vanilla ice cream. Drizzle with the melted Nutella for what might be the best dessert you’ll ever have.

Olé!

Apple Cinnamon Empanadas

1/2 cup butter, softened
1 (3 ounce) package cream cheese
1 cup sifted all-purpose flour
1 small can apple pie filling
1/3 cup white sugar
1 teaspoon ground cinnamon
vanilla ice cream
Nutella


DAY BEFORE: Cream butter and cream cheese together until smoothly blended. Beat in the flour. Shape dough into a smooth ball, wrap in foil or cling wrap, and refrigerate overnight or up to a week.

AT BAKING TIME: Remove dough from refrigerator 30 minutes before using. Heat oven to 375º.
Lightly pulse apple pie filling in a blender or food processor to thin it out, but not liquidy.
Roll chilled dough thin*. Cut with 3 inch round cookie cutter or small juice glass. Place small spoonful of filling in center of each round, moisten edges with water.
Fold round over and press edges together. Bake on lightly greased cookie sheet 15 to 20 minutes. Immediately roll in sugar mixed with cinnamon.

Take a spoonful or two of Nutella, and place it in a microwave-safe bowl. Heat it up for 15 seconds, wait 5 seconds, then heat up for another 15 seconds (30 seconds straight will cause it to burn). Place an empanada on a plate next to a small scoop of vanilla ice cream. Drizzle with the melted Nutella.

* If you’re having trouble rolling the dough, add more flour. It’ll make the dough less sticky.

Share

Broiled/Grilled Veggies with Roasted Red Pepper Sauce

April 23, 2010 Entrees, Menu No Comments

I had the urge a few nights ago to make something fun and quick for dinner, using a mix of fresh vegetables. I came up with broiled veggies with a roasted red pepper sauce. My first thought was to grill the veggies – which would have worked great – but I was also juggling ‘daddy duties’ this night, so 20 minutes under the broiler spared me plenty of free time to keep the kids occupied. I went with my grilling/broiling standards: eggplant, zucchini, squash, asparagus and grape tomatoes (would have thrown in some fennel too, if I had some on hand). I did some research on red pepper sauce and found a couple of options: mixed with balsamic, olive oil, garlic and seasonings for a thinner sauce; or mixing with light sour cream and lemon zest for a creamier sauce. I decided on creamier, but instead of sour cream, I went healthy by using fresh guacamole. Unbelievably good! When I say ‘fresh guacamole,’ I mean no jarred guacamole dip (the kind that you find sitting next to the salsa and nacho cheese dip in front of the potato chip rack). Read the ingredients on on the jarred stuff and you’ll know why. If you have the time and the recipe to make a fresh guacamole dip, have at it (and please share the recipe with me!). If not, you can find good, all natural guacamole dips in the produce section of your grocery store. I recommend Wholly Guacamole.
This dish is beneficial in so many ways: it’s healthy, nutritious and tasty; it’s a quick fix for a weeknight (the most time you’ll spend is with chopping up the veggies); and it’s very versatile. It would serve well on it’s own, on top of pasta, rice or chicken, or would work as a side dish at your next grill-out. For an extra kick, try toasting up some garlic bread and use the veggies and sauce as a bruschetta-like topper!

BROILED/ROASTED VEGGIES WITH ROASTED RED PEPPER SAUCE

1 medium eggplant, skin removed, cut up into cubes
1 zucchini, cut up into cubes
1 yellow squash, cut up into cubes
1 bunch asparagus, cut up
1/2 container grape tomatoes (whole or cut in half)
1 clove garlic, minced
olive oil
salt and fresh ground pepper
1 12-oz jar roasted red peppers, drained
1/3 cup fresh guacamole (not jarred guacamole dip)

Place vegetables and garlic into a large mixing bowl. Add a few nice glugs of olive oil, enough to coat all veggies but not so much that they’re swimming in oil. Add some salt and fresh ground pepper. Mix well.

If broiling – pour veggie mix into a baking dish, sit directly under broiler at 450º for 15-20 minutes, stirring once, until slightly charred and tomatoes start to burst.

If grilling – place veggie mix on a sprayed vegetable grill tray. Grill veggies on direct heat until slightly charred and tomatoes start to burst.

*Note – broiling will allow veggies to retain most of it’s juices and the added olive oil, while grilling will allow the veggies to become more charred.

For the sauce – drain peppers of all jarred water. Place peppers in a blender and puree. Add 1/3 cup guacamole and blend until sauce is creamy. Spoon/drizzle a bit of sauce over each serving of vegetables and add additional sauce on the side of the dish for dipping.

Mangiare bene!

Share

Salmon Cakes with Ponzu Dipping Sauce

April 17, 2010 Appetizer, Entrees, Menu 1 Comment

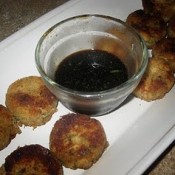
This recipe was influenced by my good friend Lisa, who passed it along as an appetizer suggestion. It is a nice alternative to the traditional crab cake or fish cake. There’s hardly any additional filling, so you’re getting nice chunks of salmon in each bite. You can use fresh salmon, cooked and finely chopped (as Lisa did), or you can use canned salmon (which I chose to do).

Now, here’s the thing on canned salmon. It’s made from top quality salmon, and is only flavored with a pinch of salt. So it’s very nutritional. You’ll notice a couple of varieties. First, you have a choice of traditional (the big cans), or boneless and skinless (the smaller cans). Traditional cans are packed with the skin and tiny, delicate bones. Both the skin and bones are edible…seriously! The salmon is pressure cooked in the cans, so the bones become so soft, they can smushed into the meat with a fork. The bones are also rich in calcium and magnesium. The smaller cans have the skin and bones removed, so the meat resembles the texture of chunk white tuna. The smaller cans cost more, but I prefer no bones or skin in my canned salmon. Next you have a choice of pink or red (sockeye) salmon. The pink is lighter and milder, while the red is more intense in flavor and color. Both work well in all dishes.

I spoke about ponzu sauces a few posts back (click here for previous article). For this version, I’m using low sodium soy sauce as a base, and flavoring it with brown sugar, minced green onions, grated ginger and lime juice.

Thanks, Lisa, for this great recipe suggestion!

SALMON CAKES WITH PONZU DIPPING SAUCE

Salmon Cakes
3 (5 oz.) cans salmon
3/4 c. bread crumbs
1/2 tbsp. lemon juice
1/4 c. finely chopped onion
Pepper to taste
2 tablespoons butter

*Note – the mixture worked well for me without using any eggs as a binding agent. However, you can use an egg to help bind the mixture if you wish.

Mix all ingredients together. Form mini cakes by rolling the batter into meatball-shaped balls and patting down into small cakes. Heat butter in a frying pan. Pan fry 2 to 3 minutes on each side, adding more butter if necessary. Makes 10-12 cakes.

Ponzu Sauce Recipe
1/4 cup of soy sauce
Juice of 1 lime

1-1/2 tsp of brown sugar

1 tbs of minced green onions

1/2 tbs of grated ginger

Mix all ingredients together.

Share

Easter Recap: Breaking Bread

April 12, 2010 Dessert 1 Comment

The decorations have been put away, the candy baskets have been separated and divided, and the last of the ricotta pies have been finished. Another Easter holiday has come and gone. It was a good holiday for us this year filled with family get-togethers, insane amounts of home made food, breads and desserts, a trip to the zoo with the kids, and beautiful spring weather. Aside from a minor ‘ham catching on fire’ incident at my in-law’s house, it was a perfect holiday weekend. There was, however, a slight situation that had me a bit concerned….

In my last post, I wrote about my attempt to make Easter bread this year. I did my research, checked out a good amount of recipes, and put together what I thought would make for a traditional Easter bread. I gave it a test run the week before Easter and got thumbs up across the board. I wrote out the recipe, posted it on my blog and shared it with my readers. Compliments and kudos came in, and a few people even said that they were looking forward to trying the recipe themselves. Mission accomplished, right?

Holy Saturday (the day before Easter) was a particularly busy day. Aside from the regular weekend chores, we decided to take advantage of the gorgeous weather to catch up on some outdoor cleanup. On top of all this, I still had plans to make two of my ‘perfected’ Easter breads. Now, as I’ve written a number of times, I am no baker. I am not familiar with the in’s and out’s of dough, but I do know that the slightest adjustment can screw up your dough like nobody’s business. I followed my recipe to the tee, covered it and let it alone to do it’s thing. I check on it an hour later and it looked nice and poofy, all ready to go…or so I thought.

I don’t know when it happened, how it happened or why it happened, but when I went to punch down the dough, it turned into a gooey mess. Maybe it was the humid weather, maybe not. Whatever it was, it wasn’t dough that could be weaved, braided and twisted as I previously promised. SInce it was now 8:30 at night, I was faced with two options – scrap the dough, hang my head in shame and have no Easter bread to serve for breakfast, or make some sort of compromise. I found that compromise in the form of a tube pan. I figured if I can’t shape the bread, let the bread shape itself. And that it did in the tube pan! What started out as a glop-fest rose into a beautiful, cake-shaped loaf of sweet, fresh bread. A little glaze and some candy sprinkles later, and the bread was saved. It was an Easter miracle!

So, if you tried my recipe and had similar struggles, my heartfelt apologies. But if you own a tube pan, give it a shot next year. I promise you’ll be glad you did!

Share

Recent Comments

Archives

powered by
Socialbar