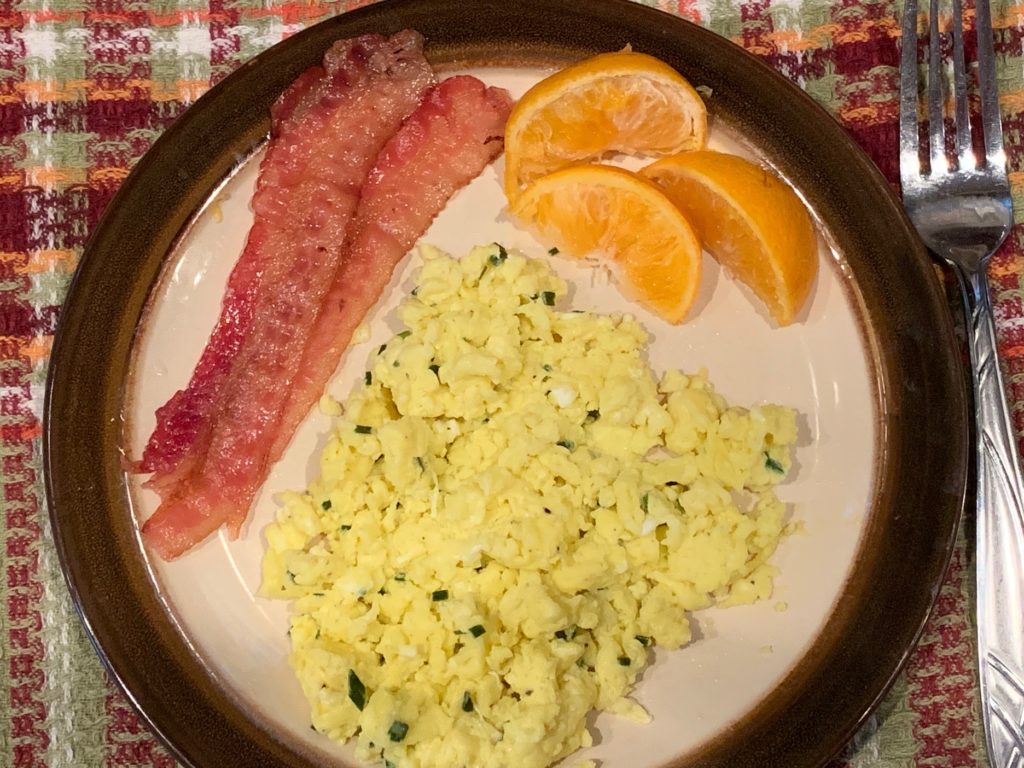
I’d like to share with you a cooking method that I recently discovered to help make really good scrambled eggs. You are probably thinking that scrambled eggs may be one of the easiest recipes to make. It was the first dish that I started making for myself when I was a kid. And I’m sure that you all have your own little ingredient tricks to make your perfect version of scrambled eggs. Some people may prefer to add milk, cheddar cheese, sour cream or creme fraiche. Mine is adding some parmesan cheese and chives along with some salt and pepper. This post is not so much about the recipe, but rather the cooking technique.
Instead of using a traditional frying pan, I have recently started scrambling my eggs in a heated non-stick sauce pan. Using a sauce pan allows you more surface area to get a good scramble going. You can tilt and move the pan while scrambling, without worrying about eggs splashing out all over the stove top. I also like to use the 20-20 method. I start by adding a small pat of butter or drizzle of olive oil to the heated pan. Then I add my scrambled batter to the pan and start scrambling immediately and constantly with a wooden spatula. I keep the pan on the stove for twenty seconds, then I lift and remove the pan for twenty seconds, while continuing to constantly scramble. The eggs will still cook in a heated pan, even if they are not over direct heat the entire time. Twenty seconds back on the stove, then twenty seconds off again. This method gives you more control over getting the eggs to the perfect temperature and texture of your liking. Continue the 20-20 on and off steps until the eggs reach your desired consistency.
So there you have it. Heated sauce pan, repeated pattern of twenty seconds on and twenty seconds off, constant scrambling with a wooden spatula until done to your liking. Now get scrambling!!!
Mini potatoes have always been a bit of a guilty pleasure for me. While they may not be the best choice for practical, everyday use (a five pound bag of russet potatoes often costs less than a bag of minis), they are a great choice when the timing is right. Mini potatoes are very versatile. They are easy to prep, easy to cook, tasty, and they come in a variety of colors. Really, what’s not to like about them?
This particular recipe is a perfect example of how well their miniature size comes in to play. I put this recipe together as an appetizer for a recent get together with friends. The dish is very similar to stuffed mini button mushrooms, only we are using the mini potatoes in place of the mushrooms. Being that I’m not so much of a mushroom fan, this recipe is a good alternative for me.
You can adjust the serving amount to your need, so I decided to make enough to use with two different fillings: a traditional bacon and cheddar filling, and Trader Joe’s Artichoke Antipasto, which happens to be one of my favorite condiments. A pepperoni pizza filling would be a fun option, and a crab filling that you would use with stuffed mushrooms would also work really well with this recipe – and I plan on giving both a try some day. I also chose the multi-color mini potatoes for a bit of variety. You can also go with all red or all white…whatever you prefer. Because this recipe can be adjusted according to how many you need and what filling you would like to use, I am only going to share the basic steps. You can easily adjust measurements and ingredients according to how much you prefer to make. I encourage you to get as creative as you like!
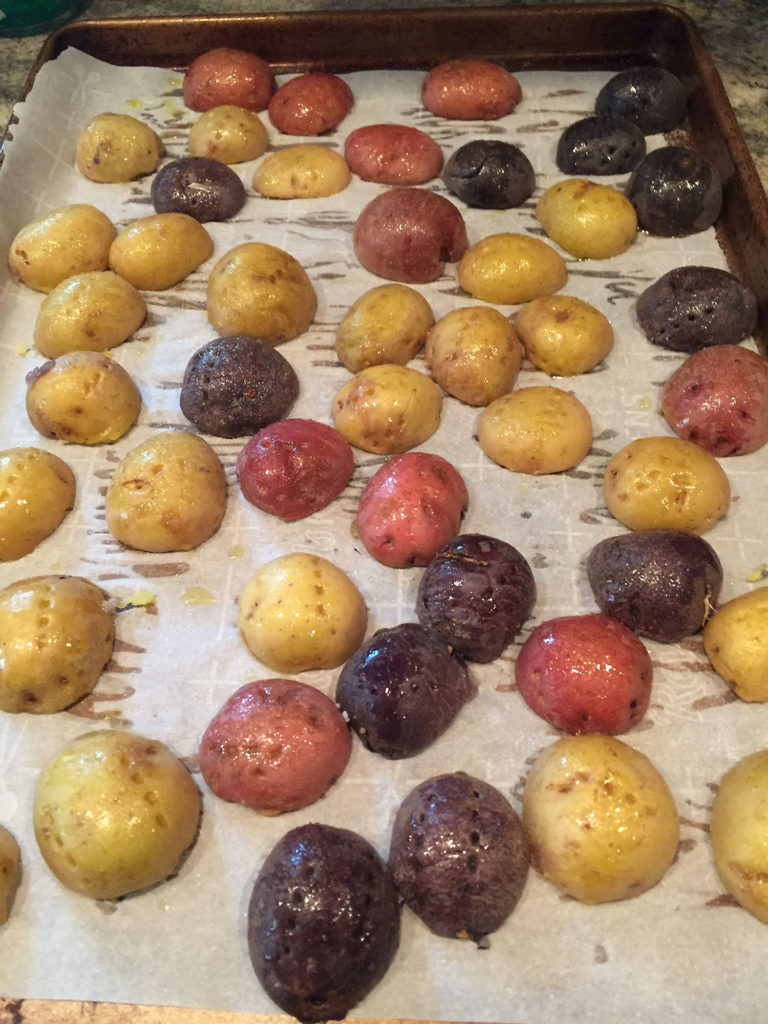
1. The first step is to slightly soften the potatoes so that they can be easily sliced in half and the filling scooped out, leaving a thin layer of potato in tact (in other words, do not scoop it out all the way to the skin). Start by poking the potatoes with a fork a few times. Place the potatoes on a microwave-safe dish, and microwave for 2 minutes. Move the potatoes around a bit, and microwave for another 2 minutes. Remove the potatoes, slice in half and scoop out most of the filling.
The mini potatoes…cut, scraped, brushed with olive oil and seasoned with salt and pepper.
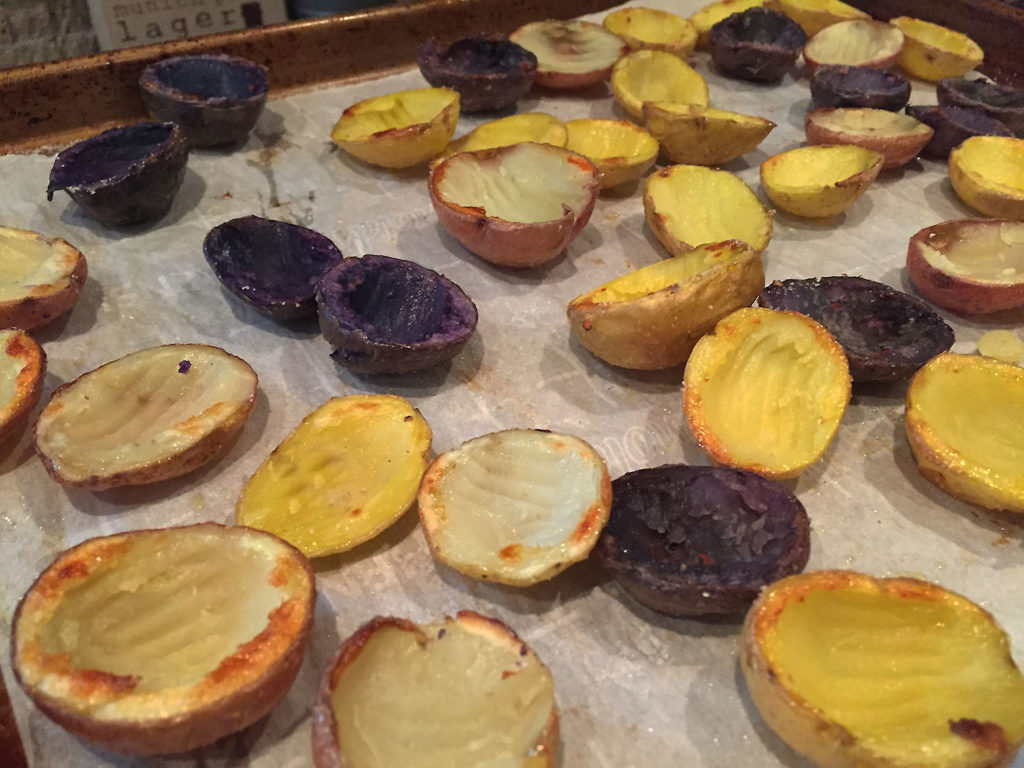
2. Place the potatoes cut side down on a baking sheet lined with parchment paper. Lightly brush the potato skins with olive oil, then sprinkle with a pinch of salt. Bake at 450 degrees for 10 minutes or until the skin starts to brown. Remove from oven and carefully flip the potatoes so they are cut side up.
The potatoes have been baked and flipped, and are now ready to be stuffed.
3. You are now going to add your filling to the potatoes. As mentioned earlier, I chose to sprinkle some shredded cheddar topped with bacon pieces, and I also used a dollop of Trader Joe’s Artichoke Antipasto. Whatever filling you prefer will work well. Place the stuffed potatoes back into the oven for another 8-10 minutes, until your fillings are heated and melted to your liking. Carefully remove from oven, plate, serve and enjoy!
Traditional cheddar and bacon stuffed potatoes.Artichoke Antipasto stuffed potatoes.
Growing up in South Philadelphia, you would think that my food blog would feature the occasional cheesesteak-inspired recipe. Up until this post, my Cheesesteak Egg Rolls recipe was the only recipe that was somewhat related to the beloved South Philly sandwich. Thanks to an all-appetizer Memorial Day Weekend get together with our friends Chrissy, Carl and Lucas, I am now able to add another cheesesteak recipe to my repertoire…and this recipe even comes with a couple of creative variations!
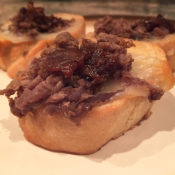
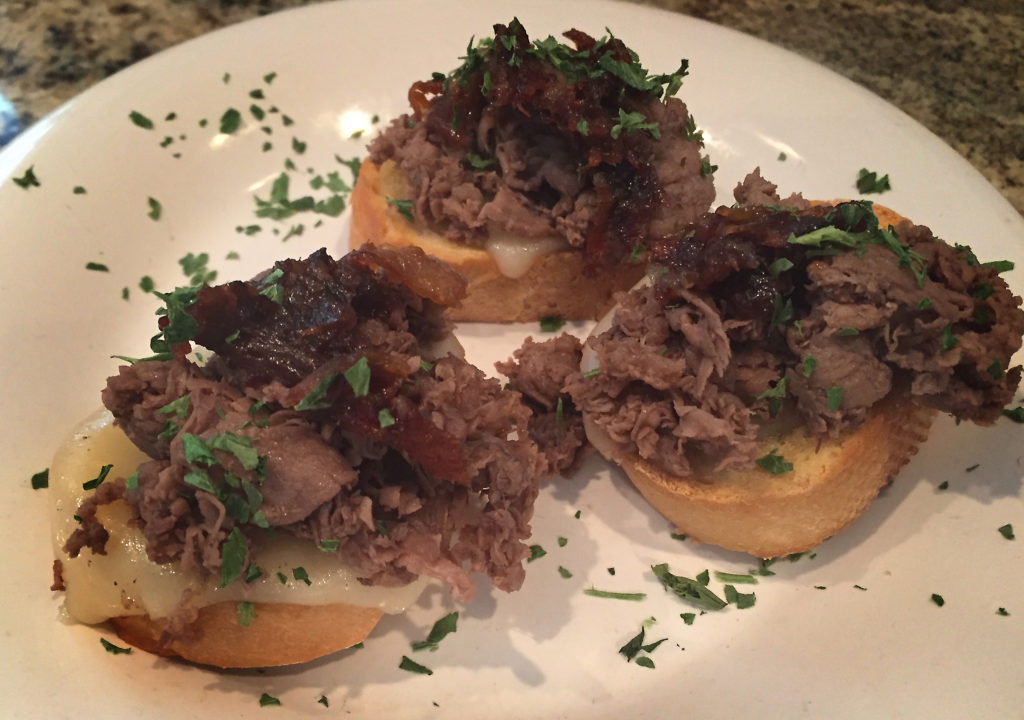
The definition of crostini is a small piece of toasted bread, served with a food topping or spread. Being that a cheesesteak is served on a long roll topped with either Cheese Whiz, provolone or American cheese and the optional fried onions (fondly referred to as a cheesesteak ‘wit’ or ‘witout’ – you leave off the ‘h’ when ordering at one of the classic South Philly joints), a cheesesteak crostini seemed like a match made in heaven. The crostini part itself was very easy. I would slice up a baguette into 1/2 inch slices and toast it with a garlic butter spread until lightly brown. My cheese of choice is provolone, so I would add a half slice of provolone to each crostini toast and continue to heat them until the cheese just starts to melt, then top it with the cooked steak and caramelized onions.
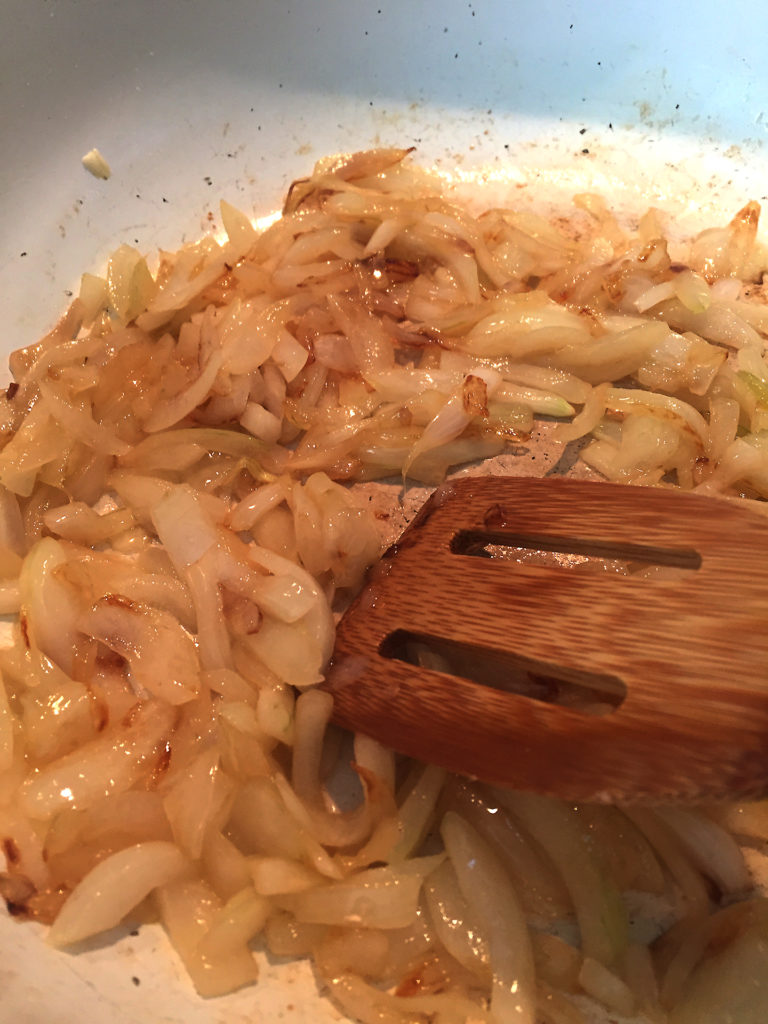
Caramelizing the onions. You can do this up to a day in advance,
The trick to this recipe is what cut of steak to use? My preference for steak sandwich meat has always been ribeye. While I do prefer a more tender fillet when eating a piece of steak, there is simply not enough flavor in a fillet to have it work well in a steak sandwich. The fat content in a ribeye is just enough for good flavor, without making the steak tough or chewy. If in a pinch, frozen sliced sandwich steaks, such as Steak-umms, would also work.
There are a couple of options for purchasing ribeye. You can purchase a piece of ribeye either boneless (or bone-in), or you could purchase finely sliced ribeye. The boneless/bone-in options are the way to go if you would like to prepare the steak on the grill. After cooking the steak for about 5-7 minutes on each side, you’ll let the steak rest as you prepare and grill your crostini toast. Once the steak has rested, you’ll slice it into 1/4 inch slices and top it on the toasted crostini. The finely sliced ribeye is a great option for cooking it on the stovetop as your crostini toasts up in the oven. You’ll also get more steak for your topping with the finely sliced, but without the grilled flavor. Either method will work well!
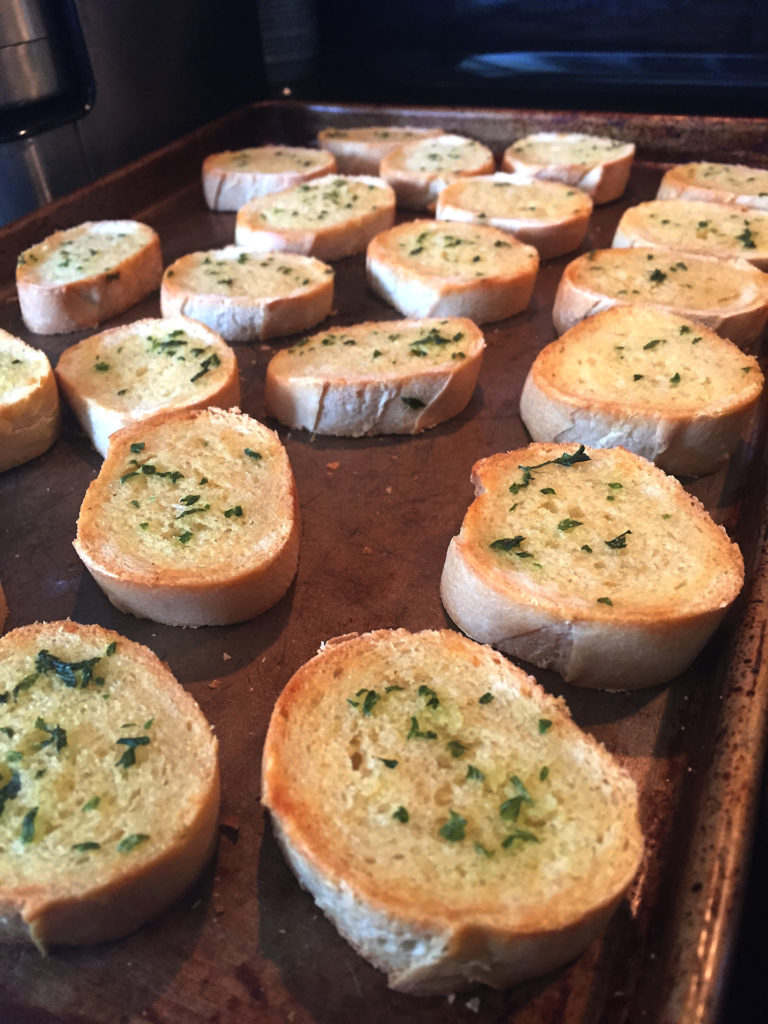
Toasted crostini, fresh out of the oven!
CHEESESTEAK CROSTINI
1 16-ounce boneless ribeye (if preparing on the grill) 1 12-ounce package finely sliced ribeye steak (if preparing on stovetop) Kosher salt and fresh ground pepper Canola or vegetable oil
For the caramelized onions: 2 large yellow onions, peeled 2 tablespoons unsalted butter Kosher salt to taste For caramelized onion recipe, click here. The caramelized onions can be prepared and refrigerated ahead of time. Be sure to remove them from the fridge about a half an hour prior to using.
For the crostini: 1 baguete or loaf of French bread, sliced into twelve 1/2-inch slices 2 tablespoons unsalted butter, melted 1/2 teaspoon garlic powder 1 teaspoon finely chopped parsley 6 slices of provolone cheese, halved
FINELY SLICED RIBEYE ON THE STOVE TOP
Start by preparing the crostini. Mix the melted butter, garlic powder and parsley together. Brush the top of each slice of bread with the melted butter mixture. Place on a baking sheet, buttered side up. Bake at 375 degrees for 10-15 minutes, or until the bread starts to brown. Remove from oven and let sit until the ribeye is done cooking on the stovetop.
Remove the steak from the refrigerator about 10 minutes prior to cooking. Pat the steak dry with a paper towel to remove any excess moisture. Place a large frying pan over high heat. Add one tablespoon of oil to the pan. Place the steak into the pan, season with salt and pepper. Flip and rotate the pieces occasionally with tongs for about 60 seconds, breaking it up into smaller pieces, until the steak begins to brown. The steak is best when medium-rare to medium, so do not overcook. Remove steak from pan and let it rest on a plate for a few minutes.
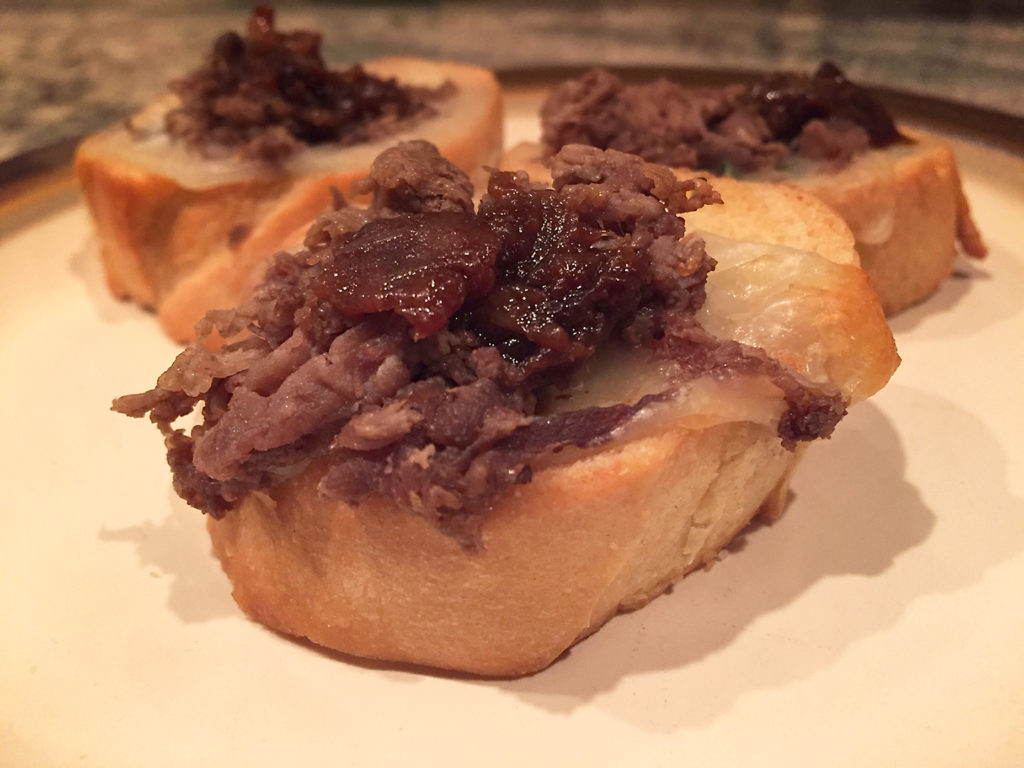
Place a half slice of provolone cheese on each piece of toasted bread. Place the bread back into the oven for about 3-5 minutes, until the cheese starts to melt. Remove from oven, top each slice with a small mound of steak and a bit of caramelized onion.
BONELESS RIBEYE ON THE GRILL
Heat the grill to high. Let the ribeye sit at room temperate, covered, about 20 minutes prior to placing it on the grill. Brush both sides of the steak with the oil and season with the salt and pepper. Place on the grill, cook for about 5-6 minutes on each side for medium-rare steak, a minute or so longer for medium. Transfer the steak to a cutting board, loosely tent with foil and let it rest for about 5 minutes. Once rested, slice the steak into 1/4-inch thick slices.
While the steak is resting, you will prepare the crostini. Mix the melted butter, garlic powder and parsley. Lightly brush one side of the bread and place the bread buttered side down on the grill for 1-2 minutes. Flip the bread, place 1/2 slice of provolone on each piece of bread and let it melt for about 2-3 minutes.
Remove the bread from the grill, top each piece of bread with a slice of the steak and a bit of the caramelized onions.
Meatballs are a very versatile food to use with a slow cooker. Whether you are serving meatballs and sauce at a party, or perhaps preparing a fresh pot of meatballs Swedish style or in a barbecue sauce, the slow cooker is a resourceful and easy-to-use kitchen appliance.
One of our favorite weekday meals is crispy baked meatballs, sans gravy or sauce (many of you may still prefer the more traditional frying method…either choice being perfectly fine). We recently decided to make baked meatballs on a day that we were also planning to head to a matinée movie with the kids. My original goal was to roll and bake the meatballs earlier in the day, and to reheat them in the oven when we returned home. Being a home cook who is always looking for new takes on the traditional, I started to wonder if and how I could put our slow cooker to use.
Normally, a slow cooker would be used to simmer a dish unattended at a low temperature as opposed to baking, boiling or frying. While you can use a slow cooker to prepare dry ingredients such as breads and cakes, a majority of slow cooker recipes incorporate some form of liquid, whether it is produced from a meat that is in the recipe or if the liquid is added by hand. Because the slow cooker operates at such a low temperature, the heated liquid helps the cooking process without actually burning off or evaporating.
However, the whole intention of making crispy baked meatballs was to enjoy them crispy, without having them simmer in a liquid or a sauce. If I were to put the already baked meatballs into a slow cooker without any additional liquid, I may risk having the meatballs dry out and/or burn. It’s doubtful that the already baked meatballs would produce enough juice to heat the meatballs without having them become too dry to enjoy. If I were to add liquid to the slow cooker, they may become soft and lose the desired crunchy taste and texture.
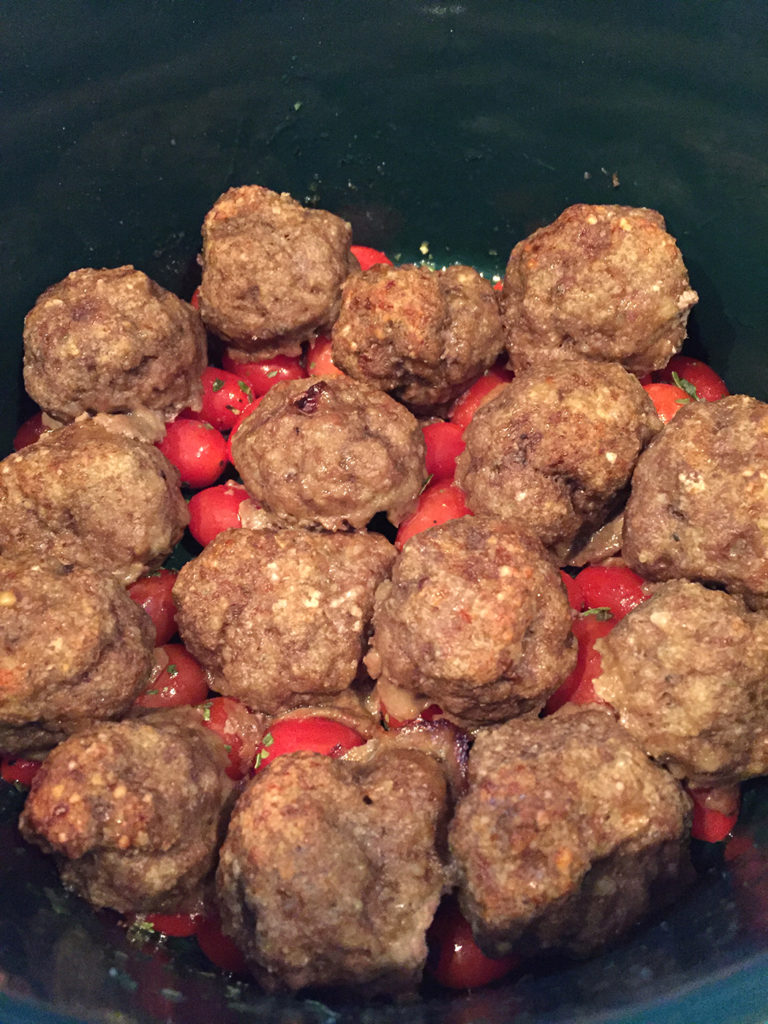
I needed to add something else to the pot that would either produce its own juices or would absorb any other liquid that I may have added, without the risk of having the meatballs turn soggy. The solution ended up being simple and practical. Because my family and I traditionally serve meatballs in Sunday Gravy, I decided to play off of the roots of the sauce ingredients and use grape tomatoes tossed with olive oil, fresh basil, salt and pepper, along with a half cup of broth. By adding the seasoned tomatoes to the bottom of the slow cooker, I now had a bed for the meatballs to sit on without having them come in contact with the broth at the bottom of the slow cooker. The broth would heat up and cause enough moisture in the slow cooker to keep the dish hot, without having to worry about the meatballs soaking in the broth and becoming mushy and losing the desired crunch factor.
Another plus to this solution was that we also ended up with a nice warm tomato salad to serve on the side. Not only was this solution easy and efficient, it also added a rich and flavorful coating to the exposed portions of the meatballs, with no lose of crunch appeal. Of course, you can use a number of different vegetables to achieve the vegetable bed. Seasoned zucchini or squash, or a combination with grape or cherry tomatoes would all work well.
Winner, winner, meatball dinner!
Slow Cooker Baked Meatballs with Seasoned Tomatoes
• 12-15 baked or fried meatballs (follow your favorite meatball recipe) • 1 small container of grape or cherry tomatoes (zucchini and/or yellow squash would also work well) • 1/2 cup broth (beef, chicken or vegetable would all work) • olive oil • salt and pepper • 2 tablespoons chopped basil • Italian seasoning (optional)
Lightly drizzle the tomatoes with olive oil, season with salt and pepper and the chopped basil. Toss to evenly coat. Place the seasoned tomatoes on the bottom of the slow cooker pot. Place the cooked meatballs on top. Pour the broth over the meatballs. Season with additional Italian seasoning if you prefer. Set the slow cooker to low for 6-7 hours. Serve the meatballs along side the cooked tomatoes and enjoy!
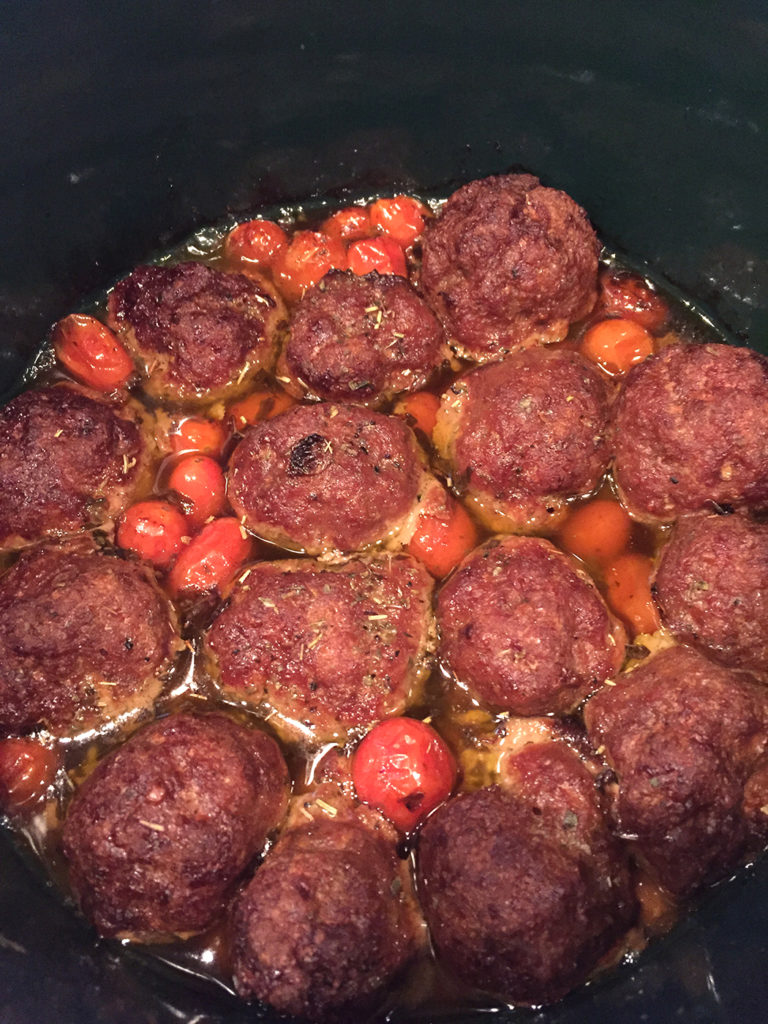
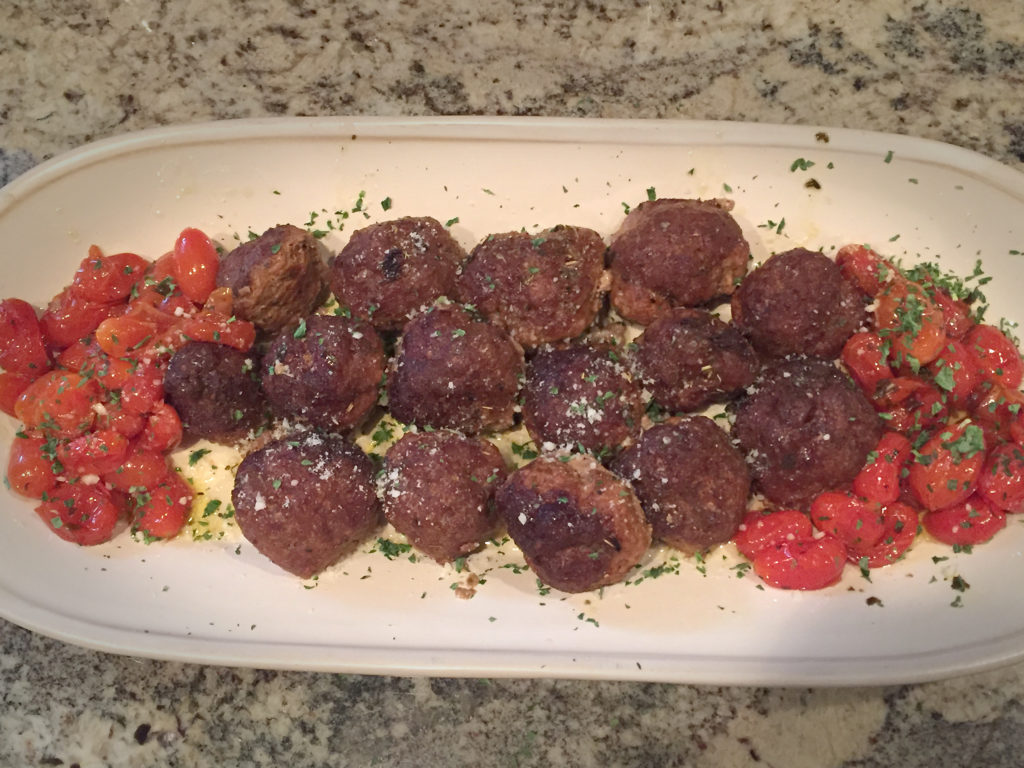
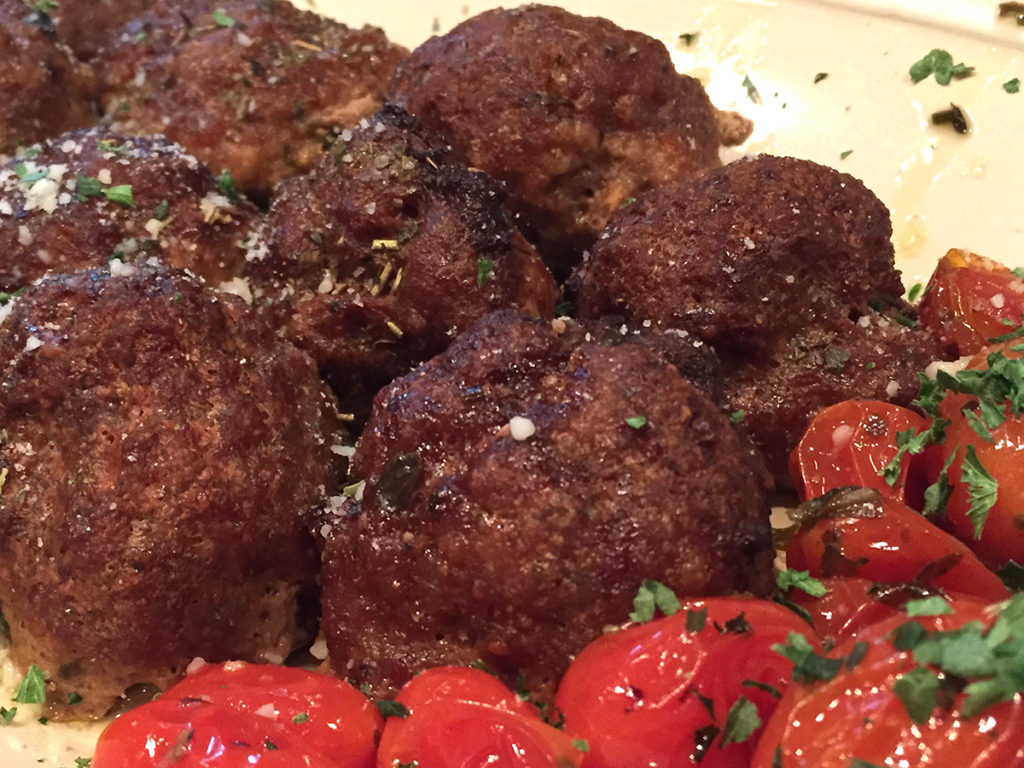
Baked meatballs placed on a bed of seasoned grape tomatoes.Six hours of being cooked at a low temperature produces a rich and robust coating on the still-crispy meatballs.The slow-cooked tomatoes become a perfect and flavorful side dish to the meatballs, dusted with parmesan cheese and parsley.Crispy and delicious!


Recent Comments