Recent Articles:

Honey-Butter Salt and Pepper Wings

February 16, 2017 Appetizer, Entrees, Menu No Comments

I was never a huge fan of easy pickin’ foods that are slathered with sauce. Whenever I grill ribs or chicken, I always opt for a nice dry rub as opposed to brushing it with barbecue sauce. Because of this, chicken wings are not usually on my radar. And when they are, I am very particular on how they are prepared. I don’t like them breaded, I don’t like them fatty and I don’t like them floating in a sauce bath. This past Superbowl weekend, I decided it was time to give it go and figure out how to prepare wings to my liking.

The last time that I had enjoyed wings, they were prepared with just a salt and pepper rub on them, and they were finger-licking good. The salt and pepper blend was baked perfectly into the juicy chicken meat, making the plate of tiny wings and drumsticks truly addicting. This was the recipe that I decided I was going to start with for my game-day party plate.

Te recipe that I used was very simple: 1 teaspoon of salt and 1 teaspoon of pepper, combined, for each pound of wings (which is approximately a dozen wings). Making the adjustments for a larger batch would be simple using the ratio of 1:1:1 (meaning 1 teaspoon salt and 1 teaspoon pepper per 1 pound of wings). The challenge that I had was how to properly cook them. Frying is the traditional method used to cook the perfect crispy and meaty wing, rendering off any of the unnecessary fat. But my preference is almost always baking over frying. However, baking wings often leaves the skin a bit fatty, which is one of my wing no-nos. In order to achieve the desired crispness, you really have to crank your oven temperature up to at least 425˚. While the higher temperature will help achieve the desired texture, the high-heated fat will start to splatter, which will lead to a smoky oven. Not fun if you have a smoke alarm close to your kitchen quarters.

This is where celebrity chef Alton Brown’s admirable food and science knowledge comes in to play.

Alton’s method is to steam the wings prior to baking them. As Alton says, “the trick is to steam them first to render out a lot of the fat. Then you cool them to tighten the skin.” This step, which does involve a little bit of labor, will help cut back heavily on oven splatter, since much of the fat has been rendered off. The end result is a beautiful crispy and flavorful wing, without a smoke-filled kitchen when you remove the tray from the oven!

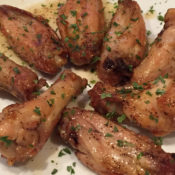
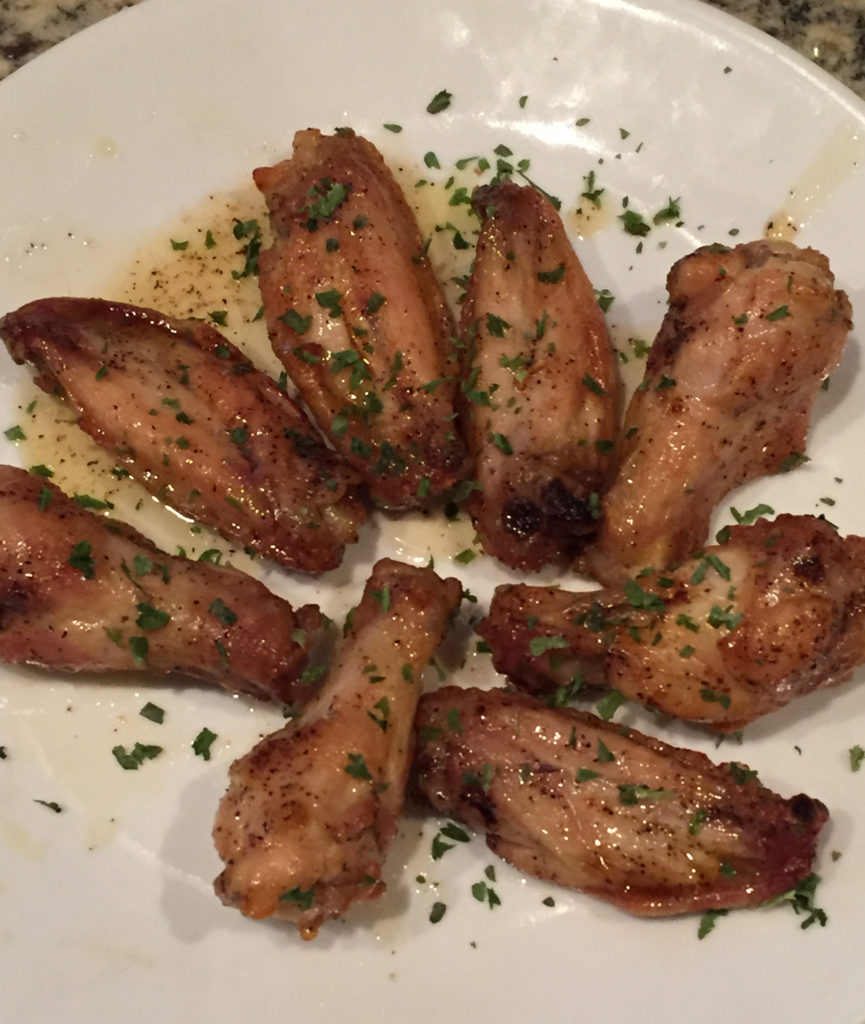
As I mentioned earlier, I am not a big fan of wings that are slathered in sauce. But I also did not want serve wings that were too dry. Because my wife and kids do not like hot or spicy food, I opted to make a sweet honey-butter sauce that I would quickly toss over the wings. This quick sauce was just enough to coat the wings, and was a great complement to the salt and pepper rub. Just enough of a sweet coating without over-saturating the wings.

Below is the step-by-step process to my wings. Again, you can use the ratio method of 1:1:1 for the salt and pepper rub. The honey and butter measurements for the coating can be increased per pound as well.  The ingredients are simply a starting point. Additional spices can be added to the rub, and hot sauce can be added to the honey-butter coating to your liking.


Honey-Butter Salt and Pepper Wings

Makes approximately one dozen wings.

1 pound party chicken wings
1 teaspoon salt
1 teaspoon pepper
2 tablespoons butter
1 tablespoon honey
(optional – fresh chopped parsley for garnish)


Step 1: Steaming the Wings

This is Alton Brown’s method for steaming the wings. This step helps render the chicken fat, which will reduce the amount of splatter and oven smoke while baking. You can eliminate this step if you do not have a steamer basket, but there will be some oven smoke and splatter made while baking.

For Alton Brown’s complete Buffalo Wing recipe, click here

Load a 6-quart saucepan with a steamer basket and 1 inch of water in the bottom, over high heat, cover and bring to a boil.

Place the wings into the steamer basket, cover, reduce the heat to medium and steam for 10 minutes. Remove the wings from the basket and carefully pat dry. Lay the wings out on a cooling rack set in a half sheet pan lined with paper towels and refrigerate for one hour. You can do the wings in batches if you can’t fit them all into the steamer basket at once.


Step 2: Coating and Baking the Wings

Preheat the oven to 425˚. Combine the salt and pepper. Once the wings have completely cooled and dried, coat the wings on both sides with the salt and pepper rub. Either place the wings on a small rack sitting in a baking dish (my preference for even cooking), or place the wings on a baking sheet lined with parchment paper.

Bake the wings on the middle rack of your oven for 20 minutes. Flip the wings and bake for another 20 minutes, or until golden brown.


Step 3: The Honey-Butter Coating

While the wings are in the final 20 minutes of baking, you can prepare the honey-butter coating. Melt the butter in a sauce pan. Add the honey, stir well and continue to heat until warm and thoroughly combined.

*Note – you can add hot sauce or spices to your liking to add heat to the honey-butter coating.

Once the wings are done, toss them with the honey-butter coating. Sprinkle the wings with some fresh chopped parsley, serve and enjoy!


Share

Game Day Empanadas!

February 2, 2017 Menu No Comments

Superbowl Sunday is like the Thanksgiving holiday for party foods. Everything from pizza, wings and ribs, to sandwiches, salads and dips are all well represented at any game day festivity. And not unlike turkey day, you will most likely overindulge. But it’s one day out of the year, so strap on your stretchy pants and enjoy!

The key to a successful game day party, and the reason why this menu works so well, is because you want to have easy access to low maintenance food. Even if you’re not fully wrapped up in the game, you’ll still be entertained by other party goers, the commercials, and maybe even the half time show. This leaves little time to sit down and enjoy a traditional meal that requires significant time away from the action. The idea that I’m sharing with you today can incorporate just about any of the go-to game day foods into a convenient, almost bite-sized pastry pocket.

Empanadas, a Latin-American inspired dish, are pastry pockets that are fried or baked, and can be stuffed with just about any combination of food and spice. You can find recipes that have various fillings, from savory (beef, chicken, pork, rice, vegetables with herbs), to sweet (chocolate, fruit, custards). Fried empanadas will give you more of a crunchy exterior with a soft inside, while baking will make more of an even-cooked, pie-crust texture. You can decide which method is best, based on your choice of filling or your cooking preference.

You can click here for a basic empanada dough recipe.

As I mentioned earlier, there are countless recipes available online that you can search out based on what you have in mind. Or you can get creative and come up with your own filling combination. Many of the game day foods that I mentioned earlier would make for fantastic empanada fillings. For example, you can go with:

  • A buffalo or barbecue chicken filling.
  • How about a cheese steak or a roast pork filling?
  • Better yet, a meatball mozzarella filling!
  • A jalapeño popper filled empanada would be considered a real touch down (yeah, I went there).
  • You can go all in this year and serve Superbowl team-related foods, like New England lobster empanadas as an appetizer and Georgia peach empanadas for dessert.

As you can see, you can cover all of your party foods by serving them empanada-style. What’s nice about this method is that you can take care of all preparation well ahead of time if you are hosting. Baking the empanadas during the party will allow you plenty of free time to mingle with your guests. And if you are bringing empanadas to a party, have the empanadas prepared and ready to be baked at the party, so they are served fresh. Just be sure to let your party host know that you will need use of their oven for about a half an hour.


image courtesy of istockphoto.com


As I’m sitting here writing, I’m still unsure of what fillings I am going to use in my game day empanadas. I do know that I will in some fashion be using ricotta salata, which is a pressed, dried and salted ricotta that can be shaved, grated or cut into cubes…and according to my cheese monger, will make for a perfect empanada filling. I’m thinking I’ll mix it with some fresh herbs, but that’ll most likely be a game day decision. My daughters also put in a request for chicken, bacon and cheddar filled empanadas.

Below is a link to my Apple Cinnamon empanada recipe, which I shared as a Cinco de Mayo feature a few years back. I have also shared my recipe for Mini Inside-Out Pizza, which pretty much qualifies as an empanada. The link to that recipe is also below.

Dom’s Apple Cinnamon Empanadas
Dom’s Mini Inside-Out Pizza


While doing my research for this post, I came across some great resources, one of which really offers incredible ideas for a wide variety of empanadas. Laylita.com, which is a fantastic food website, has an entire section dedicated to empanadas. Everything from basic dough recipes to cooking techniques to a beautiful and extensive list of tasty suggestions…it is the Empanada 101 guide, and you can find a link to that site below as well.

Laylita’s Empanada 101 Guide


Whatever empanada recipe you decide to use or create, be sure to make plenty. These are a guarantee party food touchdown!

image courtesy of istockphoto.com


BEER HERE!

If you really want to score some extra crowd points, don’t forget the beer! My game day pick is anything by Samuel Adams or Sweetwater Brewing Company. Both breweries produce quality beer, and are a good choice to represent the New England and Atlanta regions at your game day party.


Share

Sunday Funday: Kitchen Time with the Kids

January 17, 2017 Menu No Comments

Sundays are always a productive day for me to spend in the kitchen. Whether it’s spent stirring a gurgling pot of meatballs and sausage in red gravy while listening to Sinatra croon in the background, or preparing a handful of meals for the upcoming week, it’s time that I look forward to (and start mapping out with a full shopping list) about 3 or 4 days prior. Now that we have settled into the cold winter months – when we are often stuck inside, trying to find activities that don’t involve a cell phone or other electronic devices – it’s the perfect opportunity to get the kids involved with preparing the family meals. I’ve always found it beneficial to get my kids involved with cooking for a number or reasons. Not only are you spending quality time with the kids, you are also teaching them life skills and encouraging their creativity. I have also found that kids are more willing to sample different types of foods if they had a hand in creating it. If one of our daughters helped stir a pot of soup when they were younger, it became their soup. Naturally, they’re going to eat what is theirs. So you see, it’s a win-win situation! Below is a recap of the two dishes that I got to make this past Sunday with our daughter, Ava.


Home-made Gnocchi

Home-made pasta is always a fun meal to make with kids. You get to use your hands to mix and form a huge dough ball, then roll it through a hand-cranked machine or press it with a stamp to make fun shapes. Sounds a lot like playing with Play-Doh, doesn’t it? Making home-made gnocchi is especially easy because it does not require any special tools. All you need is a few basic ingredients and some counter space to roll out your dough. With adequate parental supervision (and clean hands), you child can learn how to shape and safely cut the dough into mini dumplings. After a quick boil (I strongly suggest the parents handle this portion of the project) your family will have a delicious bowl of delicate, pillowy purses of fresh pasta, perfect for serving with a traditional red gravy or a nice butter sauce accented with parmesan cheese, garlic and sage!  You can also make gnocchi ahead of time and freeze it for future use, like we did.

Here are a couple easy home-made gnocchi recipes, along with my favorite savory brown butter sage sauce recipe:

Gnocchicourtesy of allcecipes.com
http://allrecipes.com/recipe/18465/gnocchi-i/

Lidia Bastianich’s Butternut Squash Gnocchicourtesy of alexandracooks.com
http://www.alexandracooks.com/2010/10/31/lidia-bastianichs-butternut-squash-gnocchi-with-sage-brown-butter/

Butter and Sage Saucecourtesy of foodnetwork.com/Mario Batali
http://www.foodnetwork.com/recipes/mario-batali/butter-and-sage-sauce-recipe.html


Home-made Whipped Cream

Dessert is always a child’s favorite meal. A rich and decadent, gooey sweet treat is enough to get someone young or old to start salivating. But dessert doesn’t always have to be over-the-top to be enjoyable. One of the easiest and most versatile desserts to make is a light and fluffy home made whipped cream. Whether you are using it as topping on a pie or brownie, dolloped in a mug of hot cocoa, or as a dip with fresh fruit, a bowl of fresh made whipped cream will always be better than any store bought can or tub. You will need either a hand mixer or a stand mixer to properly make home made whipped cream, but again this is a recipe that a child could easily help make – with proper supervision, of course.

Here is a simple and easy recipe for home made whipped cream:

1/2 pint heavy whipping cream
1 tbspn powdered sugar
1 tspn vanilla extract

Combine cream, powdered sugar and vanilla extract in a chilled mixing bowl. Using a hand mixer or a stand mixer, mix together until soft peaks form. Cover and refrigerate until ready to use.

As you can see from the photos below, we had a lot of fun in the kitchen this past weekend. Both Ava and I walked away from the cleaned-up kitchen feeling a sense of accomplishment and pride. I look forward to spending many more days in the kitchen with my kids, and I will be sure to share those experiences with you here on my food blog. Please feel free to share with me your stories of kitchen time with your kids by writing to info@domskitchen.com. They are moments to be cherished, for sure!

Pillowy gnocchi, rolled out and cut. Ready to be boiled or frozen.


Careful cutting skills in action. Fingers curled to avoid any injuries!


Ava’s favorite kitchen gadget…the stand-up mixer.


Scooping out the fresh whipped cream.


Ava and Jules – proud of their creations!

Share

Vodka Cream Sauce

December 27, 2016 Menu No Comments

Vodka cream sauce is my favorite alternative to a traditional red pasta sauce…aka gravy! While it may be tempting to simply grab one of the jarred varieties available in your grocery store, making a home made vodka cream sauce is not all that complicated. You do need to dedicate a little bit of time to allow the flavors to marry, and allow the sauce to thicken to the perfect creamy consistency. If you are a regular follower of my food blog, you probably know by now that I focus on low-fat alternatives to rich and creamy foods as often as I can. Unfortunately, this is not one of those recipes. Butter and cream substitutes aren’t going to give you a true, rich and tasty vodka cream sauce. But hey, you have to enjoy life to the fullest once in a while…why not enjoy it with a yummy pasta dish?

You may be curious as to why vodka is used in this classic recipe. From what I’ve learned, its purpose is to help release additional flavors from the tomatoes which are normally not released during a traditional cooking process. This is the same reason why certain recipes call for the addition of wine or other alcohols. The vodka also acts as an emulsifier. The oil from the cream would typically separate when it interacts with the acidic tomatoes. The addition of the vodka helps to prevent this from happening.

You can build on the ingredients and taste if you like. For additional spice, try adding a bit of crushed red pepper. If you are really in a creative mood, add a can of crab meat and some cooked chopped asparagus. Whatever way you choose to enjoy this recipe, I guarantee it will put a smile on your face.


Vodka Cream Sauce

Makes enough for 6-8 servings, with 1 lb of cooked pasta
Total cooking time: approximately 1 hour, 30 minutes

2 shallots, diced
1/2 cup butter
1 cup vodka
2 28-oz cans crushed tomatoes
1/2 pint heavy whipping cream
1 tbspn grated parmesan cheese
2 tbsp fresh chopped basil
*optional – 1 tspn sugar

Melt butter in a large skillet or pan over medium heat. Add shallots, sauté until soft. Add vodka, let cook for 10 minutes. Add the crushed tomatoes and one tbspn of fresh chopped basil. Stir together. Lower heat to medium-low, let simmer for 30 minutes, stirring occasionally. Add the heavy whipping cream and parmesan cheese. Stir together. Lower heat to medium-low, let simmer for another 30 minutes, stirring occasionally. Give the sauce a taste. You can add a tspn of sugar to help sweeten it up a bit. Add the second tbsp of fresh chopped basil during the last 10 minutes of cooking. Serves well with penne, rigatoni or your choice of ravioli.

To make enough sauce for a half pound of pasta, simply cut the recipe in half. However, be sure to follow the same cooking time.


Stirring the sauce.

Plated and ready to serve!

Share

Recent Comments

Archives

powered by
Socialbar