Cream Sauces Part 1: Red Pepper Cream Sauce
Without a doubt, one of the most popular cream-based sauces used in Italian-American cuisine is the classic alfredo sauce. Named after Roman restauranteur Alfredo DiLelio, this rich and creamy sauce is the perfect combination of butter, cream and Parmigiano-Reggiano cheese. For those who are more health-conscious these days, it is also a heavy and decadent meal that is often referred to as ‘a heart attack on a plate’ and should only be enjoyed every so often. But if you are a fan of cream sauces, there are less fattening options, and many of them start with the timeless French-inspired white béchamel sauce.
For this post, I’ll be sharing with you the basic steps for a classic béchamel sauce, along with other popular cream sauces that use a béchamel as its backbone, including my very own Red Pepper Cream Sauce. In my upcoming post, I’m going to take it even further with a hybrid combination of béchamel-based sauces mixed with sautéed eggplant. But first, let’s start off with the basics of béchamel.
According to thekitchn.com, béchamel is known as one of the classic French “mother sauces” that form the basis of much French cuisine. It is a simple, relatively low-fat sauce that uses just a few basic ingredients (equal parts unsalted butter and flour, hot milk, salt and fresh ground pepper) which are cooked until smooth and creamy. The sauce can then be used in a variety of dishes, from soufflés and pastas to a creamy topping for vegetables. It is also a key ingredient in the popular Greek dish, Moussaka.
The first step to a classic béchamel is to make a roux, which is a combination of equal parts melted butter and flour combined in a sauce pan until it makes a light bubbling paste (making sure not to let it brown while cooking). Next, you stir in hot milk, bring to a boil and continue to stir until it thickens to your liking. Season with salt and pepper, and your béchamel is ready to go. You can control the consistency of your béchamel by adjusting your ingredients accordingly. A light roux (one tablespoon of flour and butter per serving of milk) would make for a thin sauce. Two tablespoons of each would make for a slightly thicker sauce, and three tablespoons of each would make for an extra thick sauce. You can also control the amount of milk in your béchamel.
From here, you can add additional ingredients to your béchamel to make more flavorful cream sauces:
• A mornay sauce has shredded or grated cheese added to it. Mornay is a nice alternative to an alfredo sauce. It has a similar cheesy taste and consistency, but is lighter because you are using milk instead of heavy cream.
• A soubise sauce is a béchamel with the addition of puréed onions and serves well with vegetables and meats, such as roasted pork and baked chicken.
• A velouté sauce replaces milk with a stock as its primary liquid (such as vegetable, chicken, beef or shellfish), and serves well with vegetables, chicken and seafood.
Now that we have the basic béchamel and some of it’s influenced sauces covered, let’s move on to my Red Pepper Cream Sauce.
Red Pepper Cream Sauce
Makes 2 cups
2 tbspn unsalted butter
2 tbspn flour
1-1/2 cups 2% milk*, heated (heating the milk in the microwave for one minute will work well)
6 oz roasted red peppers, puréed
salt and pepper to taste
*2% milk gives a nice consistency. You can also use whole or 1% milk if that is what you have on hand. The lighter the fat content, the thinner the sauce.
In a medium sauce pan over medium heat, melt the butter until it starts to bubble, but does not brown. Add the flour to the melted butter, about 1/2 tbspn at a time, stirring with a wooden spoon as you add. Once you add all of the flour, stir until it forms a roux, or a golden, bubbly texture that looks like an egg batter. If your roux is too thin, you can add an extra pinch of flour. Again, be sure not to let it brown. If the roux does start to brown, remove the pan from the heat and continue to stir. Add the milk a little at a time, whisking thoroughly as you add. The first bit of milk will turn the roux into a pasty consistency. As you add and whisk more milk the texture will become creamy. Continue a constant whisk until the mixture is creamy and all of the roux is incorporated into the milk. Next, you want to slowly add and mix in the puréed peppers. Taste as you add the peppers. You may find that an amount less than the 6 ounces is to your taste. Once you have the peppers whisked in, season to taste with salt and pepper.
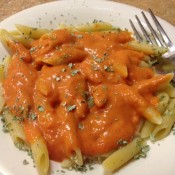
Serve over ziti or penne and enjoy!
For step-by-step photos on how to prepare a béchamel sauce, including photos on how your roux should look, click here. The measurements on the link are a bit different than mine, but the photos are good references.







Recent Comments