Recent Articles:

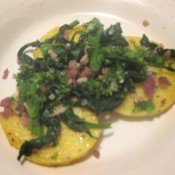
Polenta with Greens

March 21, 2012 Appetizer, Menu No Comments

One of my favorite parts of a traditional Italian meal is the side dishes. Some of the most popular traditional side dishes consist of a fresh-picked green (mostly either broccoli rabe, swiss chard, escarole or spinach), usually sautéed in garlic and olive oil. Today, I’m showing you how you can double your pleasure by simply combining Italian greens with my other favorite side dish…polenta! Polenta of course, is a hearty, stick-to-your-ribs meal that is made by stirring together cornmeal and heated liquid, until you get a thick, slightly creamy, slightly mushy consistency. By adding greens to polenta, you not only get a good balance of hearty and healthy, but you also get a tasty old world combination that in my opinion goes toe-to-toe with any other traditional dish that you could name.

The prepping and serving of this dish is incredibly simple…once you get past the 20+ minute marathon of stirring and mixing the polenta (you can click here for Giada DeLaurentiis’ step-by-step instructions on how to prepare polenta). Once you have gotten past the polenta preparation, the rest is simple. Just steam and sauté your greens, and serve on top of a bed of polenta. If you’re feeling rustic, just mix it all together. If you’re going for presentation, gently pile the greens on top of the polenta and top with some fresh shaved parmesan cheese.

My personal favorite green to cook with, especially for this dish, is broccoli rabe. The slight bitterness is the perfect combination for the sweet, creamy polenta. You can add some tasty accent to the rabe by cooking it up with some onion and garlic, and even a little pancetta or bacon for an extra treat.

If you’re looking to make this during the week but don’t have the time to prepare a fresh batch of polenta, simply pick up one of the pre-cooked polenta tubes that are located in the produce section of your grocery store. I use these often, as they are very easy to prepare. Simply slice the polenta up into 1/2 inch slices, drizzle with olive oil, salt and pepper, and bake at 350˚ for about 10 minutes, or until crispy enough to your likeness. You can prepare the broccoli rabe on the stove top at the same time, and have this delicious meal on your table within 15 minutes!

POLENTA WITH GREENS

1. Preparing the Polenta
Courtesy of Giada DeLaurentiis
• 6 cups water
• 2 teaspoons salt
• 1 3/4 cups yellow cornmeal
• 3 tablespoons unsalted butter

Bring 6 cups of water to a boil in a heavy large saucepan. Add 2 teaspoons of salt. Gradually whisk in the cornmeal. Reduce the heat to low and cook until the mixture thickens and the cornmeal is tender, stirring often, about 15 minutes. Turn off the heat. Add the butter, and stir until melted.

2. Preparing the Greens
• 2 lbs broccoli rabe, cut into 2-inch lengths, thick stems discarded
• 2 tablespoons plus 1 tablespoon extra-virgin olive oil
• 4 large garlic cloves, thinly sliced
• Salt and freshly ground pepper to taste
• (Optional – 1/4 lb pancetta, sliced 1/8 inch thick and cut into tiny cubes)

In a large saucepan, bring 2 quarts of salted water to a boil. Add the broccoli rabe and cook until just tender, about 5 minutes. Drain, shaking off the excess water. Wipe out the saucepan.

Add two tablespoons olive oil and pancetta to saucepan and cook over moderately low heat, stirring often, until the pancetta is golden, 8 to 10 minutes.

Add the garlic to pancetta and cook, stirring, until golden, about 3 minutes. Add the broccoli rabe to the pancetta, season with salt and pepper and cook over moderately high heat until tender, 3 to 4 minutes.

Again, pancetta is optional – you can skip adding if you prefer.

3. Combining the Polenta and the Greens
When polenta and greens are done, you can either plate individual servings, by placing some greens on a bed of polenta, or you can serve family style by combining both in to a large serving bowl.

Share

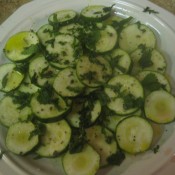
Zucchini Carpaccio

This week, health and wellness expert Joe Sammartino shares with us an incredibly simple recipe for zucchini squash. By using just a handful of everyday ingredients, the end result is a delicious and fresh-tasting zucchini salad that is packed with lots of healthy benefits. I have tried this dish and have to agree with Joe…it is unbelievably tasty! You can take it a few steps further than the recipe below by adding crushed red pepper for spice, or fresh shaved parmesan for a beautiful accent. You can also substitute lemon or lime juice for the red wine vinegar if you wish. Try it first as is, then adjust to your liking. If you like zucchini, you’ll love this dish!

ZUCCHINI CARPACCIO
Submitted by Joe Sammartino

Here is something you can do to spice up some summer squash First off it is high in vitamins and minerals. It’s high in vitamin A (for eye site), vitamin C (for tissue growth and repair), Riboflavin (for red blood cell production), and Manganese (for immune system). Just some nutrition info!!

Ingredients:
3 zucchini squash
2 tbspn olive oil
1 tbson red wine vinegar
salt and pepper to taste
2 tbspn chopped fresh mint

Directions:
Take a serrated knife to thinly slice 3 zucchini lengthwise. Arrange slices on a salad plate; drizzle on 2 tablespoons of olive oil and 1 tablespoon red-wine vinegar, and add salt and pepper to your taste. Sprinkle with 2 tablespoons chopped fresh mint. Let the slices marinate about 20 min at room temp before serving.

This will make 4 servings.

I have had Zucchini so many ways but, this was tasty.

Share

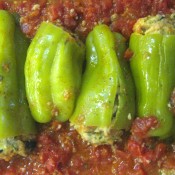
Aunt Tina’s Stuffed Peppers

February 25, 2012 Appetizer, Entrees, Menu 5 Comments

One of the biggest thrills that comes with writing this blog is being able to share some of my family’s recipes. For this post I am very honored to share with you a stuffed pepper recipe inspired by my Aunt Tina. I use the word ‘inspired’ because, like most Italian family recipes, exact measurements were not specific. This, of course, is the beauty and charm of family recipes. Like one of life’s lessons, you are given just enough instruction and guidance to get started, allowing you to discover and adjust the end results on your own terms. And after a couple of attempts and a few adjustments here and there (the more seasoning, the better), I’ve got to say that this stuffed pepper recipe may be one of my all time favorites!

Another trait that comes with Italian cooking is that, no matter how hard you try, there’s always someone in the family who can cook circles around you. I am fortunate to have a few people in my family who are amazing in the kitchen, and my Aunt Tina is definitely one of them. Anytime my parents would talk about one of her recipes, it is always accompanied with  “my God, it was so good!” or “ohh, you should taste how Aunt Tina makes it.” WIth that said, I’m sure that my attempt at this pepper recipe doesn’t come close to how Aunt Tina would make them. But I am definitely sure that you will like them nonetheless. Just be sure to use fresh ingredients, and don’t hold back on the seasoning…and you’ll be good to go!

Thank you Aunt Tina for sharing!

AUNT TINA’S STUFFED PEPPERS
Measurements were approximated, adjust taste to your liking!

Ingredients:

6-8 cubanelle (Italian frying) peppers

stuffing mixture:
2 cups cubed bread stuffing
4 eggs
1/4 cup grated cheese
1 tbson parsley
salt & pepper to taste
1 tspn garlic powder
1 tbspn fresh basil (plus another 1 tspn for sauce)
you can also add chopped olives, mushrooms, and provolone or blue cheese…whatever your preference is.

1tbspn chopped garlic
cut up plum tomatoes (I used a 12.5oz can of diced tomatoes)

Directions:

Cut off top of peppers, clean out. Mix all stuffing ingredients together, stuff into peppers.

Take a large skillet coated with olive oil, add chopped garlic, let brown. Add tomatoes and  additional fresh basil.

Add peppers to skillet, let cook on medium to low heat for about 20 minutes. Lower heat, put lid on and let cook another 25-30 minutes.

You can add some water, chicken broth and some white wine for additional flavor. Season to taste with salt and black pepper.

*Because this is a meatless stuffed pepper, it is also a great dish to serve during the Lenten season!


Share

Fresh Ricotta!

February 11, 2012 Dessert, Menu 1 Comment

Of the few guilty pleasures that I have in life, cheese would have to be one of my favorites. And the one cheese that I most enjoy to indulge in is ricotta. Whether its used as a filling in a pasta dish or a rolantini, or as a key ingredient in an Easter cheese pie or cannoli, there is no denying that sweet, creamy ricotta is decadent, and sinfully delicious. Imagine my surprise when I found out how easy it is to make your own, homemade ricotta…and you don’t even need to milk you own cow to do so!

Unlike traditional cheese making, ricotta is the product of leftover milk from the production of other cheeses. Actually meaning “recooked”, ricotta comes together when you produce curds from heating and stirring up the leftover milk whey along with an acidic liquid (usually vinegar or lemon juice), then strained through cheesecloth and chilled.

Even if you are not producing your own cheeses at home, you can still make your own ricotta by following this simple recipe below that I found on Epicurious.com. All you need is whole milk, heavy cream, lemon juice, salt, cheese cloth and a few hours, and you will have the most delicious, creamy ricotta ever imagined. It can be used in any recipe that calls for ricotta. I’ve already made a few batches for family and friends, and they all agreed that the fresh ricotta is amazing. Even my friend’s 2 year old daughter, who is a ricotta connoisseur, gave my ricotta a thumbs-up. The only trick to using homemade is that because there are no preservatives, there is not much of a shelf life…only about 3-4 days to be exact. So you want to make sure that you have a purpose in mind when making homemade ricotta.

HOMEMADE RICOTTA
makes about 1 lb fresh ricotta
2 quarts whole milk
1 cup heavy cream
1/2 tspn salt
4 tbspn lemon juice

In a large pot, slowly bring the milk, cream and salt to a rolling boil over moderate heat. Be sure to stir occasionally to prevent scorching. Add lemon juice, then reduce heat to low and simmer, stirring constantly, until the mixture curdles.

Pour the mixture into a sieve, or colander, lined with cheese cloth and let drain for just a few minutes. Once liquid is drained, cover and chill ricotta. Use within a few days.

Now that I’ve (hopefully) convinced you to give homemade ricotta a try, allow me share a quick and delicious recipe that will make for an unforgettable Valentine’s Day dessert. We’re going to make two ricotta dips, one with almond flavoring and one with nutella. Simply cut up some fresh fruit (strawberries, raspberries, blueberries and bananas work well), plate it with the ricotta, some chocolate pieces and cinnamon graham crackers. Spread a bit of the ricotta onto the cracker, top with sliced fruit or chocolate. Try drizzling the almond flavored ricotta with a little honey and a sprinkle of cinnamon. It’s better than just about any cannoli out there!

ALMOND HONEY RICOTTA 
Start by stirring in 1/2 teaspoon almond extract, 1 teaspoon vanilla extract and 1 tspn confectioner’s sugar into home made ricotta. Adjust measurements according to taste.

 NUTELLA RICOTTA
Stir in 1 tspn nutella into ricotta. Add to cracker, top with fresh fruit. Heaven.

Share

Recent Comments

Archives

powered by
Socialbar