Recent Articles:

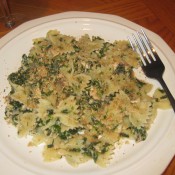
Bow Tie Pasta with Spinach and Salmon in White Wine Sauce

August 16, 2011 Menu, Pasta No Comments

Heavy winds, nasty rain and a bit of Sunday laziness kept me from my usual summer grilling this past weekend. The trade-off was that I was able to spend some quality time in the kitchen preparing a couple of meals for the week. We were in the mood for fish, but I wanted to get a little pasta going as well. I decided to saute some spinach and salmon in white wine sauce, and mix it with bow tie pasta. The dish was quick and delicious…the perfect cure for a blah-zy Sunday afternoon!

Bow Tie Pasta with Salmon And Spinach in White Wine Sauce

1 lb bow tie pasta
1 box frozen chopped spinach, thawed and strained
2 6-oz salmon fillets
4 tablespoons butter
2 shallots, chopped
1/4 cup white wine
olive oil (to drizzle on salmon)
juice of 1 lemon
salt and pepper to taste
reserved pasta water (about a half cup or so)
breadcrumbs and parmesan cheese for topping

1. Season the salmon with some salt. pepper, lemon juice and olive oil. Place salmon in a foil-lined baking dish, bake at 375º for about 30-35 minutes, until flaky. Remove from oven, flake and set aside.

2. Bring a large pot of water to a boil. Just before you’re ready to add the pasta to the boiling water, melt the butter in a large pan over medium heat. Add the pasta to the boiling water.

3. Add the shallots to the butter, stir. Let simmer until translucent, for about a minute. Next, add the wine to the butter and shallots, stir. Let simmer for a few minutes, to allow the alcohol to burn off.

4. Add the chopped spinach and flaked salmon to the wine sauce, mix well. Most of the wine sauce will be absorbed. Season with salt and pepper to taste. Keep warm in pan until pasta is al dente.

5. Remove pasta from water, reserving about a half cup or so of pasta water. In a large bowl, toss the pasta with the salmon and spinach mixture. Slowly add a bit of the pasta water, one ladle at a time, to your liking.

6. Plate the pasta, top with some breadcrumbs and parmesan cheese.

Serve with crusty Italian bread and white wine!

Share

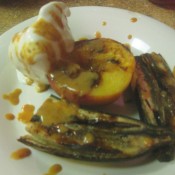
Grilled Bananas and Peaches with Caramel Sauce

August 10, 2011 Dessert, Menu No Comments

Grilling fruit is a fun and delicious way to prepare dessert in the summertime. It’s also a nice way to impress your guests without much effort! Bananas and peaches are my usual go-to grilling fruits, and my friend Jay also does grilled pineapple. Preparation is simple and grilling time only takes a few minutes.

First thing you want to do is clean your grill of all charred food remnants, so that you’re cooking on a clean surface. I suggest using a gas grill instead of a charcoal grill. I’ve had fruit grilled on both, and the charcoal grills tend to leave a smokey taste to the fruit.

Preparing the fruit is very simple. First you want to slice the fruit.
• For the bananas, you’ll want to slice the banana in half, length-wise. You can then cut the two pieces in half, to get 4 equal parts. Do not remove the banana from the peel.
• For peaches, slice in half and remove pit.
• For pineapple, remove the skin, then cut down to 1″ thick slices (you can serve the slices as whole or half).

Next, you’ll want to season the fruit. I like to sprinkle some brown sugar and cinnamon on the cut side of the fruit. You can also brush with melted butter or honey to sweeten it up a bit, but I prefer the brown sugar and cinnamon on their own. You’ll want to do this about 5 minutes before grilling, so that the seasoning settles into the fruit.

Now you’re ready for grilling. Preheat the grill and be sure to use some non-stick spray on the grates. Place the fruit cut-side down for about 4 minutes, until the fruit starts to get slightly charred. If doing pineapple, you can cook each side for 4 minutes. Remove the fruit, plate it grilled side up, serve with a scoop of vanilla ice cream. Magic!

If you REALLY want to wow and impress your guests, add a drizzle of home made caramel sauce to this already elegant dish. Yes, I said HOME-MADE CARAMEL SAUCE. Sounds intricate and impressive, but home made caramel sauce is incredibly easy to make. It also makes for a good parlor trick when you’re hosting. “Hey, you know what would go really good with this? Home made caramel sauce! Give me a few minutes, and I’ll be right back…” I’m telling you, your guests will be talking about this for years to come. The ingredients are very simple: sugar, heavy whipping cream and butter. And the best way to remember the measurements is by the 1:1:1 ratio. In other words, you’re using equal parts sugar, heavy whipping cream and butter, depending on how much you need to make.

Heat up the sugar in a pot over medium heat, until it dissolves, stirring occasionally (you can add a tablespoon of water to it to help it along). Be very careful while doing this. Hot sugar will not only burn you, it will also stick to your skin. Once it dissolves, it turns into a beautiful amber-colored syrup. Remove from the heat, carefully add the cream and whisk. The cream will start to boil at contact. Whisk until combined, add butter and continue to whisk. Once combined, let cool for a few minutes, the serve. The caramel will keep for about a month when covered tight and placed in the refrigerator.

DON’T FORGET TO ADD A LITTLE CAPTAIN TO YOUR CARAMEL!
Cooking with spirits is always a fun and easy way to add flavor and a little kick to your dish. Captain Morgan’s Spiced Rum is the perfect compliment to home made caramel sauce. For the adult crowd, whisk in a splash or two (to your liking) just as the caramel starts to cool. If you’re looking to cut back on the alcohol kick, heat up the spiced rum in a pan to cook off the alcohol. Not only will the addition of the spiced rum accentuate the taste of the grilled fruit, it also makes for the perfect topping for ice cream, pound cake, cheese cake, cinnamon buns, bread pudding…you name it!

Share

Green Tomatoes: The Fall and Rise of a Damaged Vine

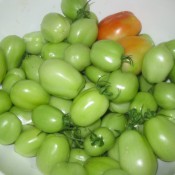
They say when life gives you lemons, make lemonade. But what do you do when life gives you a hurricane that rips almost all of your premature green tomatoes off of its vine? Last week’s massive storm that rolled through our area did just this. To say that I was heartbroken is an understatement. Thankfully our next door neighbor, along with being incredibly kind and patient with our kids, has the greenest thumb around! Almost immediately after telling her about my tomato tragedy, she had searched out this great website that offer suggestions for green tomatoes (click here for the site). Thank you, Fran, for taking the time to help out with suggestions!

I read through a few websites and found quite a few intriguing ideas. Of course, fried green tomatoes were on the top of every list that I read. But I was on a mission to try something a bit more unique and challenging. Listed below are the three ideas that I went with, in order that I made them. Two were inspired from recipes that I found on other websites, and the third was improvised. Thankfully I was able to put to use almost all of the prematurely picked tomatoes. The remaining greens are gonna get fried!

GREEN TOMATO SPICE CAKE
Courtesy of allrecipes.com

This recipe incorporates puréed green tomatoes into a standard spice cake recipe. Similar to a zucchini bread, the green tomatoes are added more for texture and nutrients, rather than taste. It’s a bit more moist that a traditional zucchini bread, and you do notice the occasional tomato seed, but the spice really shines through on this. Serve as is, dust with powdered sugar, or top with a cream cheese icing.

Ingredients
4 cups chopped green tomatoes
1 tablespoon salt
1/2 cup butter
2 cups white sugar
2 eggs
2 cups all-purpose flour
1 teaspoon ground cinnamon
1 teaspoon ground nutmeg
1 teaspoon baking soda
1/4 teaspoon salt
1/2 cup raisins
1/2 cup chopped walnuts

Directions
Place chopped tomatoes in a bowl and sprinkle with 1 tablespoon salt. Let stand 10 minutes.
Place in a colander, rinse with cold water and drain. Purée in a food processor.
Preheat oven to 350 degrees F (175 degrees C). Grease and flour a 9×13 inch baking pan.
Cream butter and sugar. Add eggs and beat until creamy.
Sift together flour, cinnamon, nutmeg, soda and 1/4 teaspoon salt. Add raisins and nuts to dry mixture; Add dry ingredients to creamed mixture. Dough will be very stiff. Mix well.
Add puréed tomatoes and mix well. Pour into the prepared 9 x 13 inch pan.
Bake for 40 to 45 minutes in the preheated oven, or until toothpick inserted into cake comes out clean.

GREEN TOMATO FAJITAS
This recipe was totally improvised. I started off by sautéing some garlic and onions in olive oil until onion was translucent. I added a chopped green pepper, stirred it until tender, then added the tomatoes, again cooking on medium until tender. I then added some chopped chicken, salt and pepper and some dried barbecue spice. Served it on warm tortilla shells with shredded cheddar cheese. The end results were fantastic! The onions, garlic and peppers help liven up the bland taste of the green tomatoes, and the oil and salt helped soften them up to a nice tender texture. Gonna get this in my summer rotation often!

GARLIC PICKLED GREEN TOMATOES
Here’s an old world recipe that’ll put a large amount of the tomatoes to good use. Very good use! The jars that I made are still settling – you’ll need about two weeks to let them fully marinate. Look for a follow up post when I crack open my first jar. Let’s hope for tangy-liscious results!

Ingredients
5 pounds small, firm green tomatoes
3 1/2 cups cider vinegar
3 1/2 cups water
One fourth cup canning salt
6 or 7 garlic cloves
Pickling spices (a combination of spices, such as mustard seeds, peppercorns, dill, coriander seeds, cloves, and red pepper flakes)
6 or 7 bay leaves

Directions
Wash and core tomatoes, cut into halves or quarters. Combine vinegar, water and salt; bring to a boil. Pack tomatoes into hot jars, leaving 1/4-inch headspace. Add 1 garlic clove, 1 heaping teaspoon of Pickling spices, and 1 bay leaf to each jar. Pour hot liquid over tomatoes, leaving 1/4-inch headspace. Adjust caps. Process 15 minutes in boiling water bath. Yield: about 6 or 7 pints.

Share

Grilled Calamari Salad

July 10, 2011 Menu No Comments

If you’re a fan of calamari, and if you like to experiment on the grill, I highly recommend you give this recipe a try. It’s very simple and quick to prepare, and looks really impressive when plated on a bed of fresh spring mix salad. I guarantee that when you serve this to your friends, you’ll come off like a rock star.

You’ll use about 30-40 1″ thick calamari rings for this dish, which comes out to about 8-10 calamari tubes thinly sliced. You can also use pre-sliced calamari rings, which can often be found in the frozen seafood section of your grocery store. I usually only use the body of the calamari for this dish, but you can also use the tentacles if you like.


GRILLED CALAMARI SALAD

Ingredients
30-40 1″ clamari rings (which is about 8-10 calamari bodies sliced)
1 red bell pepper, chopped into small pieces
1 green bell pepper, chopped into small pieces
3/4 cup extra virgin olive oil
4 garlic cloves, minced
1-1/2 tspn kosher salt
zest and juice of one lemon
1 tspn fresh chopped basil
1 tspn fresh chopped mint
*optional – 1/2 tspn peperoncino flakes for a little spice
spring mix salad

Directions
Place dried calamari rings and chopped peppers into a bowl. Mix remaining ingredients in a separate bowl. Pour half of the liquid mix over the calamari, reserving the remaining mixed liquid. Toss calamari and peppers to coat, let marinate for about a half an hour. In the meantime, fire up your grill and get it nice and hot (you want to cook this at about 400º). After the calamari and peppers are done marinating, you’ll want to pour them into a grill tray or grill wok, placed over direct heat. The calamari and peppers will sizzle when first added to the grill. Mix everything up well and then close the lid, checking and mixing every few minutes. You’ll want to grill for about 15-20 minutes, until the calamari are tender and golden brown. Carefully remove one piece of calamari and taste for desired texture. When done to your likeness, carefully remove the entire mixture from the grill. Spread the grilled mixture over a bed of spring mix salad, drizzle with the remaining dressing. Sprinkle with a little fresh grated parmesan cheese and some fresh black pepper.

Share

Recent Comments

Archives

powered by
Socialbar