Recent Articles:

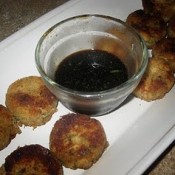
Salmon Cakes with Ponzu Dipping Sauce
April 17, 2010 Appetizer, Entrees, Menu 1 Comment

This recipe was influenced by my good friend Lisa, who passed it along as an appetizer suggestion. It is a nice alternative to the traditional crab cake or fish cake. There’s hardly any additional filling, so you’re getting nice chunks of salmon in each bite. You can use fresh salmon, cooked and finely chopped (as Lisa did), or you can use canned salmon (which I chose to do).

Now, here’s the thing on canned salmon. It’s made from top quality salmon, and is only flavored with a pinch of salt. So it’s very nutritional. You’ll notice a couple of varieties. First, you have a choice of traditional (the big cans), or boneless and skinless (the smaller cans). Traditional cans are packed with the skin and tiny, delicate bones. Both the skin and bones are edible…seriously! The salmon is pressure cooked in the cans, so the bones become so soft, they can smushed into the meat with a fork. The bones are also rich in calcium and magnesium. The smaller cans have the skin and bones removed, so the meat resembles the texture of chunk white tuna. The smaller cans cost more, but I prefer no bones or skin in my canned salmon. Next you have a choice of pink or red (sockeye) salmon. The pink is lighter and milder, while the red is more intense in flavor and color. Both work well in all dishes.

I spoke about ponzu sauces a few posts back (click here for previous article). For this version, I’m using low sodium soy sauce as a base, and flavoring it with brown sugar, minced green onions, grated ginger and lime juice.

Thanks, Lisa, for this great recipe suggestion!

SALMON CAKES WITH PONZU DIPPING SAUCE

Salmon Cakes
3 (5 oz.) cans salmon
3/4 c. bread crumbs
1/2 tbsp. lemon juice
1/4 c. finely chopped onion
Pepper to taste
2 tablespoons butter

*Note – the mixture worked well for me without using any eggs as a binding agent. However, you can use an egg to help bind the mixture if you wish.

Mix all ingredients together. Form mini cakes by rolling the batter into meatball-shaped balls and patting down into small cakes. Heat butter in a frying pan. Pan fry 2 to 3 minutes on each side, adding more butter if necessary. Makes 10-12 cakes.

Ponzu Sauce Recipe
1/4 cup of soy sauce
Juice of 1 lime

1-1/2 tsp of brown sugar

1 tbs of minced green onions

1/2 tbs of grated ginger

Mix all ingredients together.

Share

Easter Recap: Breaking Bread

April 12, 2010 Dessert 1 Comment

The decorations have been put away, the candy baskets have been separated and divided, and the last of the ricotta pies have been finished. Another Easter holiday has come and gone. It was a good holiday for us this year filled with family get-togethers, insane amounts of home made food, breads and desserts, a trip to the zoo with the kids, and beautiful spring weather. Aside from a minor ‘ham catching on fire’ incident at my in-law’s house, it was a perfect holiday weekend. There was, however, a slight situation that had me a bit concerned….

In my last post, I wrote about my attempt to make Easter bread this year. I did my research, checked out a good amount of recipes, and put together what I thought would make for a traditional Easter bread. I gave it a test run the week before Easter and got thumbs up across the board. I wrote out the recipe, posted it on my blog and shared it with my readers. Compliments and kudos came in, and a few people even said that they were looking forward to trying the recipe themselves. Mission accomplished, right?

Holy Saturday (the day before Easter) was a particularly busy day. Aside from the regular weekend chores, we decided to take advantage of the gorgeous weather to catch up on some outdoor cleanup. On top of all this, I still had plans to make two of my ‘perfected’ Easter breads. Now, as I’ve written a number of times, I am no baker. I am not familiar with the in’s and out’s of dough, but I do know that the slightest adjustment can screw up your dough like nobody’s business. I followed my recipe to the tee, covered it and let it alone to do it’s thing. I check on it an hour later and it looked nice and poofy, all ready to go…or so I thought.

I don’t know when it happened, how it happened or why it happened, but when I went to punch down the dough, it turned into a gooey mess. Maybe it was the humid weather, maybe not. Whatever it was, it wasn’t dough that could be weaved, braided and twisted as I previously promised. SInce it was now 8:30 at night, I was faced with two options – scrap the dough, hang my head in shame and have no Easter bread to serve for breakfast, or make some sort of compromise. I found that compromise in the form of a tube pan. I figured if I can’t shape the bread, let the bread shape itself. And that it did in the tube pan! What started out as a glop-fest rose into a beautiful, cake-shaped loaf of sweet, fresh bread. A little glaze and some candy sprinkles later, and the bread was saved. It was an Easter miracle!

So, if you tried my recipe and had similar struggles, my heartfelt apologies. But if you own a tube pan, give it a shot next year. I promise you’ll be glad you did!

Share

Easter Bread

March 27, 2010 Dessert 1 Comment

Tis the season for Easter pies, cakes, breads and desserts!

Last year, I posted an article on Easter traditions in an Italian household (click here for the article). It was a great opportunity for me to trace the history of the many desserts and treats that are served during this special season. It was also an opportunity for me to share my recipes for the traditional Italian ham and rice pies that are served this time of year. My main goal in writing this blog is putting my own spin on traditional recipes and sharing them with you. I spent the past 5 years or so tweaking and adjusting my versions of the ham and rice pie recipes until I felt that they were right. I was very honored to receive some positive and very kind feedback on last year’s post.

This year, I set a new goal for the Easter season – I decided to learn how to make Easter Bread. For those of you not familiar with Easter Bread, it’s a sweet bread (often flavored with anise) that’s braided and woven into a basket shape. It usually has colored Easter eggs placed in the middle and is topped with a glaze and candy sprinkles, which gives it a bright and festive look. Serving a slice topped with butter, with a nice hot cup of coffee, tea or espresso makes for the perfect spring time breakfast.

While growing up in my neighborhood, you either made your own bread with a special family recipe, or you stood in line at the neighborhood bakery, waiting for a fresh loaf. We were fortunate to have a wide variety of neighborhood bakeries, including Varallo’s, Potito’s, Termini’s, Isgro’s and Cosmi’s, to name a few. My grandmother would make her own bread, as would many of my aunts. Not wanting to tamper with their perfected recipes, I set out to find a recipe of my own. I checked out a bunch of recipes on the web (there are many out there) and put together a recipe that sounded best to me. One challenge that I had to deal with right off the bat is that we do not own a large stand mixer. Quite a few bread recipes that I found suggest you don’t use a hand mixer, as the dough may become too heavy and burn out the unit. After a bit of searching, I did find a recipe that didn’t require too much work or a dough hook attachment. I started there, adjusted some ingredients to my taste and gave it a shot. Gotta say, I was very happy with the end result! The taste, the texture, the aroma…it was all there!

Before we get to the actual recipe, there’s one more anecdote on traditions that I would like to share with you. Earlier this week, I posted as my Facebook status “Trying out new Easter Bread recipe.” True to family fashion, my cousin quickly stepped up and offered to share my Aunt Tina’s recipe for Easter Bread if I ran into any trouble. A friend of mine also offered to share a recipe that she had (she made sure to let me know that she wasn’t allowed to share her Mom’s recipe…ain’t no arguing that one!). This is exactly what I had in mind when I started this blog. A nice little community to share recipes with family and friends and be influenced by each others ideas. Thank you to my cousin Pauline and and my friend Emma for having my back this time around! And thanks again to everyone for continuing to check out my updated posts. It’s a fun ride and I’m glad to share it with all of you!

Buona Pasqua!

EASTER BREAD

1/2 cup milk
1/4 cup butter
2 cups flour
1/4 cup sugar
1 package dry yeast
3 eggs at room temperature

Optional ingredient for additional flavor*
1/2 tsp. aniseed OR 1/4 tsp. anise extract

Eggwash (1 egg, beaten with 1 teaspoon of water)
6 dyed Easter eggs**
sprinkles

*Anise has a licorice flavor and is often used to flavor cakes and cookies. Aniseeds are traditionally used, but you can use anise extract if you do not want the small seeded texture in your bread. The ratio of seed vs. extract is 2 to 1.

**There is no need to pre-boil the 6 dyed Easter eggs. They will cook with the bread in the oven. Carefully dye them and tuck into the bread when called for.

In a small saucepan warm milk and butter to lukewarm. In a large bowl mix 3/4 cup flour, sugar, and yeast. Add warm milk mixture, stirring well. Add 3 eggs and aniseed/anise extract, blend well, and add remaining flour. Knead with a dough hook or on a floured board until smooth, then place in a greased bowl and cover, let rise for 1 hour.

Punch down dough. Divide in half; roll each piece into a 24 inch rope. Loosely twist ropes together; place on a greased baking sheet and form into a circle. Pinch rope ends together. Cover and let rise for about an hour.

Brush bread with egg wash, gently spread sprinkles over bread Gently split ropes and tuck eggs into openings. Bake at 350 degrees for 30-35 minutes, until golden brown.

Share

Lenten Meals Part 2: Baked Tilapia with Shrimp Stuffing

March 18, 2010 Entrees, Menu No Comments

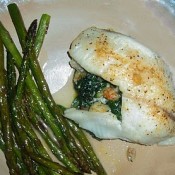
Another great dish to make during the Lenten season is Baked Tilapia with Shrimp Stuffing. Tilapia seems to have become the ‘go to’ fish over the past few years, holding it’s own along with flounder, shrimp, salmon and tuna. I wanted to try something other than traditional baked tilapia, and found this recipe on the web a few months back. It’s fairly simple to prepare, is very healthy and makes for a nice presentation. Serves well with steamed asparagus, rice and a nice glass of white wine.

BAKED TILAPIA WITH SHRIMP STUFFING
courtesy of applecrumbles.wordpress.com
(click here for original recipe posting)

Serves 2

1.5 fl oz Lemon Juice (or use juice of 1/2 a lemon)
8 large cooked Shrimp, chopped small
1 tbspn Olive Oil,
1 tbspn Scallions (green onion), chopped
2 cups fresh Baby Spinach
1 tspn Minced Garlic
1 tbspn Parmesan Cheese, grated
4 pcs. (4oz ea) Tilapia filet
Old Bay Seasoning, (about 1 tsp)
Sea Salt and Fresh ground Pepper to Taste

Preheat oven 425F
Squeeze/sprinkle lemon juice over tilapia and set aside.
Chop the shrimp small.
Heat oil in saute pan over med. hi heat.
Add chopped green onion, garlic, spinach, you can add sea salt & pepper if you want, to taste.
Simply toss until spinach begins to wilt … about 1 – 2 min. Add shrimp and turn off heat.
In a baking dish sprayed with non stick spray or coat with olive oil (I usually line a foil baking pan with aluminum foil for easy clean up), place 2 pcs. of fish side by side.
Sprinkle with Old Bay Seasoning…Not Too Much!
Top fish with the spinach/shrimp mixture, spreading evenly on top.
Top that layer with your other 2 pcs. of tilapia and sprinkle with Old Bay, salt & pepper to taste, and 1/2 TBS parmesan cheese on top of each fish assembly.
Bake about 20 minutes or til cooked through.

Share

Recent Comments

Archives

powered by
Socialbar