Recent Articles:

Melanzana Marinata (Marinated Eggplant)
September 27, 2009 Appetizer, Menu 6 Comments

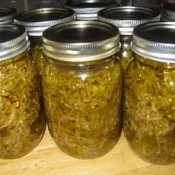
The fall season is finally here…and now is the perfect time to put all of your harvest (or whatever veggies you purchase at the store) to good use! I would always look forward to this time of year, when my grandmother would marinate and jar eggplants. It would be put to especially good use around the holidays when my grandfather would add it to his famous hot pepper salad. I decided to start marinating and jarring eggplant myself a few years back and have now made it a tradition that I look forward to every year. It’s not nearly as labor intensive and time consuming as jarring your own tomato sauce (something I still haven’t done yet!), but there is still some quality time and effort involved. As a time-saver, I now shred the eggplant in the food processor instead of slicing. I also think it makes for easier serving. Whatever method of slicing you prefer will work well. However, after all of the slicing, shredding, straining, boiling and packing (and a few precious months of aging), you will be guaranteed instant gratification. The eggplant works great as a topper on eggs, pizza, sandwiches, cutlets, pasta, bread…you name it! It also makes for a nice, from-the-heart holiday gift, as the jars will be ready for serving just after Thanksgiving, if you decide to do the jarring by mid-late September. Give it a try…you’ll be sure to impress!

Melanzana Marinata (Marinated Eggplant)

6 lb. eggplants
2 1/2 tbsp. salt
3 c. white vinegar
2 c extra-virgin olive oil, plus more for topping off jars
6 cloves garlic, peeled & sliced
2 tbsp. dried oregano
1/4 tspn red pepper flakes
4 pint-size glass canning jars (often called mason jars) and 2-piece metal canning lids

Rinse and peel eggplant. Either a) shred the eggplant in a food processor, or b) cut into 1/4 inch lengthwise vertical slices, then cut slices into lengthwise 1/4 inch french fry-size strips. Place the shredded/sliced eggplant into a nonreactive (plastic or stainless) colander and toss with salt. Place a plate on the eggplant and place a weight (several large cans of tomato sauce works well) on the plate. Let colander stand in the sink for 2 hours, so that bitter eggplant juices drain away. Place colander under running cold water and rinse eggplant quickly. After rinsing the eggplant, take a handful at a time and squeeze out all the excess water from it.

Put the eggplant in a bowl with the vinegar and marinate it for 30 minutes (it will return to shape like a wet sponge). Drain the vinegar from the eggplant and squeeze it dry again. Put the eggplant into a bowl with 2 cups olive oil and remaining combined ingredients.

Wash 4 pint jars with hot, soapy water and rinse thoroughly. Then, gently immerse the jars into a large pot of boiling water, turn down heat and let simmer for 10 minutes. Carefully remove jars with tongs. Fill jar with eggplant mixture to within 1 inch of top. Ladle oil into jars, filling them to within 1/2 inch of the top. Wipe rims of jars with a clean, damp cloth, as residue may not allow for lids to seal properly. Immerse lids (flat disc portion only – not the ring part) into hot, but not boiling, water. Remove and press lids onto top of jars. (NOTE: Some lids have different preparation steps, so closely follow the lid manufacturer’s directions for heating time). Screw rings onto cool jars.

At this point, you can place the jars in a pot of boiling water for a few minutes, making sure that the jars are fully immersed. This will help seal the jars.

Allow jars to cool undisturbed for 24 hours. During cooling, you might hear a soft “ping” when the lids seal tightly. Once the jars are cool, test for vacuum seals by tapping the top of the jar with a spoon. You should hear a bell-like tone, not a “clunk.” Also, the lids should be concave; a convex lid is a sign of a bad seal. Finally, the lids should not move when you press on them with your finger. Refrigerate the jars that did not seal properly. (Resealing jars after they have cooled isn’t safe.)

Store the jars in a cool, dark place, such as a cupboard or a basement for at least two months prior to opening. Once the jar has been opened, keep it in the refrigerator.

For complete tips on jarring, please visit http://www.exploratorium.edu/cooking/pickles/canning.html

Share

Calamari e Piselli (Sauteed Calamari and Peas)

September 12, 2009 Entrees, Menu, Pasta 1 Comment

I recently picked up a frozen bag of calamari (squid) pieces at the supermarket. I
wanted to try something other than fried calamari, so I went with an old
world-style, rustic dish. Gotta say that I was very impressed with the end
results. We first served it over some penne, but I decided to have a second
helping on it’s own with a nice, thick slice of Italian bread. Works great
either way! Would also make a nice option if you celebrate the Seven Fish
Christmas Eve Dinner.

Calamari e Piselli (Sauteed Calamari and Peas)

Calamari pieces, fresh or frozen* (I used about 1/2 pound of rings and tentacles from a 2-1/2 pound frozen bag)
2 tblspn Olive oil
1 Garlic clove; crushed
1 small Onion; diced
1 15-oz can tomato sauce
1 teaspoon fresh Basil, chopped
splash of red wine
Salt & pepper to taste
1/8 tspn crushed red pepper (optional for some heat)
1 cup frozen peas

*Note – if you are using frozen calamari, be sure to defrost it first. Running it under water in a colander for a few minutes works well

In a large saucepan, heat the oil. Sautee the garlic and onion in the oil
until soft and translucent. Add the calamari pieces and sautee until
slightly brown and tender. The sauteed calamari will create it’s own juice
that blends well with the tomato sauce. Add the tomato sauce, basil, splash
of red wine, crushed red pepper,salt & pepper. Simmer for 30 minutes. Add
the peas and cook for another 10 minutes, stirring frequently. Serve as a
sauce over pasta or as a stand-alone stew.

Share

Apple-Cinnamon Honey Glazed Chicken

August 29, 2009 Entrees, Menu 3 Comments

My brother passed this recipe along to me a few years ago. He first tried it while tailgating at a Jimmy Buffett concert – after all, parrotheads do know how to get their grillin’ on. Anyway, the first thing he said to me about the recipe was the attraction that the smell was making. People were walking by, getting slight whiff of apple pie! And that’s exactly what comes to mind when you grill this dish. The smell of the apples and cinnamon are amazing. The flavor, however, isn’t quite as overpowering as you may expect. Instead you get a nice, subtle hint of the apples, cinnamon and honey as the marinade forms a nice, crispy glaze.

I’ve only tried this dish on the grill, but I’m sure it would also work well in the oven. Bonus points: oven baking this dish would probably eliminate the need of a scented candle in your house for that night!

Apple-Cinnamon Honey Glazed Chicken

1/3 cup apple jelly
1 tablespoon honey
1 tablespoon dijon mustard
1/2 teaspoon ground cinnamon
1/2 teaspoon salt
4 chicken breasts

Heat grill, making sure to oil grill racks. In a small bowl, combine all ingredients, except chicken. Brush chicken with apple mixture, place on grill over medium heat. Cook 15 to 20 minutes or until chicken is fork tender and juices run clear, turning occasionally and brushing frequently with apple mixture.

Share

Grilled Romaine with Strawberry Vinaigrette Dressing

August 17, 2009 Menu, Salads No Comments

I’m not usually a big salad eater. When this dish was offered as a special at one of our favorite restaurants, I was sold. It’s very simple to make, and takes only a few minutes to grill. If you’re used to the crunch of fresh romaine, you’ll be in for a surprise with this. The heat from the grill does make the leaves wilt, but the freshness still holds up and is very tasty. I decided to add some crumpled feta cheese to the salad for extra flavor. You could also add toasted pine nuts, sesame seeds, pieces of chicken, or any other salad topping that you prefer. I also found a recipe for strawberry vinaigrette, which was similar to the one that was served at the restaurant. The dressing recipe is for four servings, so you will have plenty of dressing left over. Again, feel free to use your dressing of choice.

Grilled Romaine with Strawberry Vinaigrette Dressing
Split one heart of romaine lettuce, lengthwise. Heat your grill to high-heat, making sure to spray or oil the grates. Place the romaine halves on direct heat. Cook for about 3 minutes, until the leaves starts to wilt and grill marks are visible. Turn the lettuce and cook for another 2-3 minutes. Remove from heat, drizzle with dressing, top with crumpled feta cheese. Serves two.

Strawberry Vinaigrette
1/4 cup olive oil
1/2 cup fresh strawberries, halved
1 tablespoon balsamic vinegar
1/4 teaspoon salt
1/8 teaspoon ground black pepper
1/4± teaspoon white sugar (adjust sweetness to your liking)

In a blender or food processor, mix strawberries, balsamic vinegar, salt, pepper and sugar. Slowly add the oil. Blend until smooth.

Share

Recent Comments

Archives

powered by
Socialbar