Home » asparagus » Recent Articles:

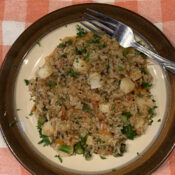
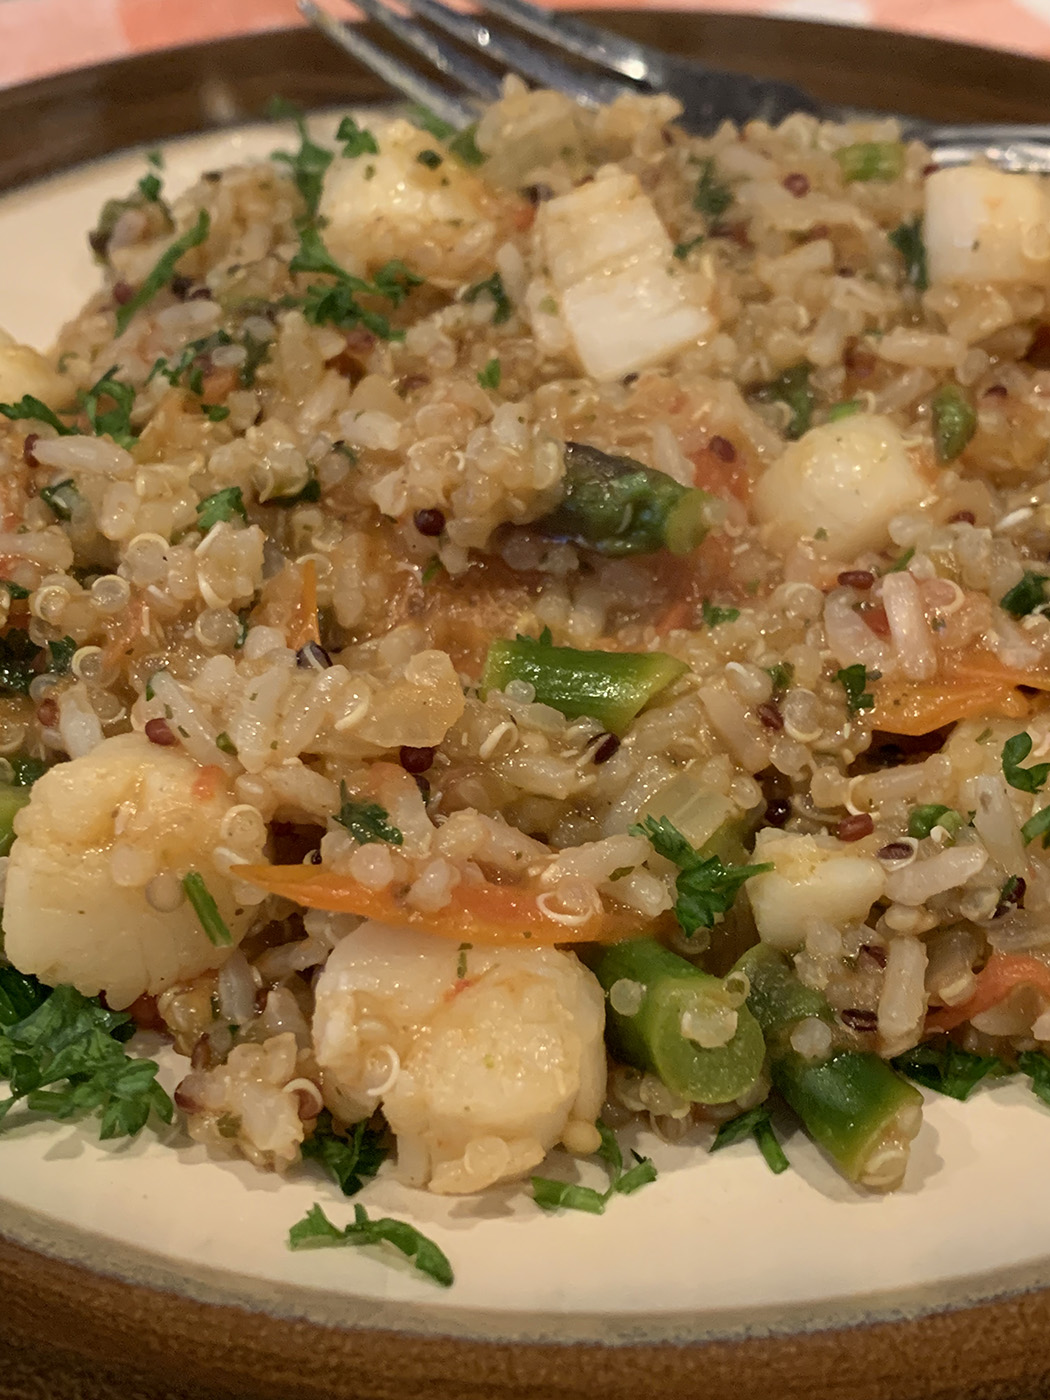
Bay Scallops, Tomatoes and Asparagus with Quinoa and Brown Rice

March 18, 2025 Entrees, Menu No Comments

Lately I’ve been experimenting with the Mediterranean diet. Being one who has dealt with high cholesterol my entire life, heart health has always been a focus of mine. I’m also looking to find more reasons to be in the kitchen nowadays, it’s very therapeutic for me, always has been. I enjoy the challenges that come along with trying new recipes. Learning about the Mediterranean diet and all its health benefits has been a fun journey so far. I’ve collected several recipes through websites, magazines, and even treated myself to a new book by Mediterranean diet guru Suzy Karadsheh. You can follow her amazing website at themediterraneandish.com.

After spending some time doing research on the proper ingredients and cooking methods, I found myself inspired to give it a go with my own recipe. I’ve always been a fan of grains, such as couscous, farro, quinoa, and brown rice. These grains, along with many more, are often included in the Mediterranean diet. The recipe that I chose to experiment with uses a mixture of quinoa and brown rice as the base. To that, I added olive oil, shallot, cherry tomatoes, chopped asparagus, bay scallops, fresh chopped parsley, salt and pepper. I ended up with a quick and delicious, filling and heart-healthy meal. I even allowed myself a shortcut by using a Near East brand box of rosemary and olive oil quinoa and brown rice mixture.

I’m looking forward to spending more time researching the Mediterranean diet, its benefits, and its wonderful flavors… and I look forward to sharing the recipes here with you!

One 4.9 ounce box Near East quinoa and brown rice blend, rosemary, and olive oil flavor
(or you can use your favorite choice of prepared rice or grains)
One shallot, finely chopped
One pint cherry or grape tomatoes
Two tablespoons olive oil
12-15 spears asparagus, 1/3 of the bottom removed and discarded, chop the rest to half inch size pieces
25 to 30 small frozen Bay scallops
1/4 cup chopped fresh parsley, plus additional for garnish
Salt and pepper

Prepare the rice according to directions, set aside when done. While the rice is cooking, heat oil over medium heat in a sauté pan. Add chopped shallot, heat until translucent. Add tomatoes, you can cut them in half or add them whole. Put a lid on the pan until the tomatoes start to soften. Add the asparagus, season with salt and pepper, cover again with the lid.

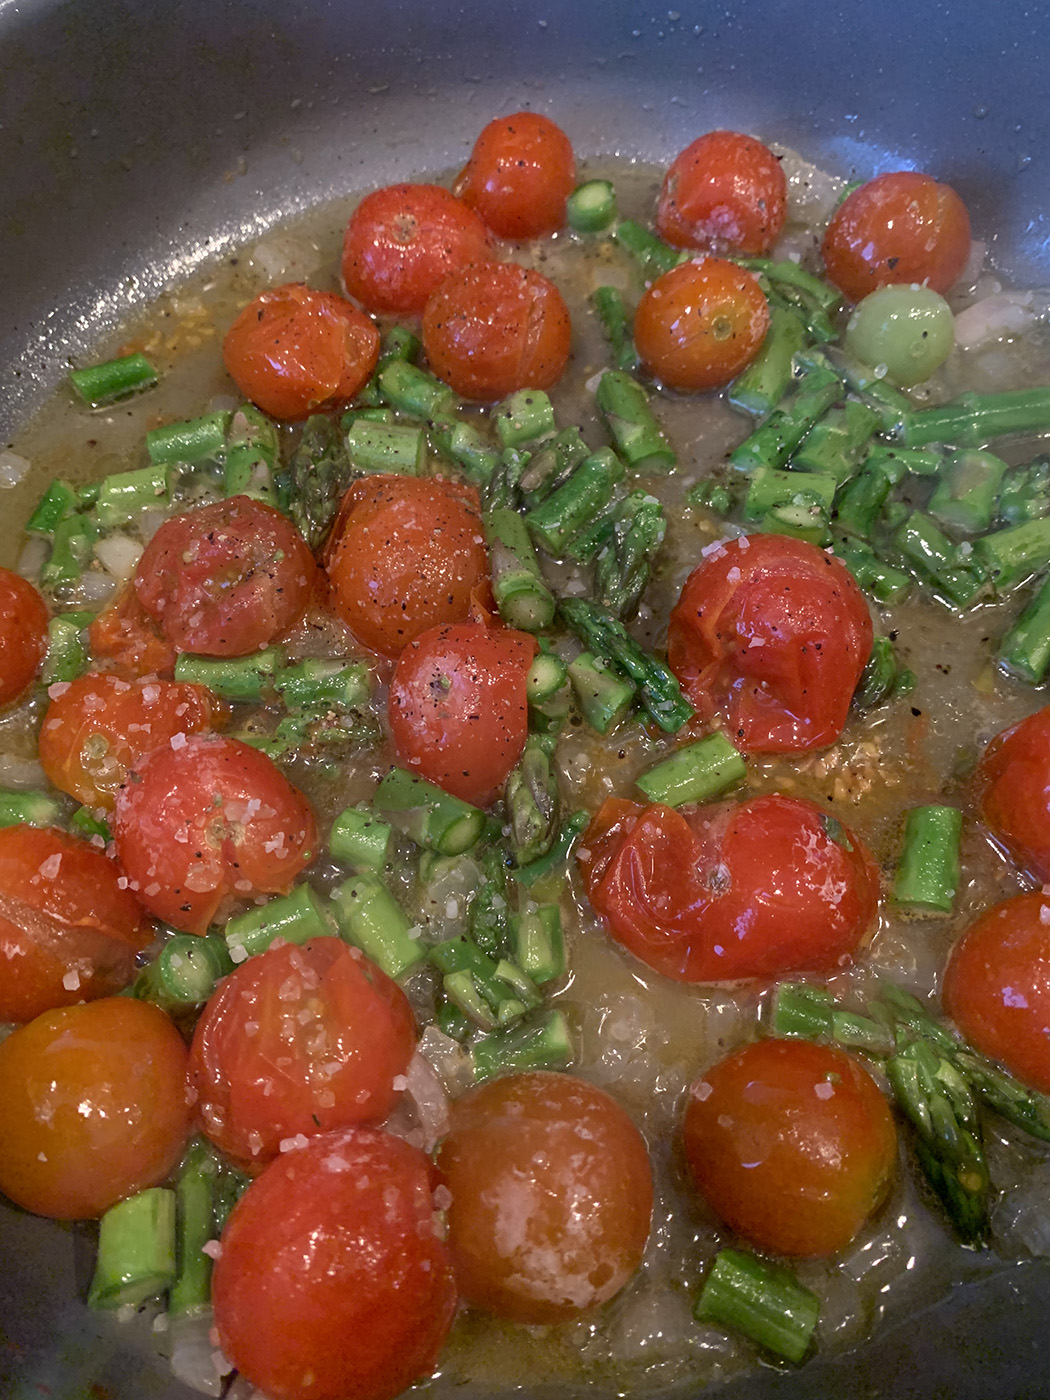
When the tomatoes start to break down and liquid starts to form in the pan, add the scallops (you can add them frozen), put the lid back on for 5-7 minutes. The scallops will cook within this time.

After the scallops are tender, stir the rice and chopped parsley into the pan. Continue to simmer with the lid off to allow the sauce to thicken.

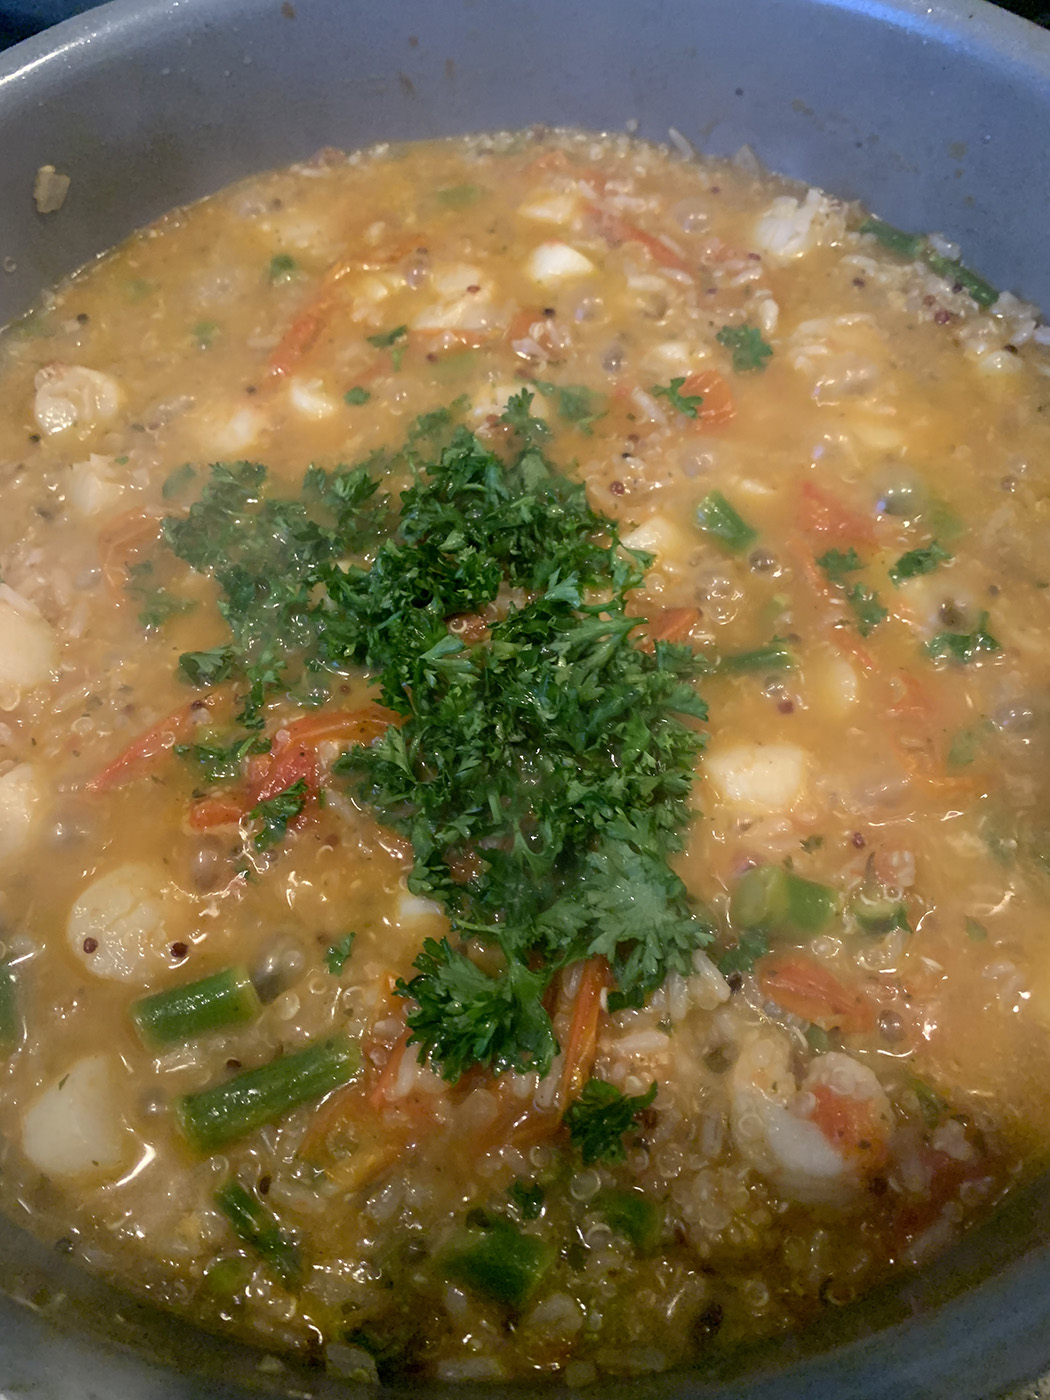
Season to taste with salt and pepper. Serve with additional parsley as garnish.

Share

Ricotta and Rice with Ham and Asparagus

April 15, 2015 Entrees, Menu 1 Comment

As I was enjoying my last few bites of the Easter ham and rice pies last week, I came to the sad yet expected realization that it will be another year before I get to savor the seasonal treats. And as usual, I always say to myself that it’s a shame that we can’t celebrate and enjoy these dishes more than once a year. Of course if we did, they wouldn’t quite taste so special. But this did get me thinking on how I could spin a variation of these annual treats into a new dish that could be enjoyed all year round. But how exactly would I do this? Thanks to celebrity chef Nadia G of Bitchin’ Kitchen, I found my answer.

In a recent episode of her eclectic cooking show, Nadia G put together a dish that she called Riso con la Ricotta, which was a decadent combination of white rice, ricotta cheese, pancetta, Vidalia onion, sweet peas and pecorino cheese. Everything abut the dish screamed ‘hearty’ and ‘stick to your ribs’. I gave the recipe a try, and it was everything that I imagined it to be. It was good. REALLY good! It also included two of the key ingredients in my Easter rice pie…ricotta and, of course, white rice.

I decided to use Nadia G’s recipe as a starting point, and build up the key ingredients to make a dish that was similar to the Easter pies. I substituted the pancetta with cubed ham (which is of course the star ingredient in the ham pie), replaced the peas with asparagus (the peas would have worked well, but asparagus is always on our family’s table for Easter dinner), added some lemon juice and zest (which give the citrus flavor to the rice pie) and a bit of fresh parsley. After seasoning the dish with a little salt and pepper to taste, the mission was complete. I had created a hearty and filling dish that had the taste and character of the traditional Easter pies, but could be enjoyed pretty much any time of the year!

You can find Nadia G’s version by clicking here. I suggest that you try both versions. Again, her’s was outstanding. But for a lighter, more spring-like taste, I’m sure you’ll enjoy my modified version. And if Nadia G happens to come across this post…reach out me at info@domskitchen.com. I’d love to spend a day comparing notes in the Bitchin’ Kitchen!!!

Ricotta and Rice with Ham and Asparagus
Inspired by Nadia G’s Riso con la Ricotta

1 cup (1-inch) sliced asparagus (about 1/2 pound)
1 cup white rice
1/2 cup ricotta cheese
1 8-oz boneless cooked ham steak, cut into 1-inch cubes
Sea salt
Freshly ground pepper
1/4 cup pecorino cheese, finely grated
2 tbspn fresh chopped parsley
zest plus juice of 1 lemon

Cook the asparagus in boiling water 3 minutes or until crisp-tender. Drain and set aside.

Put the rice in a pot with 2 cups water. Bring to a boil and cook until done, 15 to 20 minutes.

Transfer the rice to a large mixing bowl and stir in the asparagus and ham. Stir in the ricotta cheese and pecorino cheese, then add the lemon juice and zest, parsley and salt and pepper to taste.

Serve and enjoy!

ricotta rice


Share

Baked Polenta with Shrimp, Asparagus and Peppers

January 19, 2014 Entrees, Menu No Comments

I’ve been planning to put together a recipe that incorporates polenta for a while now. If you check back again in another month or so, I’m hoping to have a breakfast polenta dish to share. But for today, I’m talking about a baked polenta dish mixed with shrimp, asparagus and red bell pepper. It’s like an Italian version of shrimp and grits. Grits and polenta are both, after all, very similar porridge style dishes – grits being made from stone ground white corn and polenta from yellow corn. The preparation, for the most part, is fairly easy. Sauté the shrimp, asparagus and peppers in garlic, olive oil and the zest and juice of one lemon, then fold into prepared polenta and bake. But it’s the type of polenta that you use that will determine if this dish is just good or out of this world.

Which polenta to use?
There are two common forms of polenta. There’s the pre-made tubes, which I like to use sliced thin for grilling or baking, topped with sautéed veggies or maybe a nice slice of cheese and some tomatoes. Then there’s the traditional version made from boiled cornmeal, often mixed with a little butter and maybe some parmesan cheese to form a creamy porridge-like dish. Because I wanted to mix in some other ingredients, then bake it in a casserole dish, the traditional method was what I needed to make. If you’ve never made traditional polenta, it involves about 20-30 minutes of cooking and a lot of stirring. A LOT of stirring. Similar to risotto (the other Italian dish that requires dedicated stirring), the trick is to keep a constant stir going to maintain a nice, creamy consistency. At first, it seems like a lot of work. But as you get into it and develop a nice rhythm, it almost becomes like a well-calculated dance. You allow it to get away from you just enough, then you bring it back together and gently keep it moving, and then you repeat this form until the dance is done. The end result is always worth the effort.

While doing my research for this recipe, I found yet a third option for making polenta…instant polenta. The cooking method and preparation are very similar to the traditional style. You add the cornmeal mixture to boiling water, and you stir. Only it’s done in literally under 5 minutes. Now I’m not exactly sure what is done to the cornmeal to make it instant, but there were enough recipes available online from reputable chefs that used instant polenta. It’s gotta be good then, right?

Wrong. Gotta say, I was not happy with the instant stuff. Yes, it did take under 5 minutes to prepare. But you go from start to finish in such a quick time, that you really have no control over the polenta. There is no careful stirring, no playing, no dance. It goes from liquid to solid so quickly that I felt that it just got away from me. I didn’t even have time to properly season it as I normally would. I did make sure to add some extra seasoning when folding in the shrimp, asparagus and peppers, but would have preferred to add a little butter while cooking the polenta. And I saw no chance of doing that while using the instant, which left it very bland and dry on its own.

To help add a little extra flavor, I put together a quick lemon greek yogurt sauce to use as a topping. This gave it a well needed, flavorful punch (see recipe below).

The bottom line here is use the traditional method for a dish like this. It’s worth the time and effort, and you will be very happy with the end result!

Baked Polenta with Shrimp, Asparagus and Peppers

Ingredients:
12-15 raw jumbo shrimp, cleaned, shelled and devenined
1 small bundle (12-15 pieces) of asparagus, cut into 1″ pieces
1 red bell pepper, cut into small pieces
2 tbspn olive oil
1 clove garlic, minced
Juice plus zest of one lemon

Basic Polenta recipe
(courtesy of Giada DeLaurentiis)
6 cups water
2 teaspoons salt
1 3/4 cups yellow cornmeal
3 tablespoons unsalted butter

Directions:
In a large pan, heat oil and garlic over medium heat. Add asparagus and peppers, stir and cook until veggies are tender. Add the shrimp, continue to stir until all shrimp are pink. Add the lemon juice and zest, mix well. Remove from heat, cover to keep warm. Set aside.

Bring 6 cups of water to a boil in a heavy large saucepan. Add 2 teaspoons of salt. Gradually whisk in the cornmeal. Reduce the heat to low and cook until the mixture thickens and the cornmeal is tender, stirring often, about 15 minutes. Turn off the heat. Add the butter, and stir until melted.

Fold in the shrimp, asparagus and peppers. Pour the mixture into a lightly greased baking dish. Place the baking dish into a 350˚ oven, bake for 15-20 minutes. Slice, serve and enjoy!

Lemon Greek Yogurt Sauce
1 cup plain Greek yogurt
Juice plus zest of 1 lemon
2 tbspn olive oil
1/4 tspn salt

Optional:
1/4 tspn chopped parsley
2 tbspn crumbled feta

Combine all ingredients in a bowl. Cover and refrigerate until ready to use.

Share

Whole Grain Baked Arancini Rice Balls

August 28, 2012 Menu 1 Comment

This past weekend, I was given a very special and unique opportunity that favored the ‘good’ side of karma. You’ll recall a few posts back, when I chatted with nutritionist Dana Gollotto, who prepares the pre-game meals for the Philadelphia Phillies. It’s moments like this – being able to sit and chat with others who share the same passion as mine about food – that make writing my blog so gratifying. This past weekend, however, Dana raised the gratification bar to a whole new level when she asked me to prepare an Italian dish, using one of my own recipes, to be presented to THE PHILADELPHIA PHILLIES!

Growing up as a life-long Phillies fan, I’m sure you could imagine how much of an honor this request was for me. Once getting past the initial excitement, reality set in. What in the world does one make for a professional sports team? Based on Dana’s suggestion of focusing on a dish high in fruits or veggies and/or lean meats and whole grains, I decided to put my recent love for risotto to the test and make a healthy version of arancini rice balls.

Traditionally, arancini rice balls are made with chilled risotto, shaped into balls (often stuffed with meats or cheese), then breaded and fried. To stay on the healthier side, I chose to use whole grain brown rice in place of arborio rice, then using a wheat bread crumb mixture for the coating, and then baking instead of frying. For additional flavor, I went with the classic combination of asparagus, lemon zest and lemon juice. For my test round, I used all brown rice. Because the brown rice does not release nearly as much starch as traditional arborio rice would, the process of making the risotto took twice as long. The rice simply would not break down and absorb the liquid. This also made for a dry taste and texture. Not bad, but not what I was shooting for.

When it was officially  ‘game time’, I decided to go with a 2/1 ratio of brown rice and arborio rice, using enough arborio to create the much needed creamy and sticky texture to hold the arancini rice balls together. This round was much better and made for the exact texture I was hoping for!

Although I was not allowed to deliver and present the arancini rice balls to the team personally – they are a professional sports team and understandably can not allow just anyone to enter their club house – Dana could not have been more grateful for the time that I spent making the dish. She also graciously passed along a bunch of recipe cards that I made up from my recent blog posts. After patiently waiting to hear what the players thought of my dish, Dana got in touch with me and said it perfectly…..” A huge hit!!!!!!!!!!!!!!!!!!!!!!!  Everyone loved it.”

Even as a kid, I knew that my chances of ever making it to the major league was one in a million. But as far as my passion for food goes, I definitely knocked this one out of the park.

WHOLE GRAIN BAKED ARANCINI RICE BALLS
Makes about 30 balls

1 bunch asparagus spears, tough ends cut off
9 cups chicken stock
3 tablespoons unsalted butter, divided
1-1/2 tablespoon olive oil
1 small yellow onion, finely chopped
2 cups short grain brown rice
1 cup arborio rice
3/4 cup dry white wine
3/4 cup grated Parmigiano-Reggiano cheese
zest and juice of 1 lemon
2 cups wheat bread crumbs
1 cup corn meal
3 large eggs
2 tbspn milk
salt and pepper to taste

Step 1: Cooking the Asparagus
In a large pot, bring enough water to cover asparagus stems to a boil. Add asparagus to boiling water for 5 minutes until crisp tender, remove from water and immediately place cooked stems into a bowl of ice water to shock the stems. When cooled, remove fro ice water, pat dry, chop into small pieces and set aside.

Step 2: Cooking the Risotto
In a medium pot, bring the stock to a simmer. Reduce heat to lowest setting and keep warm.

In a deep skillet or pot, heat 1-1/2 tablespoons butter and oil over medium heat. Add onion and sauté until softened, 2 minutes. Add rice and stir to coat. Add wine. Cook, stirring, until the wine evaporates. Add stock 1 cup at a time, stirring until nearly all of the liquid is absorbed before adding the next cup. Continue until the rice is tender but not mushy. When almost finished, stir in the chopped asparagus, adding stock as needed and stirring continuously. Remove pan from the heat. Stir in remaining butter, cheese, lemon juice and lemon zest. Place cooked risotto into a covered bowl and refrigerate overnight.

Step 3: Preparing the Arancini Rice Balls 
Remove chilled risotto from the refrigerator. Scoop up about 1-2 tbspn of cold risotto and gently roll into a ball in the palm of your hands. Place the rice balls onto a baking sheet and refrigerate for about 1 hour to let the rice balls harden up again.

Preheat oven to 350˚. In one bowl, mix the breadcrumbs, corn meal, salt and pepper. In another bowl, whisk together the eggs and milk. Remove rice balls from the refrigerator. Roll the rice balls into the breadcrumb mixture, then dip into the egg mixture, then roll into the breadcrumbs again. The double coating of breadcrumbs makes for an extra crispy coating. Place the rice balls on a baking sheet. Because you are baking instead of deep frying, you want to generously coat the rice balls with cooking spray to keep them from drying out. Place the baking sheets into the oven for about 30 minutes, until lightly golden and crispy. Serve immediately.

Image courtesy/istock.com © CactuSoup
Share

Recent Comments

Archives

powered by
Socialbar